
 For some reason, November is one of the busiest months in the birthday-section of my calendar. Of course that also means November is one of the busiest months in the I-hate-my-ovenless-kitchen-department. Or, more accurately, it used to be a particularly frustrating month in that area. A couple of years back however, I decided to stop growing grey hairs over that matter and embrace the situation as the perfect opportunity to bang and clang around my kitchen on a quest to discover exiting and new workarounds for the problem that didn’t involve gelatine or cream cheese.
By now I’ve collected quite the smorgasboard of unexpected methods, imaginatively repurposed tools and contraptions that would probably turn MacGuyver green with envy in order to actually produce a birthday cake when people least expect it… with the side-benefit of getting to enjoy priceless facial expressions when I answer the question of “How did you make that in your kitchen?”. Tee~hee
This particular one was the result of an experiment with the goal of creating something special for the most special child of November in my life – my hubby. A few years back, hubby, huge fan of pears, requested my Spiced Pear Parfait as the dot on the I on his birthday dinner. Eyeballing the odd leftover pear flying around my workspace after the parfait was stashed away in the freezer, I decided that the time to mess around a bit in order to come up with something soft and warm to accompany the parfait had come. The general idea of a Tarte Tatin on one hand and my much-abused, twisted and turned pan-baked Triple Chocolate Tarte recipe on the other hand… clap~!
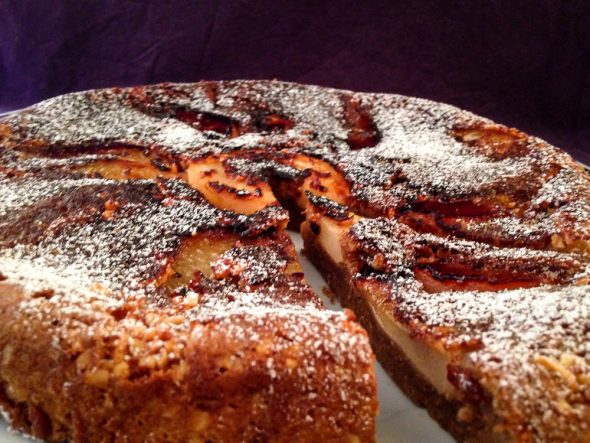
The Pan-Baked Pear Tarte Tatin
2 Ripe Pears, peeled, cored, and sliced into 1/8 segments – if they are particularly juicy representatives of their kind, pat them dry(~ish) with a couple of paper towels
2 Tbsp Light Muscovado
10-15g Softened Butter – to generously and evenly grease the pan
65-70g Butter – this time for the dough
110g White Chocolate, roughly chopped
40g 70% Dark Chocolate, roughly chopped
3 Large Eggs
1 Pinch of Salt
½ Tsp ground Cinnamon
½ Tsp ground Allspice
80g Fine Caster Sugar
120ml Fat-reduced Whipping Cream – even though this doesn’t exactly make the cake a guilt-free treat, it makes it a bit airier than heavy cream would
3 Tbsp Self-Raising Flour
1 Tbsp Finely Ground Almonds – you can go with the “naked” ones or give them a light toast in your pan to tickle out a more intense nutty aroma
3 Tbsp Roasted Hazelnuts, crushed to a size that you would expect to find along the sides of a cake
1) Add the chocolate bits and the butter you’ve set aside for the dough to a heatproof bowl, pop the bowl onto a pot of gently simmering water and, while stirring occasionally, melt the chocolate and butter into a silky-smooth ganache. As usual, make sure the bottom of the bowl doesn’t touch the surface of the water to keep the chocolate from overheating.
2) Once all of the chunky bits have dissolved, set the bowl aside and allow the mixture to cool down to room temperature.
3) Meanwhile, brush a 28cm DIA heavy-based pan with a fitting lid with a light layer of butter, paying some extra attention to the sides and the corners.
4) Evenly sprinkle the buttered surface with the muscovado and hazelnuts and tilt the pan until every loose grain has found a spot to stick to. Aim for an even distribution of the nutty bits all around the edges.
5) Once the pan is evenly lined, place it on the stove and arrange the pears in a sun-style manner around the center of the pan. You can have the pointy ends pointing out- or inwards – The slices will be visible in the end so just go with the arrangement that kicks up the eye-candy ratio for you.
6) Set the heat to medium and allow the sugar, butter and pear juices to get the caramelization process going for about 5-7 mins
7) In the meantime, separate the eggs – the eggwhites go into a large mixing bowl, the yolks into a smaller keeps-them-safe-for-now bowl.
8) Pick up a handheld whizz-o-matic and, with the beaters set to medium speed, whisk the eggwhites while slowly sifting in 40g of the fine caster sugar and a pinch of salt.
9) Once both sugar and salt have made their way into the bowl, set the speed to high and beat the eggwhites until they turn into a stiff foam. Set the bowl aside once you’re done and turn your attention to the chocolate ganache.
10) Going with one ingredient at a time, add the cream, then the eggyolks followed by the spices and the remaining 40g of sugar to the chocolate ganache – whisking the lot, with the beaters set to low speed, until every ingredient is well incorporated into the mixture after each addition.

11) Once the mixture is smooth and glossy again after the sugar went in, evenly sprinkle the surface of the mixture with the ground almonds and sift the flour on top.
12) For one last time, put your electrical beaters to work and whisk the lot at low speed until the flour and almonds are well incorporated into the “dough”.
13) Loose the whisk, pick up a rubber spatula and add the eggwhite-foam to the bowl.
14) Gently fold the foam into the ganache. This might turn out to be somewhat of an exercise in patience since the stiff foam takes its time to un-bunch and merge into the mix. Even so, keep at it and try not to stir too vigorously – the air trapped inside the foam will give the tart its fluffyness.
15) As soon as the foam is evenly distributed throughout the mixture, slowly pour the dough into the waiting pan, on top of and in between the pear segments, and set your stove to 1/3 of its maximum temperature.
16) Firmly close the lid and allow the tarte to bake for 20-30 mins.
17) Have a look at the tarte from time to time – and make sure to have a kitchen towel at the ready when you do. You don’t want any of the water that will most likely collect on the lid to drip onto the tarte, so carefully and quickly lift the lid and wipe it dry. Don’t leave the lid open for too long either, the tarte might just pull a soufflé-move on you and drop in on itself if it’s exposed to a temperature drop too early into the process.
18) At the 20-min mark, which is safe for a marginally longer lid-off break, poke a doughy spot near the center of the tarte with a wooden skewer or toothpick to check if it’s ready to come out of the pan. Make sure the toothpick doesn’t hit a pear for an accurate cake-check~!
– If the toothpick comes out covered in a smear of wet chocolatey dough, pop on the lid and leave it on the stove for 7-10 more mins before checking again.
– If the toothpick comes out with with a few moist crumbs sticking to an otherwise clean stick of wood, close the lid again, take the pan off the heat and give the residual heat 3-5 more mins to work its magic.
– If the pick comes out clean, you’re golden.
19) Turn the tarte out on a plate while it’s still hot by replacing the lid with said plate and carefully but quickly flipping the contraption before it get’s any ideas about burning your hands or slipping.
20) Leave the tarte to steam off and set for about 10-15 mins before dusting it with icing sugar.
21) This one’s best while it’s still a bit warm, so plate up and…

…Enjoy~!
♥

Wonderful flavors you’ve added here. Pears and chocolate work so well together.
LikeLiked by 1 person
Thank you 😀 I’m glad you like my concoction of spices! They really make the pears shine in this one
LikeLiked by 1 person