
 Usually when there’s a weather warning out for our general corner of the world, it never actually hits our specific corner of the world. I suppose being tucked away between two mountain ranges and two rivers might have something to do with that, but be that as it may, this time around, it actually hit us. “Storm Gusts of 85-95km/h” they predicted and that’s exactly what we got – and more, what with our two usually so protective middle mountains acting as a perfect wind tunnel.
Hubby and I actually suffered from a little bout of motion sickness after watching a handful of little puffy white clouds chasing across the sky when we decided that the bright blue sky sporting the first seriously heart- and soul-warming sunshine in weeks was a far greater motivation to go outside than that ominous and, to be honest, slightly creepy storm-howl was motivation to stay in and turn up the music to block it out. So we took a quick drive to a small forest for a comfy hike in relative (wind-) stillness through warm sunshine and slowly budding green – which made the ever present howl above seem even more bizarre… Afterwards, we decided to welcome the sun in an appropriate manner and hit our favorite artisan ice cream shop in town which had just re-opened after their winter break. Of course we weren’t the only ones ignoring the storm in favor of the sunshine… of course there was a line out their door and halfway around the block. But, for once, this was a bit of a lucky coincidence rather than just a colossal nuisance! While we were slowly shuffling closer towards the doors of the shop, the women behind us, ignoring the fact that they weren’t alone in the world, chattering away about everything and everyone loudly enough to silence the storm, were, in turn, impossible to block out after a while. Just as my listening-defenses broke down, they skimmed across the topic of gardening and a huge fig tree in the corner of their garden. And the excess amounts of figs said tree had produced during the extra-long and extra-hot summer last year, and the results of what she did with the fruit and what the kids hated about it which quickly led to new cars and the prices for holiday homes up north. My mind had what it needed to phase out the babble again, however. Figs! Fig Jam! Fig Chutney! And what to eat for dinner!
These little fingerfoody bites usually hit our table when there’s a party or a movie night raging on, but with “figs!” having turned into a mantra to block out the outside world during a time when there’s no fresh figs to be found, my stash of preserved fruit and jams immediately jumped into the forefront of my mind. And with my personal flick-of-the-wrist way of dealing with excess figs, came my flick-of-the-wrist way of turning the jam into a delicious savory bite whenever the occasion or appetite calls for a healthy dose of figs in a different costume~
Just on a side-note: I’ll start the road to delicious fingerfoodyness with my fig jam recipe but I’m well aware that some of you may have your own recipe/stash or that some may not have the time, the patience or access to fresh and delicious yet affordable figs, so feel free to snoop around the jam and marmelade section of a well-sorted supermarket nearby and maybe taste-test a couple of brands – there’s some seriously delicious stuff to be found out there! If you’re going down that road, just skip the Jam Recipe, crack your jar and move on to the Chutney stage~
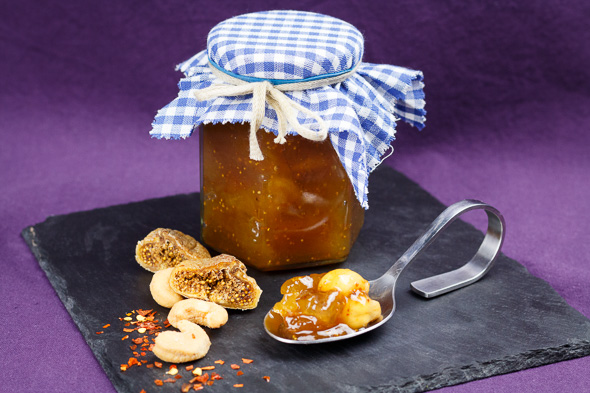
The Fig Jam
1kg Figs, stemmed and quartered – make sure they’re ripe and quite strong in flavor. The dried ones and the “jamming” process will cushion the fall of a couple of weak ones, but even they can’t save a whole weak/bad batch. Only use figs you’d enjoy eating raw as well – taste-wise that is! Bruised/slightly overripe fruit which you’d ditch for visual or consistency related reasons are fine in a jam if the flavor’s all right~
100g Dried Figs, stemmed and finely chopped
330g Fine Baking Sugar
Alt: Any 3:1 Jam Sugar or Sugar Replacement of your choice
1 Lemon, Zest and roughly 75ml of its Juice
1 Orange, 50ml of its Juice – keep the “excess” juice of the citrus fruit for the flatbreads
Alt: 1 Tbsp Orange Blossom Water
100ml Water
1 Generous Pinch of Salt
1 Pinch of Vanilla Seeds
Alt: 2-3 Drops of Vanilla Extract
1) Place the figs in a large bowl and sprinkle them with the sugar and a pinch of salt.
2) Gently fold in the sugar, then set the bowl aside for about 30 mins until the sugar has dissolved and done a delicious job with pulling the juices out of the figs.
3) Place a pot large enough to comfortably hold the fruit and everything else on the list on medium-high heat and add the water, lemon and orange juice, lemon zest, dried figs and vanilla.
4) Give the lot a good stir and bring the mixture to a rapid boil.
5) As soon as the bubble action in your pot reaches its peak, turn the heat to medium and add the contents of your fig bowl.
6) Allow the mixture to work up a low bubble again, then give everything a good stir and leave the jam to simmer away for about 30-35 mins while stirring occasionally to keep it from sticking to the bottom of the pot.
7) Have a bit of an eye on the size of the fruit chunks as you stir and decide on how chunky/smooth you’d like the end-result to be. If you like it smooth, stir more often and with more conviction. You could even go to town with a stick blender if you’d like to make sure it’s as finely purée’d as possible. If you like fruit chunks, do a careful dance across the pot’s floor with a rubber spatula instead.
8) In the end, the jam is done once the liquids are sticky, the fruit are deliciously soft and the combination of both passes the usual spoon-test.
9) In the case of the smooth jam Step #1 of “passing the test” means: the jam’s not too keen to run off the edges of the back of a metal spoon you’ve just dropped a test-blob on.
10) For Step #2, drag your finger though the dot of jam after a couple of blinks – if the jam doesn’t flow back into the mark your finger left behind immediately, you’re golden.
11) If the jam fails either of these steps, give it a couple of more minutes on the stove and try again.
12) If you went with the chunky option, the “liquid” parts of the test-drop will slowly ooze out from under the chunks but the same test-rules as with the smooth version apply.
13) Transfer the jam into sterilized jars while it’s still hot and seal them. Once they’ve reached room temperature move them into the fridge or a cool and dark space – stored that way, they’ll keep for 4-5 months
Delicious Recipe Tweaks:
#1 Use White Port instead of Water.
#2 Add a Cinnamon Stick and a Star Anise – discard while you’re moving the jam into the jars.
#3 Add a bushy Sprig of Rosemary or Thyme – discard while you’re moving the jam into the jars.
#4 Add a slice of Ginger and/or a Bird’s Eye chilli, pricked with a toothpick in several places but left whole otherwise to get the aroma and a hint but not the full blow of the chilli – discard…
The Speedy Fig-Cashew Chutney
2 heaped Tbsp of the Jam
2 Heaped Tbsp of Roasted Cashews, roughly chopped
1 Splash of Lemon Juice
1 Pinch of Salt
1 Pinch of Dried Chilli Flakes or Dry Harissa Blend
Well, I promised speedy, so here’s “Speedy”: place everything in a mixing bowl, stir until everything is well combined, have a taste and adjust if necessary. Set the bowl aside for the time being.
The Flatbreads
250g Chickpea Flour
400ml Water – or the leftover citrus juice form making the jam plus enough water to reach 400ml in total
1 Tbsp Tahini
1 Tsp ground, roasted Coriander Seeds
Opt: 1 Tsp of Baharat or Dry Harissa Spice Blend
1 ½ Tsp ground Cumin
1 Tsp Salt
Ghee for the Pan
1) Sift the flour into a large mixing bowl.
2) Add the salt and spices and lightly stir the mix until the spices are evenly distributed thoughout.
3) Press a well into the center of the spiced flour and pour in ¾ of the water.
4) Pick up a spoon and, working your way from the center outwards towards the rims of the bowl, start combine the flour and water.
5) Add the tahini as the dough comes together and ditch the spoon in favor of your lightly floured hands when the spoon doesn’t make any impact on the forming ball of dough anymore.
6) At some point, you should be looking at a smooth-surfaced ball of red-dotted pale dough sitting in your bowl.
7) Once you reach that point, tip the ball out onto a floured work surface and knead on for 4-5 mins, then divide it in two and roll the halves into evenly-sized logs.
8) I usually go with walnut-sized balls for the next step but the size of the flatbreads is completely up to you, as long as they’re no thicker than 3mm to ½ a cm, the diameter doesn’t matter.
9) So, decide upon the amount/size of your future flatbreads and divide the logs into evenly-sized portions accordingly.
10) Roll your pieces of dough up into balls, then use a rolling pin to flatten them out into 3-5mm thin disks.
11) Set a large, heavy-based pan onto medium-high heat and brush the bottom with a thin layer of ghee.
12) Once the pan reaches its maximum heat about 3-4 mins later, fry the flatbreads in batches for 2-4 mins per side until they had enough time to crisp and blister up and turn an irresistible golden-brown.
13) Just in case you’re unsure about the chickpea flour, the temperature of the pan or the thickness of your flatbreads, fry up a test-disk first and check if it’s cooked through on the inside when you’re happy with the looks and bite-feel of the outside. I actually do that most of the time because I’ve noticed there’s a flatbread mirror-image of the pancake rule – the first one always goes south~ Belief in quirky kitchen-related laws of nature aside, I highly recommend that strategy whenever you’re dealing with a new type of flour in any case.
14) Work your way through your doughlings and place the finished flatbreads on a warmed plate, between sheets of paper towels, under a tinfoil blanket as you go and wipe the pan with a paper towel in between batches to make sure the occasional grain of spice or dough left behind by the last batch doesn’t ruin your next one.
15) Once the last one leaves the pan, you’re basically ready to plate up!

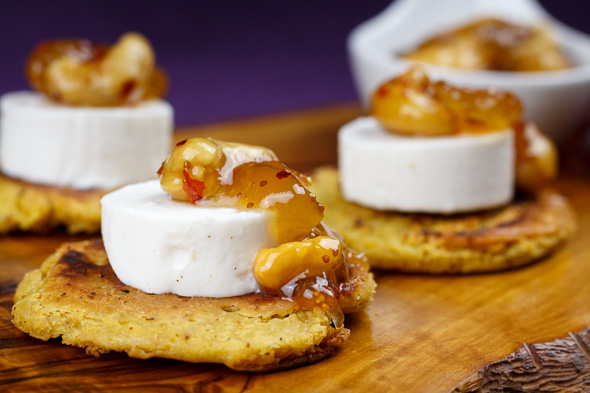
Assembling the Dish
The Fig-Cashew Chutney
The Chickpea Flatbreads
Your favorite Goat’s Cheese in bite-sized cubes, match the amounts and to the number of your flatbreads
Alt: A High-quality Sheepsmilk Feta will work too.
A sprinkle of Dry Harissa or Chilli Flakes for each bite
A few grains of Fleur de Sel for each bite
Opt: fresh figs, if available, for eye candy and dessert~
1) Place the individual flatbreads on serving plates or a large party tray.
2) Distribute the cheese on top of them and crown each bite with a nutty blob of the chutney.
3) Sprinkle the lot with salt and spice, arm yourself with a bunch of napkins, carry the plates/tray to their final resiting place, dig in and…
…Enjoy~!
“♥

What a delicious treat!!
LikeLiked by 1 person
Thank you! I’m glad you like it~
LikeLiked by 1 person
this all looks very delicious I must say! i like the sound of the cashews in the chutney. cheers sherry
LikeLiked by 1 person
Thank you so much~! If you like and use cashews a lot you might find yourself tipping the jam > nut ratio in favor if the nuts a little since this is one of the very few recipes, at least ones that I know and use, that will keep the nuts crunchy despite being contained within something “liquid”~
LikeLike