
 As autumn is making itsself at home around these parts, the outdoors’y evening activities are getting rarer and, thanks to that, the time spent in front of our screens grows longer. Being parked at the desk for a comfy nighttime gaming-spree calls for a special type of dinner, a non-fussy and non-messy type that doesn’t need much in the cutlery-department and poses a low hazard for keyboards and screens and, most importantly, a type leaving behind leftovers that can double as a snack later that night, should excessive adventures in Tyria speed up time up to midnight-cravings’o’clock in the blink of an eye… as usual~
One of my favorites filling that role perfectly on all counts is Hummus. Over the summer months, the fact that I really enjoy a bowl of it every once in a while, had completely slipped my mind for no good reason – they do so well in a picknick basket, why…? Anyways, as usual, a quick look at the Chef’s Guild’s recipe list gave my head a jump-start!


As usual, the composition of the Tyrian version didn’t fail to give me a case of the giggles before I went on a foraging trip through my kitchen…

Here’s a tidbit of foodology for those of you not in the know. Hummus is a traditional middle eastern/north african dish made of mashed chickpeas, lemons, tahini – a paste made of roasted sesame seeds – garlic, olive oil and various spices and herbs indigenous to the various countries. There’s actually some sort of culinary squabble going on over there, outcome unknown but tasty either way, over who came up with it in the first place, who makes the best and more Highlander’y stuff along those lines. Sitting on the sidelines of a culinary battlefield has never been so delicious~!
I have to admit, I haven’t always been able to appreciate this humble dip. After one seriously craptastic encounter with a portion of the store-bought stuff, I completely ignored the existence of ground and spiced chickpeas out of principle – until, years later, I found myself wearily staring at a neat pile of something suspiciously looking like Hummus at a cute little tapas bar in Barcelona. Since everything we had eaten that evening had been absolutely delicious, I decided to give it a try after a careful prod with a piece of flatbread – it didn’t attack, it didn’t squirt fountains of oil at me… it was absolutely divine! Back home, I started to research, prepare and tweak a large variety of Hummus recipes and found them to be exceptionally easy to make, healthy and satisfying – I’d say going to the store to buy some container of chickpeas with don’t-worry-about-its up the wazoo is a whole lot more of an effort than whipping up one yourself.

The Hummus
This one is the result of me playing around with a recipe, not fancying the listed green bell peppers all that much and having a couple of fresh jalapenos waiting to be put to use. Using jalapenos, of course, led to me basically rolling over the whole thing, turning into something else entirely in the process – but, as these things go, I stuck to my experimental Jalapeno Hummus ever since then. Here goes…
1 Can (400g) of Chickpeas, drained and rinsed – you should end up with 260-275g of Chickpeas after draining off the liquid
2 Tbsp Tahini – most organic food stores have jars of this somewhere around the breadspreads section, normal grocery stores are just starting to stock this yummy paste.
2 Tbsp Olive Oil
1 large Lemon, Zest and Juice
½ Bunch of Coriander, roughly chopped – just remove the woody ends of the stems
½ Bunch of Flatleaf Parsley, roughly chopped – leafy parts only
2-3 large, fresh Jalapenos – if you’re not sure about how far their fire spreads, start with 2 and adjust later
1 Shallot, roughly chopped
1 Spring Onion, white and light green parts finely sliced into thin rings
2 large Cloves of Garlic, roughly chopped
1 Tsp Salt
Have I mentioned how quick this type of dip is to make? Well…
1) Pop everything, minus the spring onion ringlets and the third, optional jalapeno, into a food processor, blender or stick-blender-ready container and have at it!
2) Keep going until the paste is smooth and creamy. If it turns out too thick thanks to the chickpeas gooping up, add 1-2 Tbsp of hot water or another splash of olive oil, give the lot another whizz and check the consistency again. You should be looking at something screaming for a slice of fluffy-yet-crispy flatbread or some raw veggies to pick it up with, thick but creamy, pale green and absolutely yumtastic!
3) Fold in the spring onion and have a quick taste. Adjust the seasoning with more salt and lemon juice and decide whether you’re in the mood for more jalapeno oomph – if so, finely chop the third chilli and fold it into the paste before repeating the taste-adjust routine.
4) Move the hummus into a serving dish or sealable container if you’re looking at a bit of time until serving time and, after drizzling it with a bit of olive oil, store it in the fridge until you’re ready.

By the way, wary-of-carbs-people like me… yes, chickpeas contain carbs, 30-40% to be precise, but! There’s a huge but right there~! These, much like other peas and beans, are the good guys in the carb’y department. Insanely rich in protein (another 30%, hello, dear vegetarians!), 15-20% fiber – thanks to which the chickpeas are so deliciously efficient at filling you up – and somewhat rarer B vitamins and minerals. At the low, low price of 80 kcal per 100g worth of dried-watered-cooked chickpeas you can have a good dose of healthy fill-your-tummy with the benefits far overshadowing the not-that-evil-after-all carbs. Oh, and they keep your blood sugar stable, no vicious attacks of sweets-cravings afterwards… at least not induced by your body. Love of sweets is a whole other story~
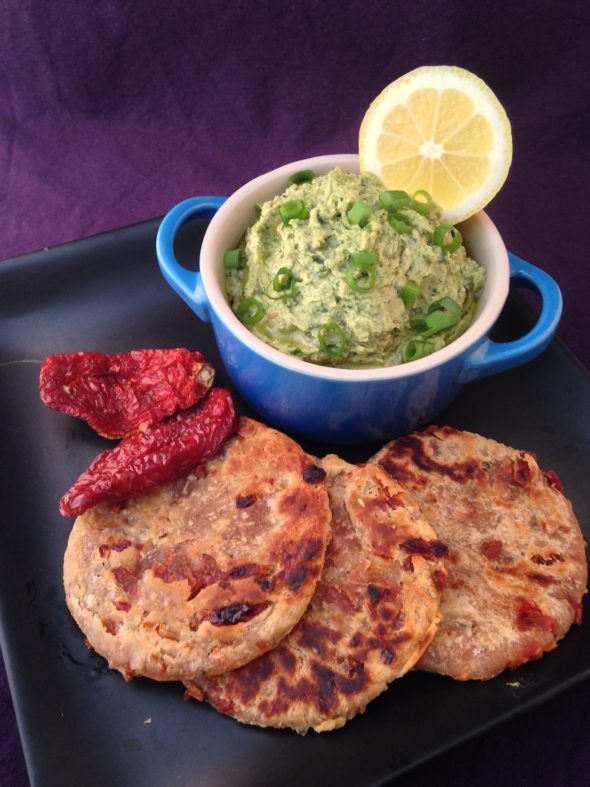
The Flatbreads
While the Hummus, much to the delight of all of us trying to keep an eye on our carb intake, chickpeas in mind, works wonderfully with all sorts of veggies – those artichokes~! -, the traditional way to serve it is with a set of flatbreads or pitas to the side to act as edible spoons. The jalapenos in this version gave me the perfect excuse to cook up a batch of my tomato flatbreads to balance out the spicy oomph.
6-8 large dried Tomatoes, finely chopped
1 Lemon, Zest
2 Tbsp Extra Virgin Olive Oil – if you’re using tomatoes preserved in a tasty oil, use that instead
10g Butter
1 Tsp Honey
1 Sprig of Oregano, leaves picked and finely chopped
1 Tsp of fresh Rosemary Needles, finely chopped
1 Tsp of fresh Marjory Leaves, finely chopped
½ Tsp dried Basil
1 Clove of Garlic, very finely chopped
200g Wholegrain Wheat Flour
50ml Skimmed Milk
50ml Sparkling Water
Sea Salt, Pepper
1) Heat a small pan on medium-low heat. Add the oil and pop in the garlic to soften up in the warming oil for 5 mins.
2) Add the tomatoes, lemon zest and herbs and leave them to simmer for another 5 mins to release their flavors into the oil. Stir in the honey at around the halftime mark.
3) Take the pan off the heat and set it aside to cool down to room temperature.
4) Lightly warm up the milk in a small pot set on medium heat and add the butter. Stir it from time to time and take the pot off the heat as soon as the butter has dissolved. Make sure not to overheat or even bubble up the milk.
5) Sieve the flour into a large mixing bowl and add a generous pinch each of salt and pepper.
6) Add the warm, buttered milk, the sparkling water and your tomato & herbs filling. Have a go at the contents of your bowl with a wodden spoon until the dough starts coming together – once it’s past the dusty, crumbly and goopy stages of dough-dom and starts to form a blob – dust your work surface with a bit of flour and tip the blob out onto it.
7) Dust your hands with a bit of flour as well and give yourself a quality kichen-workout by kneading the dough for about 5 mins until it’s smooth and lump-free, aside from the tomato bits of course. Consistency troubles? As usual, add some oil in really small amounts, one drizzle a time, in case the dough turns out too dry, if crumbles are flaking off the main ball of dough – in case the dough doesn’t come together in a smooth ball, if it’s gooey and wet, dust it with a thin layer of flour.
8) Once you’re satisfied, roll the dough into a ball and place it in a lightly oiled bowl. Cover the bowl with a kitchen towel, set it aside and let it rest for 20 mins.
9) Release the blob from it’s resting place and divide it into 4-6 equally sized portions. Roll those up into balls again and place them on a lightly floured work surface again.
10) Turn on them with your rolling pin, rolling them out into flat disks of around 3-4mm thickness. Make sure they’re rolled out evenly, otherwise you might end up with a combo of burned and raw spots instead of evenly cooked and yummy flatbreads. Place them on a sheet of baking parchment while you get your pan ready.
11) Heat up a heavy-based pan on medium-high heat. You won’t be needing any additional oil or butter at this point, the tomato filling and butter in the dough is enough to crisp them up.
12) Pop each of the flatbreads in for about 1-2 mins, depending on their thickness, until small pancake-like bubblets appear on the surface. Time to to flip and fry them on the other side for another 1-2 mins. Once they’re beautifully golden and crispy on both sides, place them on a warm plate, and cover it with aluminum foil while you’re working your way through the rest of the dough.
13) Keep them warm until it’s time to plate up and dig in!

Enjoy~!
♥

Pingback: GW2 Garlic Bread or: Madeiran Bolo do Caco – Nahdala's Kitchen