

The Curry returns! As I’ve mentioned last week, this week’s dish is a follow-up involving curry-leftovers – or a curry specifically made for this type of snack, if the need arises. Basically, these yummy, juicy buns work with every type of curry’esque leftovers.
If the leftovers in question are on the wet side of things however, squeeze out some of the liquid before freezing them or filling the buns, don’t discard the liquids though! Pull them up into a marinade syringe and inject them into the buns just before serving for an extra moisture boost~!

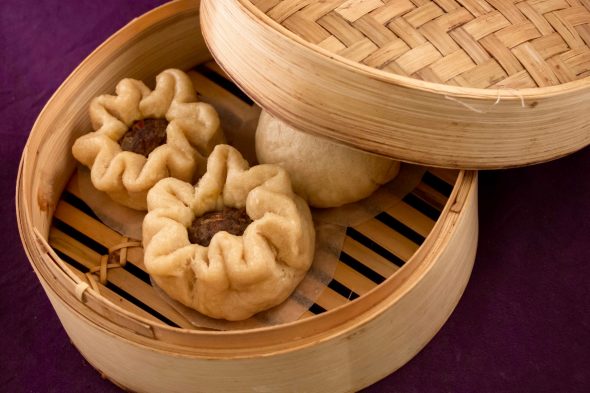
These steamed curry buns are, essentially, a street-food’y type of snack, home to every asian-touched food court, market or joint all across the earth and sold by Tyrian vendors in the streets of the wonderful cities and outposts in Kryta. If you’re aiming for something more in the neighborhood of a full meal, just serve them with a bowl of crunchy salad or pop them into a steaming bowl of soup fitting whatever you’ve hidden inside the buns! The definition of universal food~

The Buns
250g Plain Wheat Flour
5g Baking Powder
Alt: 250g Self-Raising Flour
1 Tsp Instant Yeast
25g Sugar
1 generous Pinch of Salt
1 Tbsp mild Sesame Oil
130ml Lukewarm Beef Stock
170-180g Curry-leftovers, preferably frozen into 8 equally sized, round’ish portions about the size of a walnut – if you’re able to plan ahead, chop up whatever you’re planning to use before freezing the mixture into balls to get a smoother, less dough-blanket-threatening surface
1) Sift your flour into a large mixing bowl and add the yeast, baking powder, sugar and salt.
2) Lightly stir the dry ingredients with a fork before drizzling in the oil.
3) After working the oil into the flour as thoroughly as possible, add the beef stock in ladlefuls and keep stirring until every addition has merged into the flour, turning it into crumbly blobs in the process – thats how the dough is supposed to look like at this point, so don’t worry. What you don’t want is the stock souping around the crumbles, giving the lot a sticky, glue’y texture.
4) Once all of the stock made it into your flour, keep working it with a wooden spoon until it starts to come together in a ball of something that already resembles a ball of dough.
5) As soon as it looks smooth and non-sticky enough to be worked over by hand, get to work! Keep it in the bowl for now and make sure you pick up all of the crumbles and loose flour sticking to the bottom of the bowl and incorporate it into the dough.
6) Once the bowl appears to be clean, free of stray bits of dough and flour, turn the ball of dough out onto a floured surface.
7) Time for a kitchen-workout! Dust your hands with a bit of flour and work the dough, thoroughly kneading it for 10 mins. If it takes on a bit of a sticky texture, powder your hands with flour again and knead it into the dough. This is a safer way to incorporate more flour than sprinkling it with flour in my experience – it doesn’t take as much flour as it would seem to balance the moisture out again. The same goes for a crumbly, obviously too-dry texture – lightly oil your hands and get back to the kneading routine and repeat the routine if necessary.
8) After giving yourself and the dough an intense 10-Minute Workout, your dough should be smooth – inside and out – non-sticky, non-crumbly and, well… pretty~!
9) Roll it up into a ball and set it back into the mixing bowl.
10) Tightly cover the bowl with clingfilm. Set the bowl aside to rest in a warm place for about 40 mins.
11) “A warm place” in connection to a dough involving yeast translates into 28-32°C – the ideal temperature to make yeast, a living organism despite it’s previously dried state, feel comfortable enough to multiply and grow, fluffing up the dough by doing so. Make sure not to get it into direct contact with a heat source – If the dough breaks the 36 °C mark, the yeast doesn’t grow properly anymore, turning your dough into a lumpy mess.
12) After about 35-40 min, check up on the dough to see if it’s doubled in volume. If that’s not the case, give it some more time before freeing it from it’s cage and turning it out onto your lightly floured work surface again.
13) Gently knead it to work out the air pockets trapped inside.
14) Roll the dough into a log and use a sharp knife to cut it into 8 equally sized pieces.
15) Rub your hands with a few drops of sesame oil and roll the pieces up into 8 balls.
16) Place them on a plate or tray, cover the lot with a damp kitchen towel and set them back into the “warm place” for a 15-min break. This will soften the dough again, making it easier to shape them later. Ever had a dough stubbornly shrinking back in on itself while you were doing your very best to roll it out? A second resting period, time for the gluten to “relax” after being worked through, can spare you that headache.

~ the buns, prior to a generous dose of hot steam
17) Once they’ve rested, pick up the first ball and press it down into a disk with the palm of your hand.
18) Use a rolling pin to roll it out into an even disk with a DIA of about 10cm.
19) Pinch the edge of the disk between our fingers to thin it out a little – this will make it easier to close the buns around the filling while keeping the thickness of the dough roughly the same all around the bun.
20) Place your filling in the center of the disk and gather up the rims, forming dough-pleats around the filling, coming together on top of the bun. I tried to highlight that somewhat fiddly process in the picture of the raw, un-steamed buns above and kept 2 of them open on a whim, just for the jollies and to see if they would actually keep their shape – and to my great surprise, they did~! I half expected the disk to unfold again in the steam and leave a huge mess behind… I assume this only works with frozen balls of filling that simply thaw while the dough is steaming to delicious fluffyness – as opposed to a fresh/wet filling. Since I’ve steamed my way through quite a lot of Bao’s and Nikuman by now – same concept, different counties of origin – which are traditionally made with fresh/raw ingredients, I know wet fillings start to boil inside of the buns pretty early in the process, so, unless you’d like to experiment with the open-bun-fresh-filling-combo and risk a major mess inside your steamer, I’d recommend tightly closing the buns when using fresh curry to fill them, just to stay on the safe side of things.
21) Twist and fold the dough up to and on top of the filling to tightly seal in the mixture. To make exra sure the filling stays inside of the bun, you could even out the pleats with your fingers to create a smooth surface and place the bun on top of this “weak spot” when it’s time to pop them into the steamer.
22) Repeat this with your remaining balls of dough.
23) Gently place the buns on individual disks of baking parchment to keep them from sticking to the beams of your steaming basket.
24) Speaking of… Place a bamboo steaming basket over a pot of water.
25) Gently place the buns inside the basket. To keep them from sticking to each other, make sure to leave about 3-4cm of space between the buns – mind the rim of the basket as well, while you’re at it. They will fluff up quite a bit!
26) Once they’re all inside the basket, close the lid, set the pot onto high heat and get the water up to a rapid boil.
27) Once the water is merrily bubbling away, check the time and keep the steam going at max heat for 5 mins.
28) Reduce the heat to medium and leave the buns to steam on medium heat for 20 mins, then turn off the heat and give the yummies another 5 mins of R&R inside their basket.
29) Serve and dig in while they’re still hot~!
Enjoy~!
Just on a side-note: as I’ve hinted at in the beginning, these buns are basically an empty canvas, ready to be adjusted to whatever you fancy at the time – or to whatever leftovers you wish to use up. Italian spiced meatballs? Add some rosemary or oregano to the dough. Vegetables, fried rice or spiced chickpea balls? Switch to veggie stock and add herbs or spices to the dough to compliment the filling. Sweet or fruity fillings? Same thing, sweet liquids, you get the picture~
Just twist and tweak the ingredients to suit your every whim – the preparation method stays the same!
♥
