
 You know, the Chef’s Guild has this, sometimes rather annoying, way to get under my skin in a slightly brainwash’y manner. That’s not really a bad thing, just really inconvenient at times – I suppose every foodie has a dish they can’t get out of their head to save their lives at times, though. Seeing all the tasty pizza recipes on the Tyrian menu has always bothered me in that way – sure, I usually go low-carb, low-fat and all that jazz, but even in a carefully monitored, healthy and balanced diet, there’s a time for everything, including a yummy, homemade – and still somewhat healthy! – pizza.
The biggest „bother“-part of it is, of course, caused by the lack of an oven in my kitchen. One sunny saturday afternoon, after our trip to the farmer’s market netted us a heap of various mushrooms and an absolutely delicious, artisan mountain cheese, I decided to tackle the Tyrian Mushroom Pizza…

…that had been circling my head all day for no apparent reason and experiment around with my pan and various types of pizza’ish bases to hold the yummies. Since that day, I trial-and-errored my way to 3 different methods, using 3 different types of „dough“, of cooking up the humble mushroom pizza in a slightly unusual, oven-free manner.

The Mushrooms
All three of my preparation methods require you to prep the mushroom topping first, so let’s get those out of the way.
300g Mushrooms of your choice, cut into pieces or slices of about 3-5mm – I always use a handful of King Oyster mushrooms as a base for stuff like this since they have a wonderful, almost meaty texture and aroma. They don’t turn wobbly or soggy easily, unlike „normal“ Oyster Mushrooms or Porcini Mushrooms either. The composition of the rest of the bunch depends on what our forests – and farmer’s market – have to offer.
2 Tbsp Parsley, very finely chopped
1 Shallot, very finely diced
1 Tsp of Butter
1) Set a heavy-based pan onto high heat.
2) Spread out the mushrooms, preferably in one singly layer, and dry-roast them until they start to take on color.
3) Season them with a generous pinch each of salt, pepper and a scrape or two of nutmeg, then flip them over one by one and roast the second side for about 2 mins.
4) Be careful not to cook them through entirely, they’ll get some more heat later on – the point of the mushroom’s journey through the pan is to lightly brown them and poof out some of the excess moisture trapped inside.
5) Remove the mushrooms from the pan, place them in a wide bowl to steam off, sprinkle them with the parsley and set them aside for the time being.
6) Turn the heat down to medium and melt the butter in your pan.
7) Once it’s completely dissolved, add the shallot and sautée it for around 5 mins until the cubes are tender.
8) Tip the shallot cubes into your mushroom bowl, lightly toss the contents until the onions and parsley dots are evenly distributed throughout the mix, then set the bowl out of harm’s way again.
The Base
100g Crème Légère, light Cream Cheese or Ricotta
50g Mountain Cheese, aged Gouda or Gruyère
Opt 1: 1 Tsp of preserved Green Peppercorns – they’re usually preserved in a salt brine or vinegar. Thoroughly rinse them and pat them dry with a paper towel before roughly chopping them up to avoid oversalting the mix or adding a strong vinegar note to the whole thing.
Freshly cracked Black Pepper to taste
Opt 2: 1 Small, mild Chilli, finely sliced – for an extra, slightly spicy hint in the mix
1) Grate the cheese into long, noodle’y strands.
2) Place the strands in a large bowl and gently fold in the crème or creamy cheese of your choice. If you’re going with the green pepper, add those as well at this point – if not, season the mix with a good crack of black pepper. Have a taste of the mix, paying extra attention to the salt levels. You probably won’t have to add any salt to this layer, depending on the cheese you’ve picked – if you’re not entirely sure, add a bit of your mushroom mix to the next test-bite and take it from there.
3) Once the mixture is well blended, set the bowl aside and move on to the dough’y part.
Just in case you were wondering about the lack of the usual tomatoes, I’ve got 2 reasons to keep them out. First of all, I personally had too many mushroom & tomato combos where the mushrooms simply lost the battle of aromas to the tomatoes in a very disappointing way, making me wonder why anyone went through the motions of adding the mushrooms at all. The second reason is simply provided by the whole pan-deal: it just doesn’t get as hot in the same amount of time an oven does. Since that would give a tomato-sauce’y base enough time to soak through or seep off of the dough before it got the chance to crisp and close up, I picked a lazier topping, happy to bind itself in place and less likely to, literally, run off.
The Dough
All right, this is where the fun begins. The three options all work a little bit differently from this point on, using different types of dough’y bases. Make sure you pick one before you go on a grocery shopping trip~
Option 1: Crispy Pizza Dough, the lazy way
1 Sheet of Storebought Italian Pizza dough – pick the thinnest sheet of dough you can find. They usually come in a rolled-up log large enough for an average sized baking tray of around 300-400g.
A few drops of Olive Oil, to brush the rims
20-40g Cheese of your choice – other than Mozzarella, it’s too „wet“ – to sprinkle on top. I usually stick to the cheese I’ve picked for the creamy layer, the infamous Mountain Cheese or a hearty Gruyère being my favorites.
Ready-made dough might seem a little off for my usual clean style, but I have a reason for it, other than lazyness. Vanity. I think trying to roll out my own dough thin enough on my tiny work surface almost made me grow my first gray hair… Ok, I admit, I snapped and threw the sticky stuff out this time – a couple of months earlier, with a large kitchen at hand, my dough gave us the base for an insanely tasty pizza or three, but my cutting board at home just doesn’t fit the job description of a dough-related „work surface“. And in this case, a quick and easy snack in mind, the store-bought dough does a nice job.
These dough sheets normally come along rolled up with a sheet of baking parchment, perfect for my pan version, don’t remove the paper just yet.
1) Pick up your largest, heavy-based pan with a fitting lid and roughly guesstimate how small or large your mini-pizzas will have to be to fit into it without curling up the rims. For my 28cm DIA pan, I cut the average-size dough sheet into 3 larger rectangles and 2 small ones – the larger ones went in solo, the small ones kept eachother company for the hot part of the ride.
Basically you can go as wild as you’d like, go with whatever shape floats your boat, as long as the slices fit into your pan in the end.
2) Once you’ve decided on size and shape, cut the sheet – including the parchment – into your future pizza slices.
3) Pick up your creamy-base bowl and thinly spread it out on the slices, almost up to the rims – just leave a few millimeters of space so you can grab them with your fingertips without making a major mess.
4) Carefully peel a corner of the dough off of the parchment and tightly curl about 1cm of it in on itself all around your slice, creating a bastardized version of a cheesy crust.
5) As soon as you’re done with all of the slices, fill your shroomy mixture into your now leak-proof pizza doughlings.
6) Fire up your pan on medium heat.
7) Brush the rims with a bit of olive oil and gently slide the slices, parchment and all, into the pan.
8) Pop on the lid and give them about 8-10 mins to firm up and cook through. Just in case you’re dealing with this kind of thing for the first time, take a peek beneath the slices after about 7 mins – if your parchment looks to be closing in on the singed side of things, remove it immediately and turn down the heat a little for the next slice.
9) Once the parchment sheets slide out easily, tug them out from under the slices.
10) Turn the heat down to medium-low, sprinkle the extra cheese on top, close the lid again and keep the slices in for another 3-4 mins to melt the cheese on top and get some crunch onto your base. Again, if you’re unsure about the time or heat the dough can take, take a peek every other minute.
11) Have a test-bite of the thickest bit of „crust“ of your first slice and, if necessary, adjust timing and heat for the following ones. Unlike it would be going with the usual oven-way, the crust doesn’t give much away about what’s going on inside. Due to the lack of heat from above, it doesn’t crisp up or brown as nicely as it would in the oven.
12) Rinse, repeat and dig in~
This is basically the mini-version of the real deal – if you have an oven, or even better, an oven with a fitting pizza stone – just pop the dough sheet onto a baking tray or the stone, top it off with your goodies, including the cheese on top, and bake it for 8-10 mins at 200°C – until the crust sends a delicious golden-brown shimmer your way.
Oh, and there’s a failsafe too~ if rimming the slices is too fiddly for your rumbling stomach or something goes wrong with the first slice, place a second layer of dough on top of your next creamed and mushroomed base, gently press them together and seal the rims before popping the impromptu Calzone into the pan along with a dab of olive oil. Turn the mushroom pocket every minute to keep it from burning until its crispy and golden all around.

Option 2: Tortizza
This one goes along the lines of my Summery Pizza and Zucchini Salad~ clicky here if you’re interested in a sunny and refreshing twist on this one~
4-6 Large Wholegrain Wheat or Rye Tortillas
2-3 Tbsp grated aged Gouda, Parmesan or any other firm but oozy-melting cheese – to fuse the tortillas into a seriously crispy pizza base
20-30g Gruyère, Emmental or Mountain Cheese
1) Place two tortillas per „pizza“ base on your work surface.
2) Evenly spread out the grated cheese on top of one of them, leaving an un-cheese’d rim of about ½ a cm around the edges.
3) Place a second tortilla on top and allign the edges. Lightly press the top layer onto the bottom one with the palm of your hand. The cheese between the tortillas will melt and basically glue the stack into one delicious layer of pizza base, adding an extra crunch to the base.
4) Lightly brush a small pan set on medium heat with a few drops of oil and carefully place your first tortilla stack inside. In a perfect world, your „small“ pan has a DIA just a tad smaller than that of the tortillas. That way, the rims of the tortilla base will be curled up just a little bit, acting as the tortilla-version of a pizza crust. If you don’t have one of those, keep in mind to leave a rim of about 1-2cm around your creamy topping once you get to that point.
5) Carefully move the first stack into the pan and give the glue-cheese around 2-3 mins to start melting before flipping it over to the other side. Gently but firmly press down on the tortillas to fit them to the shape of your pan.
6) Cover the pan with a lid and leave the cheesy glue to do it’s job for 3-4 mins.
7) Time to dress up the tortillas. Place a dollop of the cheesy cream in the middle of the tortilla and spread it out towards the rims in an even layer. Well, as „evenly“ as the cheese bits in the mix allow.
8) Top the pretties off with a generous helping of the mushroom mix – planning ahead and mentally dividing the mix into portions for each pizza helps. Not snacking on the mushroom mix helps a lot too, but I tend to forget all about that… Aaaanyways~
9) Sprinkle them with the cheese you’ve picked for the melty part and seal the lot back into the pan with the lid for another 2-3 mins.
10) Be ready to dig in once the cheese strands on top are melting.

Option 3: Crispy Fingerfood
Well, I tried going down this road with my pan and a small cooling rack – it kinda-sorta worked, but, of course, the pastry didn’t brown as nicely as it should, which, in my book, defeats the whole purpose of puff pastry. These are a serious crowdpleaser, fresh out of the oven, though, so here’s my oven-only option for the whole idea.
4 Postcard-sized rectangles of Puff Pastry – ok, seriously unhealthy but absolutely perfect to satisfy a large crowd of party guests in need of fingerfood
Fingerfood’y Option: 1 large Sheet of Puff Pastry – use a round, square or triangular cookie cutter to shape your bites. Simple designs work best.
1 Eggyolk, beaten
20-40g Gruyère, Emmental or Gouda
1) Slice or cookie-cut your sheet of pastry and place the pieces on a large baking tray lined with baking parchment. Don’t go too small with the individual pieces, otherwise you wont get any toppings onto them.
2) Preheat your oven to 220°C.
3) Use the tip of a very sharp knife to cut into the dough, about 1/3 through and about 1cm away from the rim of the piece in front of you, following the outer rim of your slice all around. By doing this, you’ll create a border which will puff up beautifully, forming a pizza’esque crust around your toppings.
4) To keep the now fenced-in middle of the base from puffing up just as magnificently, prick it with a fork a couple of times before spreading out the cream-base on top of it.
5) Divide the filling onto the slices – mind the borders~!
6) Brush the rims with the eggyolk to give them a glossy shine in the end.
7) Pop the tray into the oven for about 10-15 mins until the pastry is almost perfectly golden and crispy.
8) Quickly take the tray out of the oven, just to sprinkle the bites with the cheese you’ve picked as a top layer of toasty yum. Be fast with this one and keep the oven doors shut while you’re working over the bites to keep the temperatures both inside the oven and the pastry from going down too much.
9) Place the tray back in the oven for about 5 more mins until the cheese has melted, showing off a few golden-crusty dots, and the rims are irresistably golden-brown, puffy and crisp.
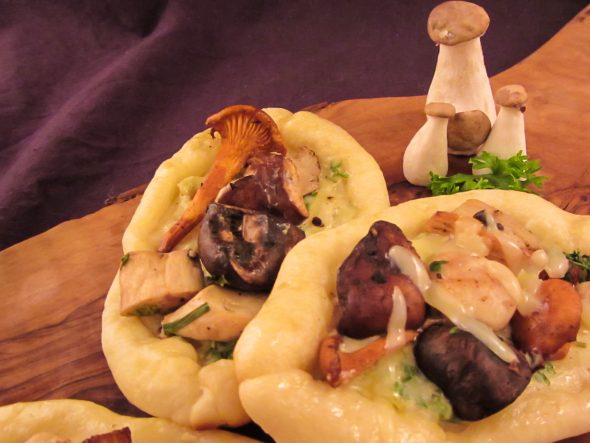
10) Serve them while they’re hot and…
…Enjoy~!
♥
