
 One of August’s delicious perks is the overwhelming abundance of perfectly ripe stone fruit flooding the displays of any market stall, store or supermarket you can find around these parts. From ridiculously large peaches down to the smallest Mirabelle Plums and Reine-Claudes (Greengages), anything goes! Fruity heaven~
I’m actually having a hard time to keep some of the deliciously fragrant and colorful globes in my kitchen long enough to do something stove-related with them. But, knowing how deliciously well these beauties turn out when they’re paired with savories, exercising patience and most importantly self-control, is worth the effort~!
This particular dish is the by now well tested and often repeated result of an experiment my mother inspired me to get working on by telling me about a dish she had at a restaurant a couple of years back – she didn’t elaborate much, knowing how much I like to play around with an idea like this, she just said: lamb, nectarines and chanterelles. My beloved nectarines… with chanterelles? That was a new one~ Of course that was more than enough to send me off to the kitchen-playground! Now, nearing the end of a rather humid August, the chanterelles are flourishing in our forests, so the perfect time to cook this one up and share it with you guys has come~!
Before we start, here’s a bit of foodology to help you out at the butcher’s shop in case you’re not all that familiar with lamb chops – a Lamb Chop-101, if you will.
Shop the Chop – In general, there’s three different types of chops, depending on their previous location:
Shoulder Chops – located near the neck of the lamb. They’re quite fatty and, since there’s a lot of muscles bound to that area, loaded with connective tissue which makes them perfect for low-and-slow shindigs and rather unsuitable for pans, grills or griddles – neither the fat nor the connective tissue would render off and tenderize before you’ve killed the poor thing a second time. These cuts do pack a punch in the flavor department though, so it might be worth the while to play around with a low-heat smoker if you want to give the coal-scenario a shot.
Rib Chops – located behind the shoulder chops, in the center section of the lamb. These are probably the chops you know, sporting a long bone with a circular piece of meat on one end. Meat-lollies, if you will. This is your cut for the job~ And, just for the record, a set of 8-12 rib chops, in a pretty “french-trimmed” row, is a Rack of Lamb. If you tie the first and the last bone of a Rack together, forming a circle, you have your Crown Roast and two racks leaning back-to-back with the ribs interlocking is a Lamb’s Honor Guard. Lots of fruity names for basically the same thing, but there you go~
Loin Chops – located towards the hindlegs of the lamb. This yumtastic cut looks more like a mini-version of a T-Bone steak with two disks of meat on both sides of the center bone. They do come a little cheaper than the rib chops simply because they’re not as comfortable to fry up or eat, what with the large bone to deal with. Flavor- and texture-wise they’re just as delicious though, so these are your budget-option with little to no loss otherwise.
Clean-up – All types of chops, with the exception of a ready-trimmed rack of lamb, tend to come with what seems to be an abundance of fat still attached to them. If you’re a little like me, the urge to go berserk with a filleting knife will be strong, but try to the resist the impulse~! Most of it will render off in the heat while tenderizing and flavoring the meat anyways. To determine which bits you can and should take off, you need to get close and personal with the chops in front of you – run your fingers along the rims of the fat and remove the gnarly, knobbly and dry bits sticking out, especially those up on the outside of the bone, away from the meat. Plus everything that looks like your butcher overlooked – you’ll know what I mean when you see it.
Pre-prep – If you’re going with the shoulder or loin chops, I’d strongly recommend brining them in a 7%-8% salt solution for around 12 hours before using them, this will take the tenderness of the meat to a whole new level and will help the “good” fat melt into the meat as it’s heating up, taking a huge flavor-boost along on its journey. As you may know, I always brine meat of any kind when it comes with a bone – it’s really worth the prep work, both in the flavor-, texture- and getting-rid-of-fatty-bits-departments. Tougher cuts, beef brisket for example, also benefit famously from a brine bath. Here are some of my recipes explaining the brine-method in more detail, in case you’re interested.
Hearty Beef & Fennel Curry
Harissa-Lemon Chicken & Couscous Salad
Jerk Chicken, Leek Flatbreads & Papaya Salad

All right, let’s move on to today’s dish~! These amounts will satisfy 2 very hungry tummies or 4 people sitting down at a multiple-course dinner table~
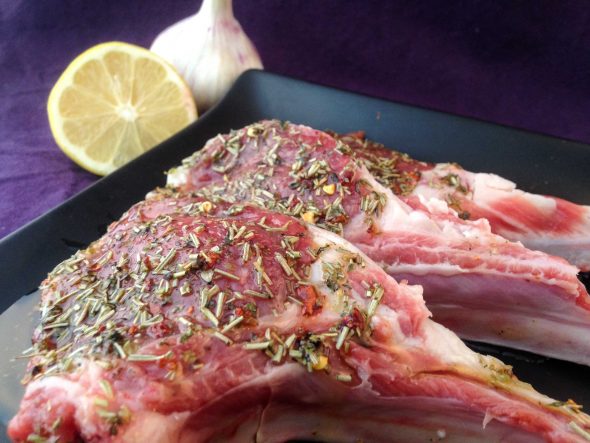
The Rosemary & Lemon Lamb Chops
6 Lamb Rib Chops – this one works even better with a whole rack of lamb if you have an oven to finish it off in. The bone-free alternative for the uncomfortable-with-a-bone-on-the-plate amongst us: a beautiful piece of lamb’s loin/fillet.
2 Sprigs of Rosemary
1 Clove of Garlic, roughly chopped
1 Lemon, Zest
4 Tbsp Olive Oil
Just a word in advance – you’re going to marinade the chops for roundabout 6 hours, so take those 6 – or more – hours into consideration, especially if you’re also planning to brine the chops before the gig goes down. If you’re cooking this one up on short notice, try to get at least 2-3 hours of marinade-time into your schedule somewhere.
1) Pour the oil into a small pot set onto medium-low heat.
2) Add the rosemary, garlic and lemon zest once you see tiny bubbles rising to the top.
3) Keep the mixture at a low simmer for a minute, then turn off the heat, pop on a lid and leave the pot and its contents to cool down to room temperature.
4) Pat the meat dry with a paper towel and place the chops in an airtight container, preferably in one layer in order to get everything glossed over evenly with the marinade.
5) Once the infused oil has cooled off, brush the chops with it on all sides, then place them back in their box. If there’s any marinade left in your bowl, tip it out onto the chops in the container.
6) Lock the seal and allow the marinade to work its magic for at least 6 hours – best overnight. In case you’re going with the “overnight” bit, add some more olive oil – just enough to cover the bottom of the container – and turn them over once or twice until you’re ready to fire up the pan.
7) Take the container out of the fridge about 1-1 ½ hours before it’s time to fire up the pan.
8) Once it’s almost dinner o’clock, set a large, heavy-based pan onto high heat.
9) Let it get up to full power, dust the chops with a generous pinch of salt on each side, then place them inside.
10) Keep in mind that, depending on the size of your chops, you might have to work in batches to keep the temperature in your pan at its max.
11) During the next couple of minutes, you’ll be working towards a nice an even sear on the chops with the help of a pair of kitchen tongs and the lid of your pan. In order to get a lovely crisp on them without the undesirable results – simultaneously burned and raw or cooked through to a state resembling leather on a scorched stick – flip the chops over every 30 seconds and close the lid in between the flips.
12) The time they need to sizzle to perfection also depends on their size, so if you’re unsure about guesstimating the core temperature of a piece of meat still on the bone by using the pressure test, poke the center of the meaty part of a chop with a kitchen thermometer or a meat probe. With a juicy lamb chop – best at medium-rare to medium – you’re aiming for 48-49°C for medium-rare or 53-54°C for medium before taking them out to rest. The residual heat within will take them up by about 5°C more while they rest and relax before you attack them~ My rule of thumb – literally, since the “usual” chop in my kitchen is around as thick as my thumb – is 2,5-3 mins total per side and 5-6 mins of R&R under a blanket of aluminum foil.
13) Once they’re done, take them out of the pan – don’t wipe or rinse it just yet~! – place them on a warm plate and wrap the lot into aluminum foil. Set the plate aside while you’re finishing off the mushrooms in the delicious juices left in the pan~
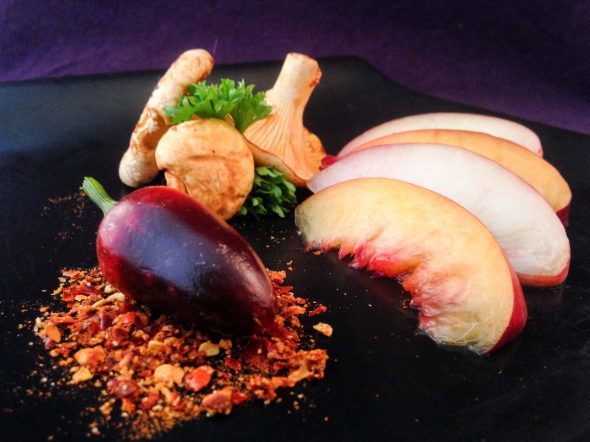
The Griddled Nectarines
1 Yellow Nectarine – make sure the nectarines aren’t on the soft side of ripe, they could break up easily while they’re exposed to high heat. Slightly less than perfectly ripe with a firmer texture works best for the griddle.
1 White Nectarine – both nectarines halved, pitted and segmented into 8 slices
1 Tsp Hot Chilli Flakes
Alt: 1 fresh, deseeded Red Jalapeño, very finely chopped
1 Tbsp Honey
1 Tbsp Olive Oil
1) While the chops are merrily sizzling away in your pan, pop a griddle onto the stove, and turn the heat to high.
2) Leave the griddle to get up to its maximum temperature and blend together the honey, olive oil and chilli flakes in a small bowl in the meantime.
3) Once the griddle is ready, brush the nectarine segments with the honey glaze and gently set them into the griddle. Keep the remains of the glaze for the chanterelles~
4) Let them sit in there, undisturbed, for about 1 min, then lift the corner of a test-slice and take a peek: If the slice bears the marks of your griddle, flip all of them over to the other side. If it doesn’t, give it a few more blinks.
5) Just in case you see a ton of juice gathering in the griddle while the slices turn threateningly soft, it’s time to ditch the marking-effort – the fruit in question was too ripe to begin with. Don’t worry, though, they’ll be just as delicious without the marks which are, at least in this case, merely a visual dot on the I after the heat has done its work.
6) Once they’re all sitting on the second side, turn off the heat and set the pan aside until you’re ready to plate up.
7) If all went according to plan, your chops should be ready to leave the pan at around the same time the nectarines are done grabbing your attention – leaving the chanterelles and the sauce to be taken care of while the meat is resting.
The Canterelles and the Sauce
The leftover Nectarine Glaze and the Juice that might have gathered in the griddle
2 Tbsp White Port
1 Tbsp Crème Légère
Opt: 1 Tbsp of the Lamb Marinade – in case there’s not enough liquid left in the pan
10g Butter
100g Chanterelles, carefully cleaned and re-checked for stubborn grains of soil
3 Leafy Sprigs of Flatleaf Parsley, leaves picked and finely chopped
A generous Scrape of Nutmeg
A generous Pinch each of Salt and Pepper
1) Turn the heat of your lamb-pan down to medium-low after you’ve removed the chops. Just in case there’s some overly crispy bits of rosemary or garlic left in there, pick them out.
2) Deglaze the pan with the port and the nectarine juices you’ve set aside earlier and make sure to blend all of the yumtastic roasty bits and flavors of the lamb sticking to the bottom of your pan into the two liquids.
3) Give the wine about 1 min to poof out the alcohol, then add the chanterelles along with the butter, a generous crack of black pepper, a pinch of salt and a healthy dose of nutmeg.
4) Close the lid and leave the chanterelles to their own devices for 2-3 mins.
5) Have a test-mushroom to see if they’re succulent and tender enough for your tastebuds.
6) Once they are, turn off the heat and fold in the crème légère and the parsley before tipping the lot out into a bowl.
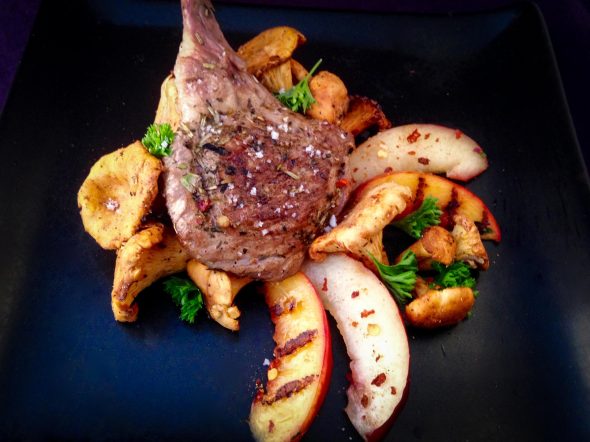
Assembling the Dish
1) Divide the nectarine slices onto your plates and top them off with a pretty chanterelle heap.
2) Lean the chops up against the mushrooms and sprinkle them with a couple of sea salt flakes.
3) Serve, enjoy and keep the potential seconds in mind~!
Enjoy~!
♥

Lemon and rosemary are a match made in heaven. Great looking dish! 🙂
LikeLiked by 1 person
Thanks! They are quite the pair~! It’s so hard not* to use those two and a bit of garlic when it comes to lamb since they all go so perfectly well together 😀
LikeLiked by 1 person
Those lamb chops look amazing!
LikeLiked by 1 person
Thank you~!
LikeLike