
 Ah, a good old Gamer’s weekend… Locked doors, PC-desk appropriate and keyboard-friendly healthy foodstuffs and lots of coffee stocked up, comfy clothes – a picture of sophisticated Gamers, no? As rare as these slightly absurd scenarios might occur during the summer months – what with two PCs and two people heating up a room and all that jazz… – during the winter months, hubby and I get on GW2 binge sprees together more frequently. Last weekend’s trip was cut short by a garbled white noise in my head when a late-night sweets-crave suddenly hit me square across the face however.
The reason for the screeching halt of activity on my screen was the one of the shiny Exalted in Tarir, waving the recipe for GW2’s own Allspice Cake at me. Normally, cake is more or less wasted on me, but right at that instant, it sounded like the perfect thing to go with a sorbet sitting in my freezer, which I had been experimenting around with after discovering the Winterberry Sorbet recipe in Farmer Simooba’s shop since she set up shop in the Bitterfrost Frontier.


Now, where does one get a specific, not all that common type of cake in the middle of a Saturday night in these parts…? Well, hell… Luckily, once I spotted a couple of eggs in my fridge, an absurdly easy sponge cake recipe – yes, one not requiring an oven… or butter, for that matter! – rushed into my headspace and the whole thing clicked together. I first came by a cake like this one in a little Japanese tea house in Frankfurt while trying to kill some time until my train was ready to take me back home. They were serving various types of artfully crafted Mochi and a selection of Gyozas from their towel-sized non-kitchen, so facing a steaming hot mini-muffin sized morsel of subtly scented, light and not too sweet sponge cake next to my cup of Matcha was kind of a surprise. After having eaten my way through the thing with shere joy, I couldn’t help but ask how on earth they had managed that – and was stunned by the simple answer: Steam Basket. Ooook, that was something entirely new to me – so, of course, I did some research on the matter as soon as I got back home. Since then, I’ve used, twisted and tweaked the base recipe I dug up back then many, many times, always fitting the season, setting and occasion – much like a classic sponge, it’s an empty canvas, just screaming for new and exciting ways to handle it~ One of its major perks is the simple fact that it takes about 30 mins, including prep and cleanup, and ingredients that I usually have in my pantry to make. So, impromptu cake-creation initiated, I simply had to add some spices and a tweak to satisfy Hubby’s “Chocolate, please” request – a couple of blinks later, we had the prototype of this dish sitting in front of us, or rather, between us and our screens. And here’s the refined version for you guys~!
The Cowberry Sorbet
This one’s especially yumtastic in combination with the still-warm allspice sponge cake, so I highly recommend to prep this the evening/morning before cake’o’clock, so you don’t have to wrestle around with your timing. Apart from the cake-occasion… having a batch of sorbet at the ready in your freezer never hurts~
400g Preserved Cowberries
Alt: 350g Fresh, ripe Cowberries and 2 Tbsp of Honey
150ml Water
Alt: 100ml Water, 50ml unsweetened Cranberry Juice
100g Fine Caster Sugar
100ml Lemon Juice
2 Tbsp Liquid Glucose
1 generous Pinch of ground Cinnamon
The beauty of a sorbet, aside from its relative shape-friendlyness (as opposed to a cream-based ice cream) is: it’s ridiculously easy to whip up – and as if the prep time wasn’t short enough already, there’s a large gap for a speed-cheat jumping up and down in order to catch your attention.
1) Set a small pot, containing the water and sugar, onto medium heat.
2) As the it’s heating up, stir the mixture until the sugar has completely dissolved, then turn the heat up to high and allow the lot to work up a gentle boil.
3) Leave it to bubble away for 5 mins before taking the pot off the heat again.
4) Stir in the liquid glucose and keep at it until it’s blended into the liquid.
5) Place the pot in a cool spot somewhere and allow its contents to cool off.
6) Meanwhile, take care of the fruity part – which is where the potential speed-cheat comes into play~ Pop the cowberries, lemon juice and cinnamon into a blender and whizz them into a smooth purée.
7) Let it sit there until your sugar syrup has cooled down to room temperature.
8) Now, here’s the cheat: If you’re one of the lucky ones with a supermarket carrying frozen, unsweetened cowberries nearby, whizz the unthawed berries and lemon juice with the syrup when it’s just slightly above room temperature to shave off about ¾ of the freezing time. Basically, it’s done at this point if you’re in the mood to dig in immediately, but 20-30 mins in the freezer will help it set and firm up a bit anyways.
9) For the non-cheaty version, add the syrup to the purée sitting in the blender once it has cooled off.
10) Blend the two together until they’re well combined and smooth before tipping the result into your ice cream maker or a wide-rimmed, freezer-proof container. If you have a magic ice gizmo, your job is done apart from a bit of a wait.
11) If you don’t, place the container holding your future sorbet in the freezer for 2 hrs, then start whisking the mixture every 30 mins for the next 3-4 hrs until it firms up too much to whisk. Point of the exercise: breaking up the slowly freezing water contents from crystallizing and setting into large clumps more or less resulting in one large, rock-solid brick of frozen fruit purée. Breaking up the ice crystals into smaller and smaller bits as they freeze – basically doing the same thing an ice cream maker does – will net you a deliciously smooth sorbet instead.
12) Give the sorbet another 30-45 mins to set after the last whisking-treatment, and then you’re golden~
The Prep-work
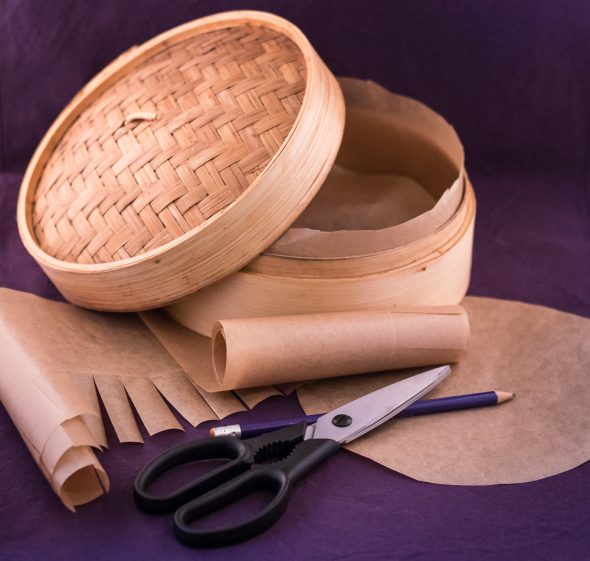
All right, like I said, this one is a real quick-fix, but there’s a bit of scissorwork to be done in advance – ever since I discovered this method, I have a small shortcut-stack of this kind of “paperwork” stashed away in my kitchen for impromtu sponge-cake-occasions like this one.
1) As you may have guessed, you’ll have to line your steaming basket before pouring a batter into it makes any sort of sense. So, pick up your bamboo basket, a large sheet of baking parchment, a pencil and a pair of scissors.
2) Smooth the parchment out on your work surface and place the bamboo basket on top, turned upside down. Trace around the edge with the pencil, copying its outline onto the parchment.
3) Pick up your scissors and cut out the disc, following the inside of your pencil line. The disc should fit the bottom of your steam basket neatly without crinkling up at the rim, so do some adjustment-work if necessary.
4) Step two of the dough-proofing business involves sealing the outer rims of the bottom and the walls of the basket. Start by wrapping the circumference of your basket and wind a long strip piece of baking parchment to guesstimate the length and height of the future paper-wall. You’ll need a piece of parchment 5 cm longer than the outline of the basket and roundabout twice as high as its walls.
5) Put your scissors to use again and place the resulting strip of parchment in front of you.
6) Take the bottom edge and fold it upwards into a 1 cm pleat all along the length of the strip.
7) Cut into this pleat with your scissors, rim to fold, in 1 cm-intervals, fringing up the bottom rim to make lining the inside-walls of the bamboo basket easier.
8) Place the strip inside your basket, fringe – now overlapping and corner-friendly – covering the outer rim of the bottom, fold snugly sitting around the edge and the upper, unharmed part of the parchment tightly covering the walls. In case your parchment was rolled up earlier, it might slip and try to curl up again – you can convince it to stay put with the help of a paper-clip or a staple into the upper, overlapping edge of the strip. Make sure to trim off the upper rim as well if needed – it should be long enough to cover the gap between basket and lid but short enough to allow the lid to close tightly without crinkling up the edges of the parchment.
9) Placing the disc of parchment you’ve prepared earlier on the bottom of the basket will wedge the bottom bits into place. And that’s one bamboo steam basked lined up for the job!
Enough of the arts and crafts, time to get the main act on the road~!
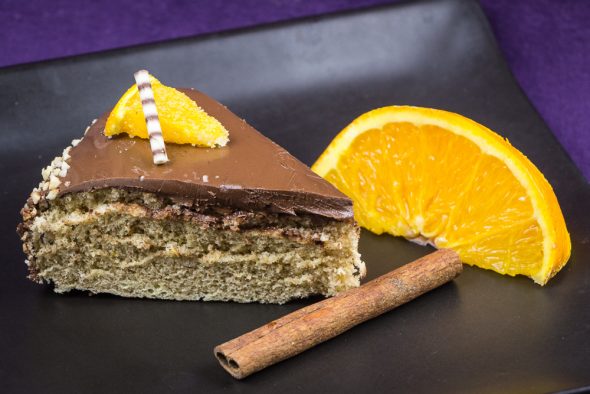
The Steamed Allspice Sponge Cake
2
large Eggs
115g Fine Baking Sugar
1 Tsp
Vanilla Extract
77g Self-raising Flour
Alt: 75g Plain Flour and 1 Tsp Baking Powder
1 Pinch of Salt
½ Tsp Ground Ginger
½ Tsp Ground Cinnamon
1 Tsp Ground Allspice
½ Orange, Zest
Just a word in advance: These amounts are made to fit a 18cm DIA bamboo basket – in case your steamer is larger than that, feel free to double the amounts and add another 5 mins to the steaming time.
1) Get your usual steaming-setup ready – my personal setup consists of a 18 cm DIA bamboo basket on top of my small, 1 l pot, with the outer rim of the pot perfectly fitting into the bottom of the basket, no wriggle- or dripping room whatsoever. If you don’t have a perfect match like that, go with a large pot or wok and one of those scaffold thingies supposed to hold a steam basket in place.
2) If you’re going with the large-pot-version, pour enough water into the pot to reach halfway up the legs of the frame. For the small-pot-scenario, simply fill the pot by half.
3) Crack the eggs into a large mixing bowl, add the vanilla extract and, while beating the mixture with your electric whisks, pour in the sugar in a slow and steady sandfall.
4) Once the sugar is in, keep whisking the egg mixture, beaters set to full speed, until it turns into a pale yellow fluff about triple the volume of what you’ve started with.
5) Loose the whisks, pick up a rubber spatula and very gently fold the flour/baking powder, spices, salt and orange zest into the dough without applying too much bubble-bursting force.
6) Place your steaming-contraption – without the basket for now – onto high heat and bring the water up to a merry bubble.
7) Slowly pour the dough into the lined basket and carefully place it on your pot or steaming scaffold.
8) Turn the heat down to medium, place the lid on your basket and leave the steam to work its magic for 15-20 mins.
9) If you’re using a large-pot-combo, check in on the water levels from time to time and refill if necessary.
10) Don’t give in to the urge to lift the lid for a peek before 15 mins have passed – if the time’s over already, have a clean kitchen cloth at hand. Try to remove the lid without tipping or shaking it too much and very quickly move beneath the lid with a cloth-covered hand to catch any droplets of moisture before they hit the cake – while they won’t ruin it, drops of water will leave unsightly dents in the surface of the sponge.
11) Your sponge is done once the usual cake-check-toothpick, poked into the center of the sponge, comes out clean.
12) Once that’s done, gently lift it out of the basket using the parchment as a handhold and, after removing the parchment, set the cake on a cooling rack.
13) Place the rack on another sheet of baking parchment and move on to the glaze.
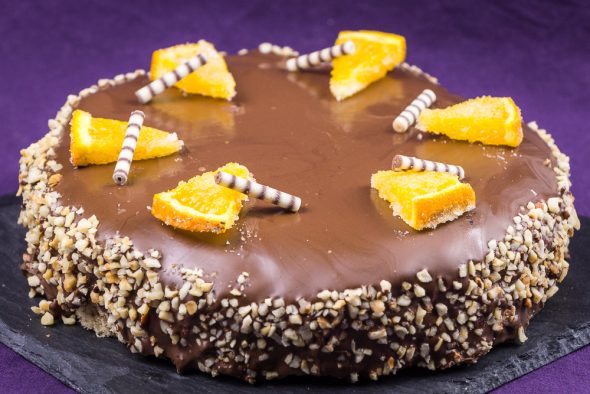
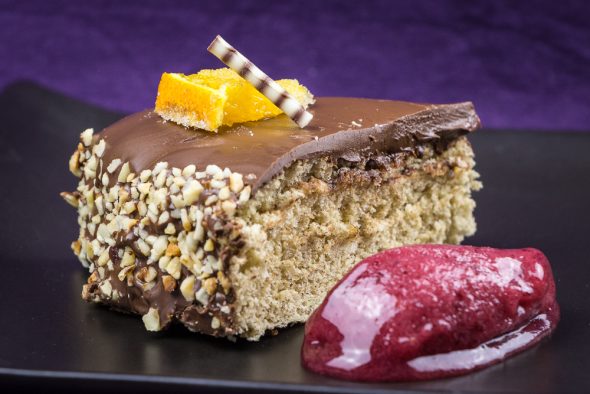
The Orange-scented Chocolate Glaze
150g Dark Chocolate, roughly chopped
20g Butter
4-5 Drops of Orange Extract
Opt: Crushed, roasted Hazelnuts for the rims and whatever chocolatey or orangey dolling-up items you fancy
1) Place a heatproof bowl on top of a small pot of simmering water and make sure the bottom of the bowl doesn’t touch the surface of the water.
2) Add the chocolate chunks, butter and orange extract and, while gently stirring the lot, melt everything into a silky-smooth and glossy liquid.
3) Set the bowl aside and allow the glaze to cool down to room temperature.
4) That done, pour the glaze onto the center of your cake and help it along by gently nudging it outwards with circular motions of the back of a ladle or a pâtisserie spatula.
5) Once the gloss reaches the edges of the cake it will, of course, run down in unruly streams – you could leave it at that for an artsy touch, or use a spatula to even out the chocolate flows, closing the gaps and creating an even coating in the process.
6) As a last doll-up, you can sprinkle the sides of the cake with crushed hazelnuts – simply grab a palmful and gently press it to the still-sticky chocolate coat – don’t overload the coating, the weight of too many nuts might pull the glaze down.
7) Set the now coated cake aside in a cool spot for about 30 mins to allow the chocolate to set – or dig in right away if you don’t mind making a bit of a chocolatey mess in the process~ And don’t forget the sorbet!
Enjoy~!
♥

Looks too yum 🙂
LikeLiked by 1 person
Thanks~!
LikeLike