
 As promised, here’s part two of this year’s Asparagus Season Finale, a follow-up for last week’s Asparagus Risotto. We had both of these dishes a couple of weeks back, conveniently and absolutely unintentionally timed for Saturday and Sunday dinners on that one “Cats and dogs are falling out of the sky with their claws out” weekend of the season – the absolute perfect weekend to spend an extended period of time in the kitchen, white wine in hand, noses and spoons in the pots… a smashing way to celebrate the veggie stars of the season while they were getting exactly what they needed as well, a serious dose of rain~!
Once the risotto was done and a couple of delicious and soon-to-be-shared-with-you-guys experiments had gone the way all delicious things go in a household like ours, this one crowned one hell of a successful cookoff weekend, rounding up the leftovers of the Risotto… and then some. Just on a side-note, by “leftovers” I actually mean a day-old Risotto, or one that turned out on the dry side of things for no good reason. A fresh and as-intended one would not comply to your suggestion of staying put inside the flowers for more than 10 seconds. Should you find yourself toying with the idea of serving the Risotto as a starter and this one as the main on the same day… of course, I’ve got the solution for that issue below. Oh, and another thing: This one has quite a number of components to it, so in order to unclutter the different construction zones running on full tilt at the same time, I added a small timeline at the end of the recipe. Here we go, dinner for two~!
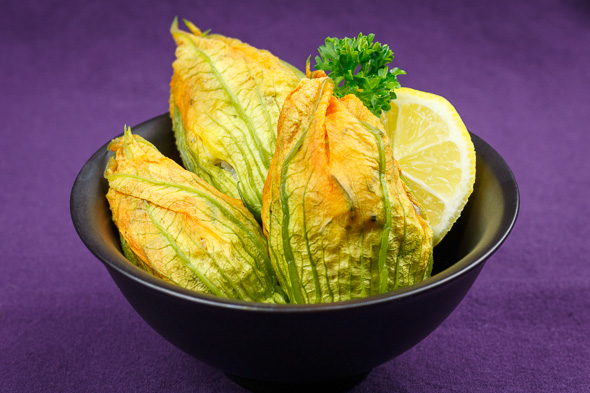
The Risotto-Stuffed Zucchini Blossoms
I’ve eaten through what, in hindsight, feels like a couple of metric tons of them in basically every way you can fry, steam, bake, fill, cook or otherwise turn into something delicious, both in Italian restaurants over here as well as at family dinner tables in Italy – and I absolutely loved the stuff. When I was trying to get a hold of them for my own experiments however, I came up empty handed for a very long time, until a vendor at the farmer’s market overheard an annoyed remark of mine aimed at the vast amounts of fresh but blossom-less zucchini stacked up on that stands display. “That Italian over there takes your soul for a couple of wilted, imported ones. If you come back here on Thursday, I’ll get you as many as you want fresh off the field if you buy the zucchinis attached to them.” I did return and ended up with a box of about 25 squeaky fresh baby zucchinis, blossoms on, for next to nothing. Without asking around for a bit, they’re still kind of a rare sight for the “normal” – as in not cheffing at a white-tablecloth restaurant – customer, so I highly recommend asking your local farmers/grocers if you’re having trouble hunting them down (for a reasonable price).
8-10 Zucchini Blossoms
8-10 Tbsp Leftover Asparagus Risotto or:
100g Cooked Rice, lightly seasoned with fresh herbs along the lines of basil and lemon zest
30-50g Pecorino
A Crack of Pepper
1) Remove the barbs at the bottom of the blossom and snip off the gnarly bits of the stem – keep the stems at about 1-1 ½cm for this one.
2) Very gently open the blossoms about ½-2/3 of the way down. Check the interior of the blossom for uninvited guests, just in case.
3) The easiest way to keep the delicate flowers under control is forming a ring with your left thumb and index, gently cupping the lower part of the blossom with your palm and supporting the stem/bottom with your pinkie. Flip the petals back over the “ring” and get stuffing.
4) Depending on the size of the blossoms, you’ll need about 1 tbsp of filling for each one – start with a small knob and gently prod it into place around the bottom of the calyx, around the rather solid pistil – unless someone removed that already. Try to poke out any air pockets while you’re at it – you won’t be looking at a case of exploding flowers in your kitchen if you miss one, but they’re prone to fill up with liquid and allow that same stuff to find a way through the petal to the outside world.
5) In a second round, fill the blossoms up to a point where you can still comfortably close the petal ends hanging over your fingers in a sot of fan-like, overlapping fashion and give them a little twist at the tops to seal them.
6) Once all of them are filled up, sealed up and pretty, place them on small sheets of baking parchment or paper muffin cups – that’s if you’re steaming them like I usually do.
7) You could also place them on a baking tray lined with a sheet of baking parchment or one of those non-stick silicone mats, drizzle them with a hint of your favorite olive oil, give them a dusting of freshly grated pecorino or parmesan and bake them to golden perfection for 15-20 mins at 180°C.
8) If you’re following my personal footsteps, pull out your bamboo steaming basket and a fitting pot – hopefully the same pot is big enough for your veggies, that way you can shave off quite a bit of time, effort and energy – fill the pot with water half-way up, bring the water to a rapid boil on high heat and pop the steamer on.
9) Gently arrange the blossoms on their individual anti-stick-protectors inside the baskets, brush them with the aforementioned olive oil, pop on the lid and and steam them for 3-4 mins on full tilt. Sadly we unfortunate ones without an oven don’t get to indulge in a crispy, cheesy crust that way… Oh well!
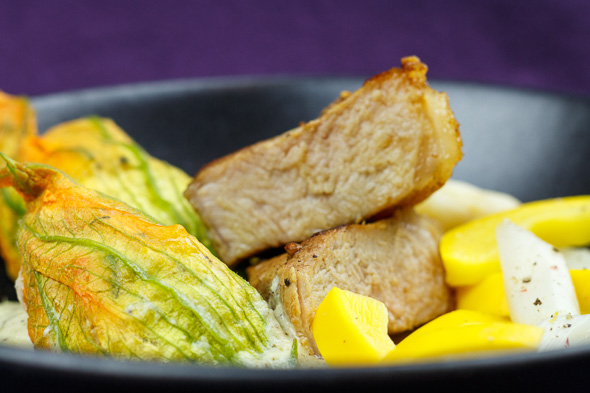
The Veal
400g Veal Fillet – preferably in one piece rather than 2x200g portions
Alt: Saddle or Chops – both of them work deliciously well, this is more a question of preference and loose quid in your pockets. There’s a tiny difference in prep, but I’ll get to that in a blink.
500ml Veal Stock – if you don’t want to make this one yourself and, at the same time, dislike using store-bought preserves, ask your butcher/market vendor for the good stuff. If they don’t have it in stock all the time, you’ll be most certainly able to order a batch.
2 Sprigs of Parsley
1 Bay Leaf – if you’re using a fresh leaf, crumple it up a bit before tossing it into the pot.
1 Sprig of Thyme, leaves picked
1 Sprig of Lovage
½ Tsp Black Peppercorns
1 Clove of Garlic
30g Butter
1 Tbsp Olive Oil
Ok, first pick, the fillet. Prime Cut, handle with care~ Care with a delicate piece of meat like this means: low and slow it in the oven (90°C until the core hits 58-60°C), go to town with a sous-vide doohickey or, in case you’re as special-tool-less as I am, poach it before turning up the heat. With a little bit of practice, you could actually go sous-vide without the usual high-tech gizmos by very, very tightly wrapping the fillet into clingfilm, putting lots of effort into sealing the “sausage” after twisting up the ends about 10 times, then tying them up with two pieces of butcher’s string the other ends of which you’ll have to tie to a wooden cooking spoon that’s long enough to comfortably rest on your cooking pot while the wrapped-up fillet is hanging below the water’s surface yet far away from the hot bottom of the pot <insert gasp here>. My personal “technique” would give MacGuyver something to chew on, I suppose – In an attempt to half-sous-vide it the way I just described and half-poach a lamb’s fillet a few years back, I picked up a couple of chopsticks and two broken roulade clamps and tinkered them into a sort-of stable hammock or stretcher with some butcher’s string… I hate clingfilm as much as it seems to hate me and I go miles to avoid messing around with the stuff… Anyways, since poaching is the easiest way (for me) to go, here’s the how-to.
1) Pick a pan or pot wide enough to comfortably accommodate the straightened out fillet.
2) Pour in the stock and set it onto medium-low heat.
3) Add the lovage, parsley, peppercorns, the bay leaf and a cooking thermometer.
4) Once the stock reaches 70°C, gently submerge the fillet in the stock. The temperature will go down a bit, so keep an eye on the thermometer and, once it’s back at 70°C, wedge a piece of potato or a wooden spoon beneath the filet to keep it away from the bottom of the pan. If that means the meat is peeking out of the liquid you’ll have to adjust the stock levels (don’t forget to up the herb dosage as well) or ditch the wedge and baby it for the next 15 mins – baste the exposed parts and keep turning it over every minute to keep the temperature at a constantly rising level without having it sit on direct heat for too long. Or… gently but firmly tie the fillet to a cooking spoon~
5) Either way, keep the fillet in the hot and aromatic bath for 15 mins, then pat it dry and keep it warm beneath a sheet of aluminum foil until the real fun begins.
6) Fire up a heavy-based pan on high heat and add the bashed garlic, butter and thyme leaves.
7) As soon as the butter starts to bubble up, add the oil and the fillet.
8) Grab a pair of tongs and give the fillet ¼ of a turn every 30 seconds until it’s beautifully seared all around.
9) Tuck it back beneath the aluminum blanket and take care of the veggies and the sauce – they won’t take long, so mentally prepare yourself to plate up in a few blinks.
10) Scan the pan for any truly burned bits, discard them and set it back onto medium heat, ready to take care of the sauce.
Alternative Picks: Saddle of Veal, Veal Chops and other suspects
If you’re going with a juicy piece of saddle, or any other cut of veal for that matter, the “difference in prep” I mentioned earlier is a simple switch from “low-and-slow first, turn up the heat second” to “Shoot first, ask questions later”… or rather “fry for the crisp first, wrap-and-poach or finish in the oven second”. Oh, just for the record, you could also turn this into a serious quick-and-easy version by using waffle-thin veal schnitzels, quick-seared in some ghee and the spices/herbs used in the stock, but that’s not the point right about now~
Once the crisp is on, settle the pieces of your choice in the oven at 90-100°C and pop in a meat thermometer. With a whole saddle of veal you’re looking at roundabout 1,5 hours of oven-time, but to make sure it comes out pink and delicious on the inside, here are the pre-resting temperatures you’re looking for:
60-62°C for the Saddle
60°C for Loin and Fillet
58-62°C for a whole Rack/Crown (the bones and their residual heat…)
59-62°C for larger, single Chops (just one bone, still the residual heat…)
All of them will rise up to 64-65°C during their R&R, giving you a perfectly medium pink piece of veal to indulge in.

The Creamy Zucchini & Lemon Sauce
Hm, ok, calling it a “sauce” may be a a case of slightly overstating things, but here it is… I call it “making the best of the delicious remains of frying up a piece of meat”.
1 generous Swig/4-5 Tbsp of Veal Stock
1 small green Zucchini, roughly chopped into fryable, yet soon-to-be-whizzed bits
150g Crème Légère
1 Lemon, Zest and Juice to taste
2 Leafy Sprigs of Basil, leaves picked and roughly chopped
1 Tbsp Brown Butter
1) Deglaze the pan with the veal stock and lemon juice once the previous inhabitant is safely tucked away.
2) Carefully whirl up all of the good stuff sticking to the pan and add the brown butter along with the zucchini and lemon zest.
3) Flip the lot and give the zucchini 2-3 mins to soften.
4) Stir in the crème légère and quickly whizz the lot into a creamy sauce – move it to a stick-blender friendly container if needed.
5) Have a quick taste-test before calling it done or pouring it back into the pan to keep warm or for the veggies to finish up their part in.

The Veggies
1 Yellow Zucchini, sliced into ½ cm thick half-moons
300g White and/or Green Asparagus, peeled, tailed and cut into bite-sized pieces
Sea Salt and freshly cracked Black Pepper to taste
A Splash of Lemon Juice
1) Bring a large pot of lightly salted water to a boil on medium-high heat.
2) As soon as the water starts to simmer, add the lemon juice and stir in the salt.
3) Once the salt has dissolved, add the asparagus and wait until the water works up some bubbles again before adding the zucchini.
4) Again, wait until the water get’s back to the boiling point, then put a thicker piece of asparagus to the poke-test. If the tip of a knife slides in and out easily, they’re ready for the ice-bucket. If you have absolute control over the asparagus in your pot, try to aim for the sweet spot just below the “perfectly done” point – that way you can finish them off in the sauce without risking to overcook them on the last stretch.
5) If you hit the perfectly done mark on the spot and are afraid to ruin them by swirling them in the sauce before serving, skip the round through the pan and simply serve them with a drizzle of sauce on top~
6) Either way, introduce the veggies to a batch of ice-cubed water to stop the cooking process. If you’re going with round two, cool them down completely, if you’re going to plate them up as they are, just douse them, allow them to steam off some excess water, then pop them back into the pot, set them aside and close the lid to allow them to keep each other warm for a couple more minutes.

The Timeline & The Finishing-Flourishes
Alright, only now that I’m writing this, I’m starting to see how many little things this one entails – things that I, since I’ve done this a number of times, do on autopilot. To make the whole process a little less ten-things-at-the-same-time, to unravel that particular knot, if you will, here’s a quick timeline for the “in-one-go” scenario.
Of course, seeing as you may have prepped the risotto way in advance as well, you could go, one by one, through the pre-prep, getting all of the veggie-related steps out of the way up to the slightly-undercooked stage the evening or morning before the shindig~
1) Prepare the blossoms up to the point where they’re sitting safely inside the steam basket and stash them out of harms way for now.
2) Prep the fillet for its bath and set it aside.
3) Get the stock going.
4) Take care of the asparagus and the other veggies while the stock is making its way to 70°C. Clean, slice, a preemptive touch of seasoning, the whole shebang.
5) Now that the more attention-grabbing things are out of the way, submerge the veal into the stock and keep an eye on the clock and the thermometer.
6) Meanwhile sort your mise en place bowls by component for easy toss-in-maneuvers.
7) Get the water for the veggies up to a boil – if possible, use a pot you can pop your steaming basket on later!
8) Fish out the veggies once they’re done – don’t forget to eyeball the veal – chill them down and turn the heat up high to move on to the steaming process in one go.
9) Fire up the pan for the veal once it’s ready – don’t forget the blossoms in the basket.
10) Once the veal is crispy and napping under its blanket, finish off the sauce in the same pan – as well as the veg if you’re going that way rather than leaving them as they came out of the water.
11) Get ready to plate up~! As in: If you’ve got your time management on the spot, the veggies, the blossoms and the sauce will be done at the same time – and the veal will be well rested and delicious at that time as well. So, slice the pretty into 2 portions and place them on your plates.
12) Drizzle both with whatever liquids have gathered on the resting plate before dividing up the veggies and the sauce.
13) Top each serving with 2-3 blossoms and arrange the remaining ones in a separate bowl – there are never enough of them, but piling them all up on helping#1 always seems a bit… gluttonous~
14) Pour yourself a glass of your favorite white, be proud of yourself, lean back and…
…Enjoy~!
♥
P.S.: If all that wasn’t enough to satisfy your drive today, here’s something to finish off the meal with perfectly – a happy coincidence in the match-up department of the “Today, one year ago” variety~ My Layered Blueberry-Yoghurt Truffle Chocolates

Such nice colors on this plate. Brilliant idea, to pair the stuffed zucchini blossoms with zucchini sauce. 🙂
LikeLike
Pingback: Thyme-Poached Veal with Pea & Wild Garlic Risotto and Strawberries – Nahdala's Kitchen