

Heeeey, the 80’s just called, they want their Chocolate Orange back! Tacky versions of the classic chocolate and orange combination aside, the aromas just go too well together to file under „outdated“, so we’ll just call it „retro“ and move on.
My first idea when I saw this…

…was pretty much the obvious:
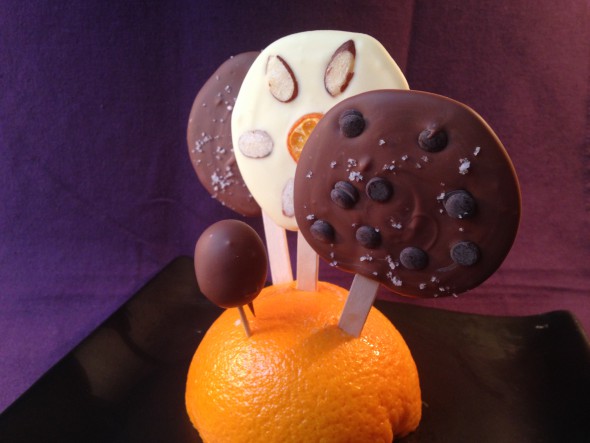
200g high quality Milk Chocolate
4-5 drops of Orange Extract or Orange Blossom Water
10 wooden Popsickle Sticks
5 Kumquats or 10 slices of dried/candied Kumquats
…But what’s the fun in leaving it at that?
A while ago I once again fell asleep in front of the TV. I woke up in the middle of the night, all fuzzy in the head, and groped around for my elusive remote to shut up the drama-laden commentary on one of those cooking competitions. I couldn’t find the damn thing before I caught an eyeful of a flustered woman holding up a bowl of something that looked like it was designed to entertain a dinner party at the Addams Family’s house. The last thing I heard before I finally managed to switch off the disturbing images was „Chocolate Mint Spaghetti with….“. A couple of hours after my first coffee in the morning it finally registered. Sweet Pasta! I had totally forgotten about that. The whole chocolate pasta thing made perfect sense all of a sudden, a pasta dough being an empty canvas that can easily be turned in any direction. After deciding to loose the dark chocolate in the dough for obvious cosmetic reasons, this is what I came up with.
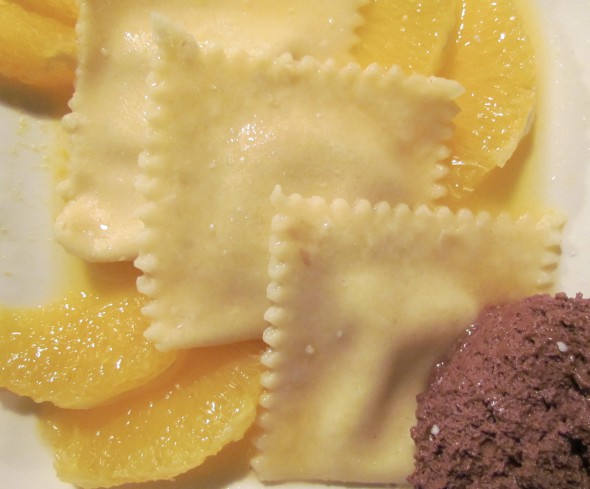
White Chocolate Ravioli with Kumquat Ricotta Filling, 4 servings
The Dough
I admit, this time I bought simple, ready-to-use pasta dough at an italian store in town. I only get to make doughs for this kind of thing myself whenever I’m taking over someone else’s kitchen and actually have the space to roll out long sheets of dough. I do however have recipe for a white-chocolate pasta dough I used before to make these at the ready.
150g Plain White Flour or Pasta Flour (Type 00) if you can get a hold of that one instead
40g White Cocoa Powder
2 M Eggs
½ Vanilla Pod, seeds scraped out
10g Melted Butter, cooled down to room temperature
1 Pinch of Salt
1) Sift the flour and cocoa powder into a large mixing bowl and sprinkle the vanilla seeds and a pinch of salt on top
2) Press a well into the middle with your knuckles and crack the eggs into it.
3) Add the butter and use a fork to lightly work the eggs into the flour. There’s going to be a major lumpage coming your way, but don’t worry about it at his point.
4) Keep at it until the general stickyness of the egg and flour mixture is replaced by drier crumbs forming in your bowl. That’s your cue to turn out the dough onto a lightly floured surface.
5) Start kneading the dough, pushing it forward with the heels of your hands and pulling it back with your fingertips.
6) Once the crumbles and lumps are gone, keep kneading until the dough reaches a slightly springy, playdough-type of texture. In case the dough comes out a bit dry – dry flakes of it falling off of it as you knead – add some more molten butter in teaspoon-fuls. If it keeps sticking to you like a bad habit, add some more flour.
7) Once you’re satisfied, roll the dough into a ball and wrap it with clingfilm before setting it aside to rest for around 30 mins. By letting the dough rest you’re giving the gluten in the flour a chance to relax again from being worked through – it doesn’t soften per se, it just gives the dough back it’s elasticity, thereby making it easier to roll it out thinly without tearing holes into it too easily.
8) Divide the dough into tennisball-sized portions and roll them out into even sheets of about 8cm width and the thickness of 2 playing cards on top of eachother.
9) You can go about filling the ravioli in several different ways from here.
– I’ve seen a couple of nifty ravioli-related kitchen gadgets so far, some of them looking like they were capable of inflicting serious injury. If you have one of those and you actually know it’s not going to kill you, go wild. If not, here’s two methods I use to fill ravioli.
– Roll out the dough into long sheets wide enough to cut out disks of 6cm DIA. If you choose to do it this way, you’re going to place a tsp of the filling in the middle and then fold the opposite sides of the disk into a half-moon around the filling.
– Another way would be to roll out the dough into two long sheets, one acting as base to place the filling on, the other one as lid to cover and seal the filling – this is what I usually do when I’m in a hurry. It’s less fiddly than folding the filling into the disks of dough.
10) Before any of this can be done, you’ll need to prep the filling first though – while the dough is resting.

The Filling
100g high-quality White Chocolate, roughly chopped
100g Ricotta
15g Kumquats, finely chopped or Orange zest
20g roasted and finely ground Almond slices
Orange Extract to taste
1) Melt the chocolate in a waterbath over simmering water. Make sure the bottom of the bowl doesn’t touch the surface of the water to avoid the chocolate getting too hot, sticking to the bowl and burning up or splitting.
2) While the chocolate is cooling down a little place the ricotta, kumquats and almonds in a large mixing bowl.
3) Add the chocolate to the mix and gently fold it in until all of the ingredients are well combined.
4) Cover the bowl with a kitchen towel and allow it to cool off.
Assembling the Ravioli
1) Roll out the dough and, if you’re going with the half-moon shaped ravioli, cut out the disks and set them onto a tray or plate lightly dusted with polenta – this keeps them from sticking to eachother or the surface they’re set upon.
2) Place teaspoons of the filling on the base sheet, about 2-3cm apart from eachother – or in the center of your disks.
3) Carefully fold the second layer over the base and the filling, starting on one end and pressing it down in between the heaps of filling to seal it onto the base as you progress to the other side. If you’re using disks simply fold over one half of the disk over the other, lining up the rims to form a half-moon. In case your dough resists your attempts to seal the edges, brush the spaces around the filling with a dab of eggwhite to act as a glue.
4) If you went with the layering-method, seperate the ravioli by cutting along the middle of the space you left between the fillings with a pasta roller or a knife.
5) As you seal the filling in, make sure you press down the dough around the filling as closely to it as possible to avoid trapping bubbles of air inside – they would make the pasta burst in the hot water.
6) Set them onto a sheet of baking parchment lightly dusted with polenta until you’re done, making sure they don’t touch and possibly stick to eachother. If you went and made really large ravioli or you get the feeling they might be a little on the soft and breakable side, cut the baking parchment into individual pieces for the ravioli before placing them on it and use those pieces to lift them into the water later.
7) Place a sheet of clingfilm on top of them – don’t wrap them in too firmly – and proceed to making the sauce.

The Sauce
400ml freshly pressed Orange Juice
100ml freshly pressed Blood Orange Juice
3 Tbsp Icing Sugar
Liquor 43 to taste
1 Orange, fillets cut out to decorate the plates
Vanilla Salt to serve
1) Pour the juices into a small pot set on medium-high heat.
2) Leave them to simmer until the starting amount has reduced down to about a third.
3) Add the sugar and gently stir until it’s completely dissolved in the reduced juices.
4) Turn the heat down to medium-low and keep a close eye on the sauce now. It should thicken into a syrup while not changing its color (much) towards a dark brown. Keep the Liquor and the orange fillets you’ll be adding in a few moments in mind when you’re checking for the consistency of the syrup. If it’s thickened a bit too much just add more Liquor 43 or some orange juice if you’re skipping the booze. If it’s still too runny, keep it on the stove for a bit longer and reduce the heat some more in case the sauce is turning too dark due to the sugar caramellizing.
5) Have a taste and adjust flavor and consistency by stirring in some Liquor 43.
Finishing Touches
1) Bring a large pot of lightly sugared water to a gentle simmer. Keep it at this temperature, below the boiling point – rising bubbles could tear the ravioli apart. Too much heat could also curdle the filling.
2) Use a slotted spoon – or the individual pieces of baking parchment I mentioned earlier – to gently slide the ravioli into the water in batches – they might stick to eachother if they touch before the dough has set, so keep the water in the pot as still as possible to avoid bouncing them around too much and don’t send too many swimming at the same time.
3) Just before serving, add the orange fillets to the warm sauce, give them a swirl and plate up.
4) Sprinkle a couple of vanilla salt flakes on top and enjoy!
♥
