
 Ever since that little early morning holiday stroll through the city gardens and our visit to the baby goat’s playground I mentioned last week, a little voice in the back of my head kept telling me to whip up something on the goaty side of things. Now, if you’re not really a fan of goat’s milk, cheese ot meat to begin with and/or have had the questionable honor of getting a capital blast of full-force GOAT odeur at some point in your life, you might wonder how getting close and personal with a couple of these fragrant animals could possibly invoke an appetite for anything related to them.
I actually ask myself the exact same thing every once in a while – that is, whenever the resident pasha of the city garden’s herd drops by for a scratch while I’m playing with the little ones or giving my fav girl goat a good rub in that special spot right behind her horns. As soon as he leaves though, his somewhat intrusive perfume dissipates, leaving behind the kind of gentle, clean hint of eau de goat that’s actually… mouthwatering to anyone who enjoys goat’s milk and everything made from it. Which is probably why I always pick up something along those lines on my way home after a visit to the gardens, come to think of it…
Anyways! Of course I know a couple of people that had their fair share of goaty overdoses in the past, so at one point I decided to show them a couple of ways even the most disinclined people might actually enjoy a bit of goat’s cheese if they wanted and, next to my Pear Tarte with a Goaty dot-on-the-i that I will be sharing with you guys once pear season is up, this one is the “Hesitant towards Goat’s Cheese Club”s favorite so far~! Even more so, it’s an absolute crowd pleaser for those who, like me, a) love the stuff and b) aren’t that much into very sweet sweets at the end of a meal at the same time – the perfect balance between a cheese course and a real dessert… or so I’ve heard~ Here we go, savory’ish Créme Brûlée for four:
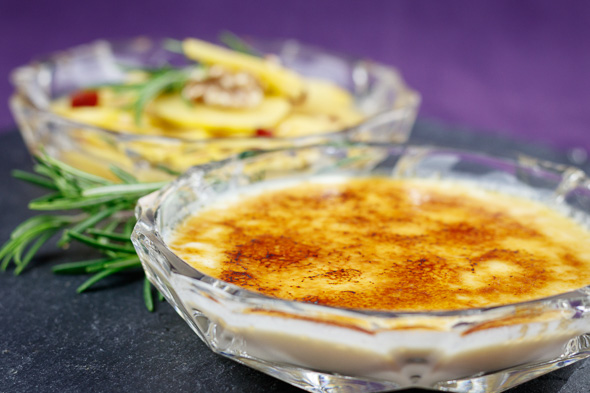
The Goat’s Cheese Crème Brûlée
150ml Goat’s Milk – While widely unavailable in “normal” supermarkets over here, every organic food store has this, and all possible products made from it for that matter, in stock
150g Low Fat Cream
3 Large Organic Eggs – the freshest and most delicious ones you can get
250g Goat’s Cream Cheese
Alt: 175g creamy Goat’s Cheese and 75g firm’ish, mild melt-in-your-mouth Gruyere-style or runaway Camembert-style Goat’s Cheese works wonderfully too – Let’s hear it for fantastic marketing! “New Flashy Packaging! Double the amount of plastic wrap! Same Price, rocking 75g less of the contents, but it’s looking snazzy now!”
1-2 Tbsp Honey
1 Pinch of Salt
1 small Sprig of Rosemary
4 Tbsp Brown Sugar for the finish
This time around, I had the chance to use an oven for the occasion, so I’m actually able to give you alternative oven- and no-oven methods for this savory Crème Brûlée~! Well, actually I’ll go with the oven version since I’ve covered my usual well-tested auto-pilot no-oven workaround one several times already – clicky here for my White Chocolate & Blueberry Crème Brûlée to find an in-depth description~
And now for the slightly less elbow-greasy oven version~!
1) Preheat your oven to 100°C and turn off the fan.
2) Pick four ramekins and place them in the fridge just before getting started. Chilling the ramekins helps cooling down the cream mixture evenly once you pour it in, guaranteeing a silky smooth textured outcome later on.
3) Add the milk and cream to a small pot and set it onto medium-low heat.
4) Stir in the salt and honey and send the rosemary sprig swimming once the honey has dissolved completely.
5) As soon as tiny puffs of steam start to gather on the surface of the liquids in your pot, turn off the heat and set the mixture aside for a couple of minutes to allow the rosemary to release its aroma into the creamy lot.
6) In the meantime, crack the eggs into a large mixing bowl, add another pinch of salt and go to town with an electrical whisk until the mixture turns slightly glossy and airy.
7) Turn your attention back to the contents of your pot and remove the rosemary after one last swirl through the cream.
8) Pick up your whisk again and work the cheese into the still-warm mixture until the lot turns out smooth and creamy again.
9) By the time the cheese has blended into the liquids, the mix should be cool enough for you to whisk in the eggs next without any danger of them being turned into scrambled eggs, so go ahead and work them in as well until you’re looking at a deliciously creamy, shiny, light-golden bowlful of proto-custard.
10) Collect the ramekins from your fridge and strain the mixture through a sieve right into the ramekins.
11) Carefully place the little container in a deep baking tray, low-rimmed casserole or brownie tin and pour warm water into the tin until the water line reaches 2/3 up the sides of the ramekins.
12) Slide the tray onto the lower rack of your oven while making extra sure to keep the custard in and the water out of the ramekins, close the door and allow the custard to do its thing for 35-40 mins.
13) Allow the Crèmes to cool off to room temperature before placing them in the fridge for another 2-3 hours of R&R – the longer the better! If the surface isn’t cold enough when the proceedings to create the signature crust of any decent Crème Brûlée are taking place, the top layer beneath the hot sugar will melt, taking the half-liquefied sugar along with it into the depths of a sad, irreparable and inedible mess. Oh and just in case you’re in a hurry… pick another dessert rather than popping the ramekins into the freezer! Believe me, the outcome won’t be pretty either. Been there… and so on.
14) So, once the Crèmes are thoroughly chilled and you’re about ready to plate up dinner, sprinkle each golden surface with 1-1 ½ Tbsp of brown sugar and torch them with a Crème Brûlée burner until the individual grains melt and merge into what your dessert spoon would probably call the whole point of a Crème Brûlée~
15) Just in case you’re unfamiliar with or unsure about the torching-technique, especially after my warning about the molten-custard-abyss, here’s a couple of pointers to go by:
– If this is your first Crème Brûlée ever, start with a test-ramekin not intended to be seen or eaten by guests.
– Make sure the sugar blanket is covering the surface of the Crème evenly, with the grains not piled up too thin or too thick or bunched up in places but closely together. Try applying 1 tablespoonful across the surface at first and gently jiggle the ramekin until the grains are evenly distributed. Sprinkle in more grains to close up the gaps where the sugar wasn’t too ready to stick to the custard in round 1.
– Move the flame of the torch across the surface in fast sweeps from side to side.
– Keep the flame about 3-5cm away from the surface to keep the grains from turning into black’ish dots before they even get the chance to melt properly while staying close enough to actually get them to a high enough temperature to melt, flow and solidify into a sheet of sugary glass once the heat is off again. Without heating up the whole thing to a mess similar to the one I mentioned above. By the way, this is way WAY easier than I’m making it sound right now!
16) In case you don’t have a torch at hand, fire up your oven once more, pop the ramekins with the ready-sugared tops on a baking tray and slide it onto the highest rack, directly beneath the grill, and give them a couple of minutes until the sugar caramelizes on it’s torch-less own.
17) Transfer the Crèmes back into the fridge for 15-30 mins to stop any and all heat-related shenanigans inside the ramekins and to help set the caramel crust. Ta~dah!

The Speedy Rosemary-Quince Compote
You might have noticed that the prep time for the Crème Brûlée is… basically not existent if you ignore the R&R periods and the cleanup – and part#2 of this recipe stays true to that~! If you want this to hit the table next to the cold and crispy Crème Brûlée in a comfortably steamy hot stage, go through the knife-work just before dinner up until the “closed lid” stage and turn up the heat 15 mins before dessert’o’clock.
2 Small or 1 Medium-sized Quince – if you find yourself out of quince season and quince preserves (clicky here for my iron ration in situations like these, my Spiced Quince Preserves), pears work deliciously well as a replacement here.
100ml White Port
Alt#1: Quince Wine – sooooo worth a try and a bit of quid if you’re a fan of quinces~!
Alt#2: Organic, unsweetened Apple Juice
2 Tbsp Golden Honey
1 Lemon, Juice and 1 Strip Lemon Peel
1 Sprig of Rosemary
1 Clove
1 Pinch of Salt
Opt: Cranberries and Roasted Walnuts as textural cherries on top
1) Pick up a large mixing bowl, place the quince inside and pour in enough water to cover the quince.
2) Remove the quince and squeeze in the lemon juice.
3) Rub the fuzz off the quince with a kitchen towel, then peel and halve it.
4) Submerge the halves in the lemon-juiced water, then shake off the liquid, pick up a very sharp knife, quarter the fruit and remove the cores.
5) Dip the individual pieces into the lemon water after every cut you make to keep the fruit from browning.
6) One by one, cut the quince quarters into thin slices before returning them to the bowl and working over the next piece.
7) Once you’ve made your way through the fruity bits and all of the slices are safely back in the bowl, covered with lemony water, add all of the remaining ingredients – minus the optional cranberries and walnuts – to a pot large enough to comfortably accomodate all of your quince slices.
8) Drain off the lemon water, shake off any excess clinging to the fruit and immediately transfer the quince slices to the pot.
9) Carefully turn the fruit over in the liquids a bit to gloss them over, then close the lid.
10) Turn the heat to medium-high and, once the liquids reach a gentle simmer, allow the lot to bubble away for 10 mins.
11) Remove the rosemary, have a test-bite for consistency and sweetness, consider the optional toppings and divide the compote into 4 serving bowls to hit the table right next to the 4 Crème Brûlées~
12) Grab a spoon and…
Tap…tap…tap… Enjoy~!
♥

Looks so very tasty! Quince and goat cheese is such a great combination. 🙂
LikeLiked by 1 person
Thank you~! I really love the combo too, and I’m always working on/looking for/experimenting with new ways to get them together on one plate 😀 this one’s a frequent visitor on our table though~
LikeLiked by 1 person
I can see why! 🙂
LikeLiked by 1 person
Pingback: GW2 Glazed Pear & Goat’s Cheese Tart – Nahdala's Kitchen