

Every once in a while I get this gnawing need for a really good burger. For some reason the overall quality of burgers in our area, ironically first and foremost in the american-diner style places, has dropped shockingly low, almost to the level of the ever-present franchises. Our favourite Irish Pub offers kick-ass basic burgers, but if we’re in the mood for something more elaborate we simply make them ourselves.
Today I was in the mood for something meaty and sumptuous, so frying up a burger was an obvious choice. I had some leftover dried tomato pesto and parmesan in the fridge which made the decision about the style of the dish easy.
Here’s my take on Tyria’s…

For 2 Deluxe Burgers you’ll need:
The Meat
400g minced Beef
Fine grained Sea Salt
½ Tsp Fennel Seeds
¼ Tsp Mustard Seeds
1 Pinch of Coarse Sea Salt
Grapeseed Oil for frying
Believe it or not, this list of ingredients is three times as long as usual. While creating the “perfect” burger has become a serious deal, almost a culinary science, the general consensus turns to be one of my ground rules concerning burgers: do not mess with the meat. Period. Pummeling or pressing the poor cow into tight balls using eggs, breadcrumbs, leafy herbs and all that jazz may turn it into a meatloaf or meatball, but it surely doesn’t produce a classic Hamburger. 100% Beef, salt and maybe pepper or a hint of other spices. Knock yourselves out with toppings, condiments and buns, but leave the meat alone. To elevate the humble beef mince to a whole new level without forgetting the whole point of it, chefs all around the world have been going wild with their own secret mince compositions, temperatures and methods to prep the patty, fat content and other kitchen voodoo. While I would personally enjoy to introduce one of those crazy people mincing a 2,500€ Kobe Beef fillet in order to create the World’s Most Expensive Burger to the business side of my palm, a couple of groundbreaking and home-kitchen compatible tricks emerged from the chaos, small things really, but they go a long way. Here goes:
- Generally there are two stages at which you can tweak the meat itself, before and after grinding it. I have to admit, since making burgers is a spur-of-the-moment decision in my house, I usually skip the “before” bit and simply trust the lady at the butcher’s and her signature burger mince, but a lot of the burger pros put a lot of effort in picking out breeds, cuts and aging techniques.
- Try out cuts from different breeds if you have the chance – used to Angus beef I had the socks knocked off my feet by an incredible burger made with Galloway beef. That experience, being able to actually taste the difference in breed and the different cuts they used, made me doubt the common misconception that anything minced can only be the odd bits and leftovers ground up, grainy mystery meat if you will. No wonder seemingly everyone with a spatula has their own secret mince recipe.
- If you want to notch it up with little to no effort, avoid the convenience store packages. It’s not as bad as its reputation would suggest most of the time, but at least for the “special” burger occasion, cough up the extra coin (if that’s even needed) and get the stuff freshly minced in a butcher’s shop. By the way, there’s an easy way to tell if – or to which extent – you got hoodwinked by the food industry with the packaged mince at a later stage (too late for that matter). I’ll cover it when we get there.
- If you’re willing to go the extra mile for your burgers, experiment around to find the mince mixture you like best. The lady at the butcher’s just smiled when I asked her what kind of mixture she would recommend, got busy with the grinder and came back with two neat piles of mince strands. “House Speciality” she said, “Some sirloin, some short rib, something secret. The lean one for the griddle, the slightly more marbeled one for the coals. Same blend really, just with some marrow to add a bit more fat to keep it moist. Let me know how it went, we can adjust from there.” I went back, but not to have the mix adjusted, I merely bought more.
- There’s a huge debate amongst the pros as to which grinders and sizes of plates to use to pass the meat through and how many times to do it. I have to yield on that one, I’ve never done it myself. Given the intensity of those discussions, I can only assume that, if you’re looking for the perfect burger, that’s something you should really get into.
- Now here’s the “after” bit, something I always do, no matter which kind of mince I use. The mince comes out of the grinder in strands – most store-bought mince also comes in strands like these. Now, if you roll the mince into a log, leaving it in these horizontal strands and then cut them in individual patties, they basically “stand” vertically inside your bun, loosely falling apart once you bite down on them, creating a wonderful melt-in-your-mouth texture. Pummeling and squishing the meat into firm balls before flattening them on the other hand creates this dry and exhausting-to-eat patties – that’s the why of the “don’t mess with the meat” rule. The more stuff you put into the meat, the more force you have to use to keep it from falling apart and by doing so you create a dense blob of meat.
- There’s a world of instructions concerning how to cook the patty to be found, for us here it’s either the pan or the BBQ though, no fancy wizz-o-matics involved. The first time I made a burger in the pan I went into the whole process rather blue-eyed, just doing what I would do with a steak in regards to the core temperature and flipping it. Turned out I did the right thing. So if you’re looking for a certain core temperature, check out my Steak-101. Enough with the general stuff for now, here’s my step-by-step for this one:
1) Lightly toast the seeds in a small pan until they start to release their aroma. Leave them to cool off for a couple of minutes, then move them into a pestle & mortar and grind them up with a pinch of coarse sea salt.
2) Spread out and straighten two sheets of clingfilm on your work surface. You will be using these to wrap up and roll the mince into a log, so make sure the sheets are long and wide enough to hold the meat.
3) Starting with the “after” part of the mincing, arrange the strands of mince lengthwise, stacking them to a diameter roughly matching the diameter of your buns.
4) Evenly salt the layers of mince strands as you go, this will, once compressed, help the strands to fuse together while retaining their individual structure. As you’re distributing the salt, pick up pinches of the ground seeds as well to make sure they are evenly incorporated.
5) As for the length of the log, roughly estimate 2-3cm per patty you will be cutting off of the log in the end (unless you’re able dislocate your jaw to get a bit of everything off in one bite…) – keep in mind the mince will be compressed a bit, in length as well as in diameter. In todays case, due to the buns diameter, this made me roll up a “log” about half as long as wide…
6) Gently pat down the strands to remove larger air pockets and fit them together snugly. 7) Wrap up the meat in the clingfilm nice and tight, still aiming for the length and diameter you need to fit your buns. Twist the ends of the clingfilm as you go to firmly seal the ends. Once you’re halfway through the length of the clingfilm, prick it with a sharp knife to release the air being pressed out from between the strands.
8) Continue rolling up the log until you reach the end of the clingfilm. Tuck the ends in beneath the log and chill it for at least 2-3 hours to set.
9) Set a pan on high heat. Don’t add any oil yet, let it sit there for about 5 minutes until it’s piping hot.
10) In the meantime use a very sharp knife to cut your meat log, clingfilm and all, into individual patties. Carefully remove the clingfilm and gently pat them into a burger shape. Be careful to keep the grain in line so you don’t waste the effort you just put into making it run vertically inside the finished burger.
11) Once the oil is sizzling hot, add the patties. As usual, don’t overcrowd the pan in order to keep the temperature high.
12) Now here’s where you will find out if you have been hoodwinked by the food industry in case you bought a convenience package. Something they like to do to max their profits while seemingly offering a bargain – they add tons of water to increase the weight. Solid slabs of meat start shrinking in your pan, giving off the excess water as soon as the temperature starts rising. A bogus burger patty will first puff up into a ball like a blowfish, then shrink in on itself while drying out. A way to avoid major puffage is to thumbprint the center of your patty to about 1/4 to 1/3 of the way through in case you’re not sure about the quality of the meat you’re using.
13) Of course any meat naturally contains water, which will also expand (rather than leak) a bit in the pan. Use a spatula – not to viciously slam down on the meat in the pan as you might’ve seen on TV too many times – but to gently press it a little to keep the surface flat and even.
14) Flip the burgers every 30-45 seconds in order to get a nice and even crust all around.
15) Assuming your patty is about 2cm thick and you’re aiming for a medium-rare result, you should reach the golden 52°C core temperature after around 2-3 minutes. As usual keep in mind that residual heat inside the meat will keep the cooking process going a while longer.
16) Set them onto a warm plate and cover them with aluminum foil while finishing up the rest.
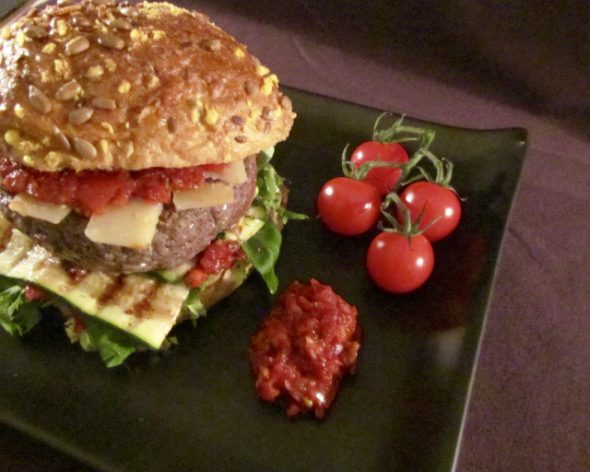
The Apricot-Tomato-Lavender Pesto
This is a staple in my fridge, so cut the amounts of ingredients down if you only want to make a certain amount of this pesto. You can prep this days in advance if you like or get it done the same day you’re prepping the burgers, just make sure it’s read to be used and cooled once the meat hits the pan.
200g unsalted dried tomatoes
190g dried apricots
5 dried physalis
200ml hot water
½ lemon, juice
½ tsp fennel seeds
½ tsp paprika powder
½ tsp chilli flakes
1 tbsp honey
1/2 tbsp lavender blossoms
2 garlic cloves
5 tbsp olive oil
1) Finely chop up the tomatoes, pour over the hot water and let them soak for 10 mins. I personally had to experiment around with different types and brands of dried tomatoes until I found the best working ones for my purposes. Some dry-stored tomatoes were simply too dry and gnarly, some too intensely salted. Neither of the oil-preserved ones I tried worked for me, I found they loose their own aroma too quickly in a sauce and in most cases they simply dissolve and leave behind a film of greasy whatever-the-preserving-oil-was-spiced-with. Luckily I found a brand of salted, dry-stored dried tomatoes that are still juicy somehow. Shop around and experiment a bit to find the dried tomatoes that work for you inside and outside of sauces.
2) Finely chop the apricots and physalis. One time I was making this I didn’t have enough apricots left for some reason and grabbed the next best dried thing I found in my pantry, which turned out to be physalis. That time I used them because I had no other choice, since then I kept them in the recipe, simply because their acidity takes off a bit of the sweetness of the apricots and adds a whole new level of flavour. Don’t go overboard with them though to avoid the whole pesto turning too sour.
3) Finely chop the garlic.
4) Grind fennel, chilli, paprika, lavender in a pestle and mortar into a fine powder. To intensify the flavours you could toast the fennel and lavender before grinding them up.
5) Add everything to a mixing bowl with the lemon juice and honey. Slowly add the olive oil while stirring until everything comes together in an even paste. If you want it smooth and without chunks, use a stick blender and blitz it. Stored in a sterilized, airtight container, the pesto keeps a couple of weeks if you keep it refrigerated.
The Toppings
10 thin shaves of Parmesan
1 small Zucchini, topped, tailed and lengthwise cut into thin ribbons
Olive Oil
1 Pinch each of dried Basil and Oregano
Sea Salt, Pepper
1 handful of bitter salad leaves or wild herb salad mix
1) Brush the zucchini with a little bit of olive oil and mark them up in a griddle set on high heat. Depending on how thinly you sliced them, this should take about 1 min or 2.
2) Sprinkle them with the dried herbs, some salt and pepper and set them aside on a cooling rack until it’s time to assemble the burgers.
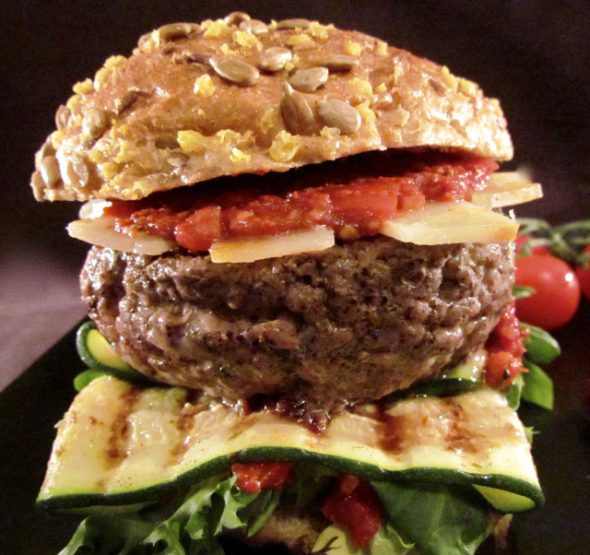
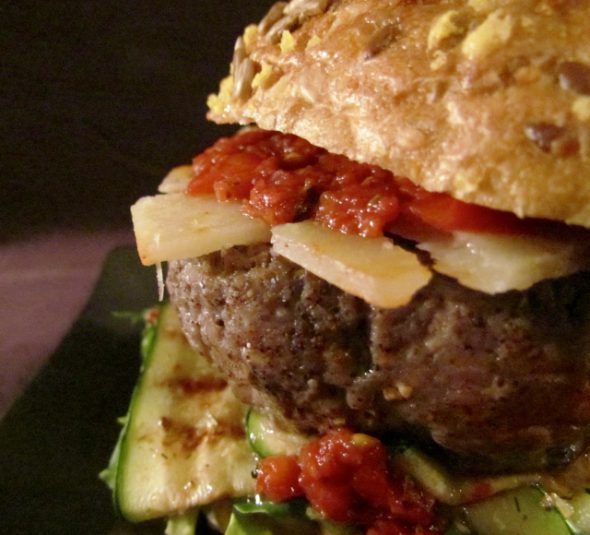
3) Prep the parmesan slices – as you can see in the pictures my cheese slivers are rather thick, the reason for that being the type of parmesan I used. It’s an aged parmesan, which decided to disintegrate into very tasty but not so photogenic crumbles when I had at it with a mandoline, so I cut them as thinly as possible with the sharpest knife at my disposal. While simply grating it, any cheese for that matter, usually is a viable option (I’m deliberately ignoring the existance of ready-grated “Parmesan”-scented dust), I prefer slivers or slices on a burger – if the cheese gets too warm and runny, it’ll turn eating the burger into a wild mess, small lumps of cheese slipping down the other toppings left, right and center. I prefer being connected to my burger by a yumtastic cheesestring rather than having my hands glued to it by means of half-molten cheese lumps. You can either stack these on top of the burger in the end or top the patties off with it after the last flip while they’re still in the pan to melt them a bit.
The Bun
Since we’re not barbeque’ing the burgers today I don’t have an oven at my disposal like I would during a summer-bbq in my mother-in-law’s garden, for which I usually bake a nice loaf of bread or buns to go with everything sizzling on hubby’s Weber. I picked up some sourdough & roasted corn buns at my favourite bakery instead. Come summertime I’ll share some of my bun/bread recipes with you. For now I can just advise you to get buns or rolls that are crispy on the outside and fluffy on the inside from a bakery, rather than prepacked cottony sesame buns from the convenience store.
1) Get everything else ready to be stacked between the bun halves. It’s showtime as soon as they’re done.
2) Basically all you need to do with the buns is to slice them lengthwise and set them, cut surface facing down, into the pan you just used to fry the burgers. If there’s too much oil left in it, remove it with a paper towel first. You merely want to toast the buns with a hint of the meaty flavors left in the pan, not soak it with cooking liquids.
Assembling the Burgers
1) Brush the bottom half of the bun with a thin layer of the pesto. Don’t go overboard here, it would simply re-decorate the front of your shirt or your plate if you used to much on the base.
2) Arrange some of the salad leaves on top to create a comfy bed for the zucchini.
3) Fold the zucchini ribbons to (mostly) fit inside the bun.
4) Place the meat on the zucchini and top it off with the parmesan slices in case you haven’t done that while the meat was still in the pan or resting.
5) Add another dollop of the Pesto, flip the lid on and have at it! Enjoy~
♥

Pingback: GW2 Horseradish Burger – Nahdala's Kitchen