
 After one particularly long and fruitful night of binge-WvW’ing, I was facing a whole lot of leftover junk food scattered around our desks. All of them came in those annoying amounts of stuff, just not enough to store away for some later point, but too much to really justify throwing them out. I racked my brain for a little while, once again cursing the oven-less state of my kitchen – I found myself looking at a bunch of leftover dried cherries, and the first thing that came to mind was the Tyrian Cherry Cookie recipe. Waaait a minute… Cherries? Check. Cookies? Check. Chocolate? Double check! Within 10 mins I had a batch of chocolate coated Cherry Cookies V.2.0 sitting in front of me and no leftovers in sight!
Whenever I’m making treats and chocolates for holidays, birthdays or just because, these are always the first things magically disappearing out of the storage boxes when I’m not looking. After a couple of times I gave up cursing at my houseghost – we call him Sino – or purposefully ignoring the innocent expression on hubby’s face. I just go make more instead – or plan ahead and make two batches. Luckily this is an easy and fuss-free sweet to make! So, the Tyrian inspiration for this was…
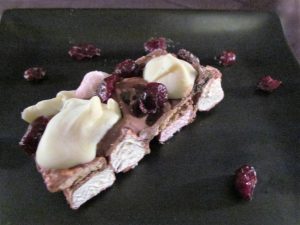
And this is my result:

When I made these last year around christmas, I made enough in advance for hubby to take to work along with a selection of other chocolates to spread some yuletide joy in the office. This resulted in one of those face-palm moments for me in regards to this treat. He returned home with empty boxes, compliments, requests for more and unsettling news about one of his colleagues regretting very much not being able to eat the cherry-cookie bars. Startled, I quickly went through the possible reasons for this in my mind, considering what set these apart from the other things I made, and it hit me. The lady in question, a true artist with cakes and cookies, by the way, is muslim – most firmed-up foamy-things, including marshmallows, are made with gelatine – gelatine is generally made from pork bones and cartilage – pork isn’t halal. Hence the facepalm. It’s one of these strings of logic one usually doesn’t think through back to the beginning – until then I always stopped at „Gelatine. Not vegetarian. I don’t know any vegetarians. <insert mental shrug here>“. Feeling slightly embarassed I went on a hunt through several organic and vegetarian food stores and turkish grocery shops in town, mind set to turning these into a vegetarian/halal version, one batch just for her. After a couple of kitchen-fails involving gelatine-replacements, I was kind of worried about the outcome, but using the halal marshmallows I found worked out perfectly, with no apparent changes in handling, consistency or taste that sometimes accompany the change of a key ingredient to a vegetarian version. I’ve decided to stick to those marshmallows after giving them a try. Such a small and seemingly insignificant thing to do for it to work out for everyone~

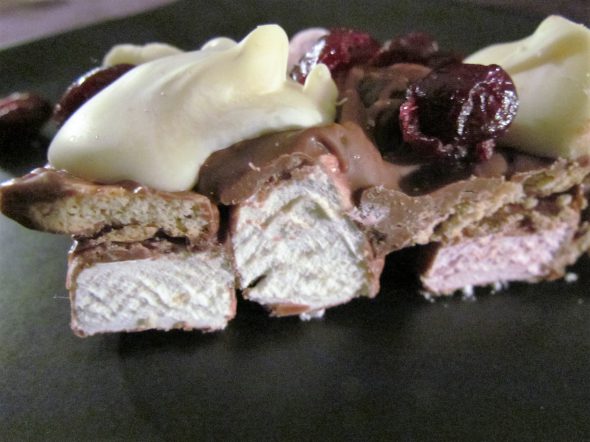
Messy-Cherry-Cookie Bars
For one batch the size of a brownie tin you’ll need:
100g dried Cherries
100g Sugar Reduced Butter Cookies
75g-100g Marshmallows – normal or vegetarian ones! Just avoid the flavored ones.
150g 70%+ Dark Chocolate
100g Milk Chocolate
50g White Chocolate
Fleur de Sel
1) Break up the cookies into 3-4 pieces each. Of course you can use normal butter cookies – I just picked up the sugar reduced ones one day because all other ingredients are really sweet enough on their own and I noticed them actually tasting more buttery than the „normal“ ones.
2) Cut the marshmallows in about thumbnail sized pieces.
3) Lightly toss the bits with the cherries in a large mixing bowl, make sure not to crumble up the cookies too much in the process.
4) Prepare 3 bowls with the three types of chocolate, seperately broken up into them. You’ll be melting the chocolates, one after another, in a short while.
5) Set up a waterbath, a bowl sitting on top of a pot filled with gently simmering water. Make sure the bowls holding your chocolate chunks don’t touch the surface of the water, they would stick, overheat and turn grainy and other sorts of yuck.
6) Start off with the dark chocolate. Melt it in the waterbath and stir until it’s smooth and silky. Set the bowl aside and let it cool down to room temperature. It’s really important to let the chocolate cool down enough, since it would otherwise melt the marshmallows on contact.
7) In the meantime, line a brownie tin with a sheet of baking parchment.
8) Once it’s cooled down enough, pour the dark chocolate into the bowl holding the cherries, cookies and marshmallows. Gently fold it into them, using a rubber spatula, to coat everything with a light layer of chocolate – this first dose of chocolate will be acting as a chocolatey sort of glue. Be quick with this, a thin layer of chocolate like this sets pretty fast, defeating the whole point of this exercise rather quickly.
9) Quickly move the chocolate coated contents of your bowl into the brownie tin and give it a good shake to evenly distribute the chunks in the tin.
10) Lightly press down on the top layer with a rubber spatula and reposition cookies or marshmallows sticking out, closing the bigger gaps in the process. Just try to pack the pieces as closely as you can without breaking things apart.
11) Set the brownie tin aside to set for 15 mins and get the milk chocolate going. Repeat the waterbath-stir-cooldown routine.
12) As soon as it’s ready, spoon the milk chocolate onto the surface of the now somewhat firmed up cherry-cookie-mess in your brownie tin. Make sure to drip it into the remaining openings and crevasses to close up air pockets. You will not be able to close all holes, the point of this is simply to glue the ingredients together, create a variety of textrues and aromas and to avoid a real mess when you’re cutting it into bars later.
13) Rip a couple of marshmallows into smaller pieces and use them and/or more cherries to stuff the remaining holes. Set the tin aside again and get the white chocolate ready, following the same pattern again.
14) Once it’s ready, slowly let the white chocolate drip off a spoon in decorative ribbons – or in whatever pattern you might fancy, decoration-wise – on top of your brownie tins contents. Just keep the uneven surface in mind, which will inevitably mess up more intricate designs.
15) Sprinkle a couple of salt flakes on top of the setting chocolate and chill the tin for at least 2-3 hours in the fridge.
16) Take the edible brick out of the tin and remove the parchment. Carefully cut it into squares. A few will crumble apart, but that’s part of the „mess“ – consider it the cook’s payment.
Just on a side note, swirls of salted butter caramel are an insanely tasty option to add to the mix – if you have an extraordinary tolerance towards sugar, that is. I discovered that one while I was preparing my Salted Butter Caramels during my Easter-Chocolates Box Marathon this year – splitting my attention between the Cherry-Cookie Mess and the caramels resulted in a bowl of chocolate covered bits sitting on a shelf, silently setting into a firm blob before I remembered to move them into the brownie tin. After making a mental note never to multi-task those two again, I turned on the blob, rolling pin in hand, and glued the shards back together with some of the caramel after moving the results of the Great Cookie Blob Massacre 2016 into my brownie tin. If you want to give that combination a try, skip the white and the milk chocolate in this recipe and prep the caramel using ¼ of the amounts I’ve listed there to replace the chocolates. Don’t forget to move the dark chocolate coated bits into the brownie tin prior to starting the caramel… I know, that’s one serious case of „do as I say, not as I do“ right there… it’s for your own good, though!
If you need something to calm down the sugar buzz, check back next sunday for a ridiculously healthy, yumtastic salad off of the Tyrian menu~
Enjoy~!
♥
