
 I never know whether to laugh or to cry when I read or hear about some airhead chef trying to sell Thai cuisine as the quickest way to prepare food known to humankind. That’s true… to some extent. After you’ve finished chopping, grinding, cleaning, slicing and all that jazz… yes, after all that, everything’s a quick-fix. Must be nice to have hordes of kitchen underlings to do the prep work for you…
Be that as it may, Thai food is one of my all-time favorites. It heavily relies on the quality of the fresh produce used, get’s along just fine without long cooking times and copious amounts of fat and carbs. In addition to that, it offers a seemingly endless supply of spices, contrasting flavors, textures and aromas just asking to be mixed, matched and experimented with. So, the tedious chop-works are really just a minor inconvenience, and there’s several shortcuts to that as well – I’ll be covering some of them in a bit. This salad & satay combo is one of those all-year-round’ers, fitting in to lighten the mood during a nasty case of winter, as well presenting a suberbly refreshing, yet hearty summer option. Just on a side note, this salad, and my skipping the crucial step of tasting the dressing before throwing in everything else, was the good-night kiss to my tastebuds that led to Griddled Bananas ending up as my dinner that fateful evening. Taste and adjust the dressing. Seriously. It’s for your own good.
This one will net you 3-4 servings (or 2 dinner plates plus a lunchbox for the next day)
By the way, I’m aware that this isn’t a traditional thai salad, at least not anymore, it started out as one though. As usual I couldn’t let it go and kept changing and tweaking a traditional Laab Gai recipe I found in an old thai cookbook over the years until it reached this point. I hope you guys like it~
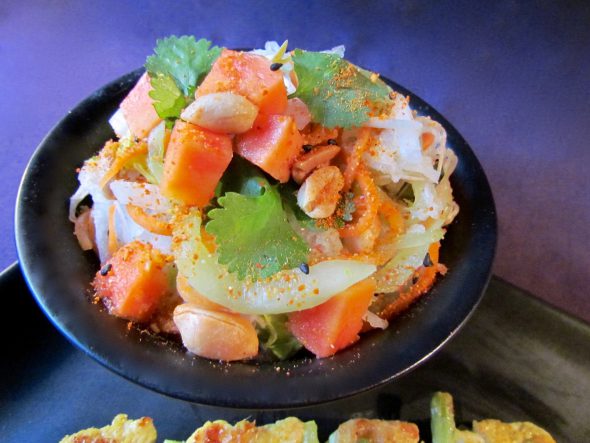
The Salad
150g Carrots, topped, tailed, peeled and julienned
150g Cucumber, topped, tailed and peeled – if you don’t feel like guesstimating how much cucumber you’ll end up with after peeling and deseeding it, just pick a medium sized salad cucumber.
200g Daikon or regular Radish, topped, tailed and peeled
1 small Papaya – if you can get a green one, julienne it into thin ribbons. If you’re going to use a ripe, yellow one, remove the seeds and cube it.
2 Limes, Juice and Zest
2 Spring Onions, finely sliced
150g Mungbean Sprouts
½ Bunch of Coriander, roughly chopped
½ Bunch of Mint, sliced into thin strips
½ Bunch of Thai Basil, finely chopped
2cm Ginger, skinned and finely chopped
1 Clove of Garlic, finely chopped
1 Bird’s Eye Chilli, deseeded and finely chopped
1 Tbsp Soy Sauce
1 Tbsp Oyster Sauce
1 Tbsp Sesame Oil
½ Tbsp Palm Sugar
½ Tbsp Fish Sauce
Opt: 1 Tsp Five Spice Powder
1 Tsp Sesame Seeds, lightly toasted
2 Tbsp Peanuts, toasted and lightly crushed
Salt, Sugar and Pepper
First off, a few words on the topic of carrot matchsticks. Julienne’ing carrots is one of my least favorite things to do when it comes to knifework. I admit, ever since I’ve discovered small baggies of ready-to-use julienned carrots in the salad section of a supermarket nearby for a reasonable price, I haven’t gone through the works. If you don’t feel like you’re being ripped off – some stores really go overboard with prices on those convenience veggies and salad-stuffs – grab those instead of „whole“ carrots. That’s shorrtcut #1, by the way.
1) Place the carrot sticks in an airtight container, add a pinch each of salt, sugar and black pepper along with the juice and zest of the limes. Give everything a good stir, close the lid and place it in the fridge for at least 3 hours. The longer, the better – whenever I have the chance to plan ahead, I prep this part an evening in advance.
2) Time for shortcut #2: Use a veggie peeler to slice… well, peel… the cucumber lengthwise into thin, long ribbons until you reach the watery, seedy core. Discard the core and place the ribbons in a large sieve or colander.
3) Repeat this process with the radish and add the radish ribbons to the colander holding your cucumber. If you feel like adding another texture to the salad, you could cut the daikon/radish into fine matchsticks instead and dump them into a bowl filled with ice cubes and water for 1-2 mins just before adding it to the rest of the salad. The bath in the icy water will double-up the crunch of the daikon. If you’re going with this one, wait until everything else is done before topping the plates off with the crunchy daikon sticks.
4) Sprinkle the lot with a generous pinch of salt, toss them lightly and set them aside for an hour. This will help draw out the excess water those two hold within.
5) Whisk together soy sauce, oyster sauce, fish sauce, five spice powder and sesame oil in a large mixing bowl.
6) Add the palm sugar and keep whisking until it’s completely dissolved.
7) Add the chillies, garlic, ginger, spring onions and sesame seeds and set the bowl aside.
8) Return your attention to the cucumber and radish ribbons. Pick up a few strands and squeeze. As hard as you can. Think of it as a workout… or an anger management class. If you’ve never done this before, you’ll probably be surprised at the amounts of liquid oozing out. Don’t worry about the ribbons breaking up, thanks to the salt that’s not likely to happen. Try to squeeze out as much as you can and loosen the strands up again before adding them to the bowl holding the dressing. Thanks to this excercise the dressing won’t be watered down and the veggies will actually soak up some of it.
9) Add the contents of your carrot-box, fold them into the mix and have a taste of the dressing. Adjust the seasoning if necessary.
10) Gently fold in the bean sprouts, papaya and the fresh herbs once you’re ready to serve. If you’re going with the Satay as well, just add the bean sprouts and herbs to the bowl without folding them in and place the bowl in the fridge until you’re ready.
11) After dividing the salad up onto your plates, dot the heaps with the crushed peanuts just before serving.

The Skewers
300g Chicken Breast, butterflied and cut into 1,5cm cubes
2-3 Spring Onions, cut into 1,5cm sticks – slice them in half if they seem to be on the thicker side of things
2 Shallots, coarsely chopped
1 Stalk of Lemongrass, woody parts removed, coarsely chopped
2 Cloves of Garlic, coarsely chopped
2cm Ginger, coarsely chopped
½ Tsp ground Coriander
½ Tsp ground Cumin
1/4 Tsp ground Turmeric
2 Tbsp Palm Sugar
1 Tsp Salt
1 Tbsp Peanut Oil
about 15-20 wooden skewers
1) Blend the shallots, lemongrass, garlic and ginger and 1 Tbsp of water into a smooth paste with a stick blender. Add the ground coriander, cumin, turmeric, brown sugar, salt and oil and stir the mixture until everything is well combined.
2) Place your chicken strips or cubes in a large mixing bowl. Pour in the paste and gently turn the chicken pieces in it until all the bits are covered all around. In case you’re iffy about dealing with raw chicken with your bare hands, use CSI gloves for this rather than using a spoon or another tool – you might tear the chicken or the meat might not be as nicely coated as it should be. The gloves also save your hands from taking on a bright yellow glow from the turmeric and cumin. That stuff takes ages to get off once it’s had a chance to dye your skin (and that doesn’t take more than a minute…)
3) Cover the bowl with clingfilm and place it in the fridge to marinate overnight or for at least 3-4 hours before using them.
4) About 30 minutes before you get to work threading the chicken and spring onions onto your skewers, place the skewers in a bowl or deep dish and cover them with water. Let them soak until you’re ready. This way the wood won’t burn in the pan/griddle or over hot coals.
5) Alternate chicken and onions while threading them onto the skewers.
6) Lightly brush a pan or griddle with a dab of of peanut oil and set it on high heat. Griddle or pan-fry the skewers in batches for about 2-3 mins on each side, depending on how thick the chicken breast was to begin with. I’m not sure how long they take on the coals, Hubby The Pitmaster always judges them by sliding off one of the bits and burning his tongue.

The Peanut Sauce
2-3 Small Red Chillies, deseeded and coarsely chopped
1 Shallots, coarsely chopped
2 Cloves of Garlic, coarsely chopped
1 Stalk of Lemongrass, woody parts removed, coarsely chopped
2cm Galangal, coarsely chopped
2cm Ginger, coarsely chopped
3 Tbsp Peanut Oil
½ Tsp Chilli Flakes
4 heaped Tbsp of Crunchy Peanut Butter
200ml Coconut Water – if you can’t get your hands on that, just use regular tap water
1 Tbsp Tamarind Paste
1 Tbsp Palm Sugar
1 Tbsp Peanuts, toasted and lightly crushed
Salt
1) Pop the chillies, shallots, garlic, lemongrass, galangal and ginger pieces into a high rimmed container and blitz them into a smooth paste with a stick blender, slowly adding the oil to the mix in a steady stream.
By the way, if this is your first encounter with galangal you might want to have a quick taste. I’ve got to admit, for a long time I thought galangal was the younger version of ginger since it looked and smelled almost the same. Their flavor and consistency are quite different though. Slice off a small piece of both and see for yourself – be careful though, too much of either and you’ll probably feel like you’ve just bitten into a bar of soap. In a way you could replace either with the other in some dishes if you prefer one over the other – on the other hand they’re so different after they had some time to develop their flavor, combining the two can lead to completely new aromas. Galangal is a lot harder than ginger and doesn’t soften up much when it’s being cooked. Like bay leaves or other woody roots and leaves, galangal pieces are usually removed from dishes after it had the time to give off its aroma.
Quick detour through mother nature’s first-aid kit:
Ginger and galangal are, in fact, related in the grand scheme of all things botanical. So closely related their medicinal effects are almost the same – both are working wonders when it comes to fighting off bacterial invasions, inflammations and other nasties all the way though the digestive system. They also both have an appetite-stimuating effect, which is why they’re often used in starters, soups and aperitifs. And, ladies, ginger in particular has an anticonvulsant, soothing and relaxing effect on our… parts during those special days of the month. Send a couple of slices swimming in hot water for a couple of minutes and skip the pain meds.
End of detour~
2) Move the paste into a small pot over medium heat, sprinkle with the chilli flakes and simmer it for about 5-6 minutes until its color turns darker and the aromas wafting up to you pack a punch. Too much punch means it’s probably burning, to have an eye on it.
3) Stir in the peanut butter, tamarind paste, palm sugar and 200ml of coconut/water and turn up the heat to medium-high. Bring the mixture to a boil while gently stirring. On a side note, going with the amount of oil I’ve listed will net you a rather thick and creamy sauce – more of a puree, if you will. <insert innocent voice here> I may be doing it this way to get more of the sauce to stick to the chicken… maybe~. If you prefer it to be a little bit more runny and silky, stir in more peanut oil at this point until you’re satisfied. Make sure it’s well incorporated to avoid ending up with a grainy texture.
4) Once it’s merrily bubbling away, turn down the heat back to medium-low and simmer the sauce for about 10 minutes. The sauce will thicken up a little during that time and a thin sheen of oil will gather on top – it’s supposed to do that, no need to worry about the sauce splitting~
5) Give it a stir, have a taste and adjust the seasoning if necessary.
6) The sauce is at its best while it’s warm, so serve it with the skewers right away.
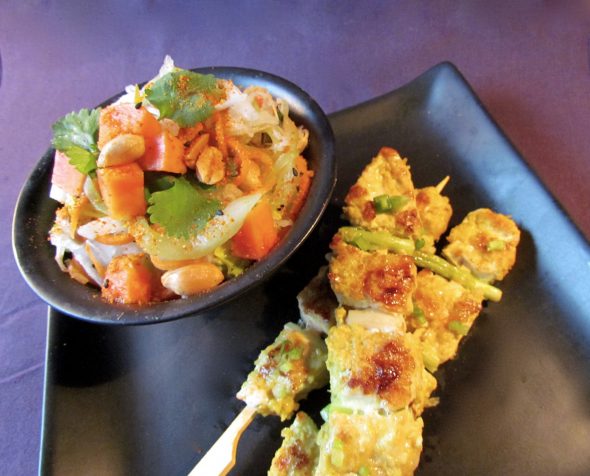
Assembling the Dish
1) Divide the salad onto plates and top it off with the crushed peanuts.
2) Arrange the skewers on the plates and fill the sauce into individual small bowls to avoid traffic jams on the commute to the sauce bath and other incidents involving a yumtastic sauce, hungry people and wooden sticks.
3) Enjoy!
♥
