
 One thing stews from all over the world generally have in common is: they’re even better the next day. A Chilli Con Carne is no exception to that rule. After my inner vamp was satisfied with last weeks Chilli Con Carne however, I couldn’t stand the thought of actually warming it up again, so I tried – and succeded~! – to find a way to make a yummy, summery picknick or late-night snack out of the leftovers with as little stove time as possible.
Last week I was debating whether to make a Guacamole to go with the Chilli after I stumbled across the „Avocado Salsa“ on the Tyrian Menu, because… well, a Chilli kind of calls for avocado’y sides, but that idea got lost somewhere along the way for no apparent reason other than me being preoccupied with keeping the raging carnivore at bay, things like condiments and sides a minor inconvenience best shoved aside for the time being. With that one off my mind, the Avocado-Salsa snuck back into my headspace, and made the decision to making one of my Garden Party/Brunch/BBQ/yougetthepicture staples to go with my Chilli leftovers an easy one. So, this Tyrian dish…

fell victim to the Chilli-tunnel vision – despite being the perfect sidekick to a steaming bowl of said Chilli – and therefore needed a special round in the limelight. So here’s my version of a GW2 inspired – second – nod towards mexican cuisine, kind of-tacos and almost-guacamole!

The Avocado & Apple Salsa
1 ripe Hass Avocado, diced into ½ – 1cm cubes
½ Braeburn or Fuji Apple, diced into ½ cm cubes
1 Shallot, finely chopped
1 Lime, Juice and Zest
½ Red Bell Pepper, finely cubed
½ Tsp Paprika Powder
½ Tsp Chilli Flakes or Habanero Tabasco
3-4 Sprigs of Coriander, leaves only, roughly chopped
Fleur de Sel and your favorite Steak Pepper Blend to taste
1) Carefully dice the apple and avocado and place them in a small bowl. The easiest way to dice an avocado very conveniently also poses the least messy one:
• Slide the blade of your knife into the avocado, lenghtwise, until you hit the pit.
• Cut it in halves by “turning” the avocado around your blade with the pit at the center.
• Grab the halves after removing the knife and turn them in opposite directions to twist them apart.
• Lightly bash the blade of your knife into the pit and give it a little twise to make it come loose while sticking onto the blade. Tap the hilt of the blade on the rim of your bin to make it fall off. Voila, all dear-kodak slapstick moments involving slippery avocado pits skillfully avoided~
• Gently hold one of the avocado halves in the palm of your hand and slide the tip of a knife through the fruit while it’s still in its skin, first lenghtwise, then across, all the way through, stopping at the skin.
• To get the cubes out of the skin, simply slide a tablespoon in at the wide “bottom” end of the avocado, scraping the inside of the skin – and guide the avocado around the spoon, dropping the cubes into a bowl as they come loose.
• I’m aware those aren’t “cubes” per se, but unless you want to go for a really showy plate – in that case, feel free to go to town with the whole skinning-quartering-dicing-routine – this is the quickest, easiest and most avocado-goop-free way to go about the cubing business.

Try not to squish them too much, this salsa is meant to be on the chunky side of things, a mini-salad if you will.
2) Sprinkle the cubes with the shallot, bell pepper, lime zest, chillies, salt and steak pepper, drizzle the lot with the lime juice and gently fold it into the avocado and apple cubes.
3) Make sure the lime juice is evenly distributed around the avocado cubes to keep them from turning an unsightly brown.
4) Have a taste and adjust the seasoning with more lime juice, salt and pepper.
5) Scatter the coriander leaves and a pinch of salt flakes on top and cover the bowl with clingfilm before placing it in the fridge until serving time.
6) When you’re ready to serve, unwrap the avocado salsa and gently fold in the top layer of coriander and salt.

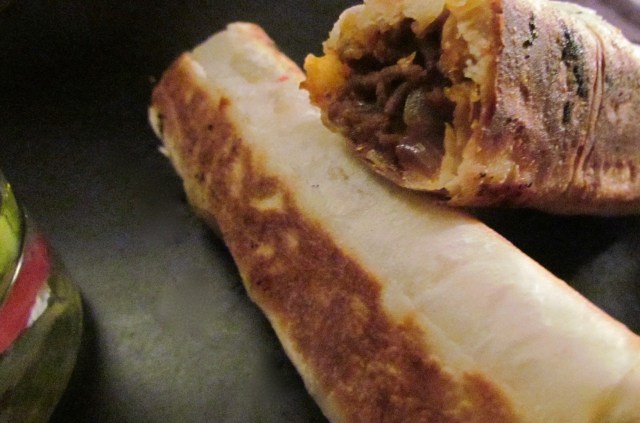
The Chilli Cigars
Well, this is kind of awkward – the amount of ingredients completely depends on what’s left inside your pot, so… let’s start with this:
5-6 Tbsp of leftover Chilli con Carne
2 Sheets of Filo Pastry
½ Tsp of Butter, really soft or melted
1 Tbsp of Sunflower Oil
Ok, so the general rule of thumb is: 2-3 Tbsp of Chilli for one Cigar – each Cigar’s outside consists of a double layer of Filo pastry, kept together by a bit of butter. To adjust this, just have a look-see at the amounts of Chilli you have waiting to be rolled up, and take it from there.
1) Place a sheet of filo pastry on your work surface. Make sure to brush out any wrinkles and bumps.
2) Brush the sheet with the butter and place the second sheet on top, corners and rims neatly aligned – as neatly as it’s possible with filo anyways, the superthin dough and the butter don’t make re-aligning things an easy task.
3) Lightly press onto the top sheet, brushing your palms outwards from the center of the sheet to the rims to remove air bubbles and butter bumps.
4) Slice the sheet in halves horizontally. If this is the first time you’re rolling something into a thin or sticky or otherwise stubborn dough – like filo, rice paper or gyoza rounds just to name a few potential grey hairs – skip this step for the first roll. Use the entire sheet to get a feel for the stuff and, if you’re feeling comfortable enough with it, go with half the filo blanket on the next rolls.
5) Scoop 3 spoonfuls of Chilli onto the lower quarters of the pastry sheets, leaving rims of around 1cm on the sides. Make sure not to pick up too much of the sauce, it would soak through the dough in literally no time. If your Chilli is on the saucy side of things to begin with, stick to the whole-filo-sheet-approach and try to press out some excess sauce while scooping it out of the pot.
6) Use a bit of clingfilm to shape the Chilli heap into an even log of yumness sitting on the bottom of your filo sheet, compressing it as much as possible as you go.
7) Slide your thumbs underneath the filling and carefully but swiftly – the first turn is the hardest, since the thin filo rips easily and the heavy filling does it’s best to eascape – roll it up like a burrito for half a turn. Make sure to push the filling back a little to roll it in as tightly as possible on the next ½ – turn. Before you get rolling again though, fold in the unfilled side-rims and tuck them safely into the roll.
8) Keep on rolling and tucking in the sides until you reach the end of the pastry sheet.
9) Brush the outside of the roll with just a hint of butter to keep it from drying out until you’re through with the rest of the rolls. Place the pan-ready rolls on a plate or tray lined with baking parchment and cover them with clingfilm until you’re ready. Sadly, this step can’t be done too much „in advance“, the pastry is a rather impatient one, holding the filling in for a maximum of 30 mins in its raw state – the finished rolls stay crispy for about a day though. So in case you have a lot of Chilli to go through, have a minion fry the already prepped rolls as you go along – I strongly recommend not juggling the two of those activities yourself, it might end messy. And painful. Believe me.
10) And on that note, heat up the oil in a pan large enough for 2-3 rolls to comfortably fit in without touching, set on medium heat.
11) Once the first „side“ has crisped up enough to allow you to carefully slide a spatula underneath, nudge it to roll over by ¼ a turn. Congratulations, at this point your rolls should be safe from major breakage unless you go poking forks into them!
12) The pastry crisps up really fast – and therefore burns just as quickly – so, after the initial flip, keep turning them, never letting them out of your sight, until they’re crispy and golden all around.
13) Place the finished rolls on paper towels to remove excess oil and butter and set them aside until your through with all of them.
14) Get the salsa out of the fridge and dig in!
15) Placed on a plate lined with paper towels and covered with another layer of those, kept cold in the fridge, they stay crispy and yummy for a day or two.
Oh and just in case you have leftovers from dealing with leftovers…

A fresh and crispy rye sourdough roll, topped off with the salsa makes for one hell of a power-breakfast
Enjoy~!
♥
