
Dear ArenaNet,
Looking at more than 10 of your recipes involving a combination of 1 head of garlic and 1 leaf of a herb or 1 seed/nut – my personal favorite being the hummus made from 1 head of garlic, 1 chickpea and 1 sesame seed – I get the feeling some of you might either be posessed by or famously obsessed with the humble bulb. Either way, to prevent me from giving myself a whiplash, shaking my head at these bizarre concoctions of yours, I decided to embrace the garlic and dedicate one of my top three crowd-pleasing condiments to you guys. Get ready to have lots of personal space around you in the office for a couple of days.
Xoxo,
Nahdala Darkwind
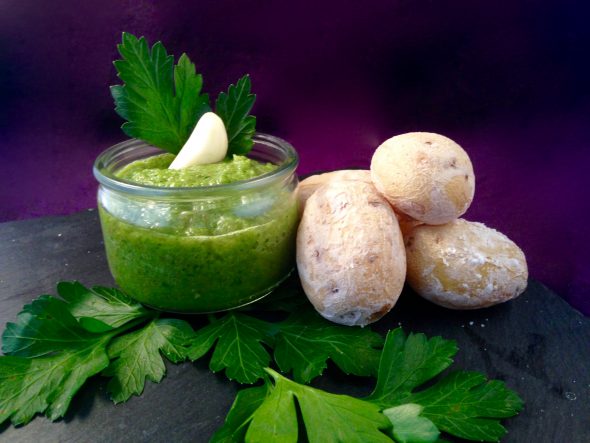
The first time I came in contact with this type of sauce was a… let’s say „interesting“ experience. Not interesting in the „this tastes bad but I don’t want to insult the one who made it“ kind of way, but in an „Aha!“ moment of clarity. Of course, the garlic-force was strong in that one, but, after I had been told it had no chillies or pepper in it, despite the bright red color, I didn’t expect it to be as spicy as it was. Garlic, just like chillies, pepper and cinnamon, amongst other things, has it’s own taste-bud-pricking agent, translating into hot/spicy in our heads. Luckily that fact serves our purposes for this delicious condiment perfectly – it ends up on our table next to grilled or fondu’ed meats, most of the time with a side of papas arrugadas a.k.a. „wrinkly potatoes“ – I’ll get to those in a bit. Mojos are a traditional condiment originating from the Canary Islands, generally made from a head of garlic, some olive oil and 2-3 other ingredients depending on the type of Mojo. I came up with this one when I came across the idea of substituting the oil in salad dressings with orange juice. As always, trying to find a way around particularly oily things, I decided to use that idea on a green Mojo I made a while back. Rather than using orange juice I picked a blood orange instead, to lighten up all that garlic with a hint of acidity – which is also why I dropped in a couple of the green peppercorns in an experimental kind of mood. It worked out famously well and a couple of experiments later, the delicious salsa I ended up with had absolutely nothing to do with the original recipe anymore…. except for the garlic and a pich of salt. So here goes, my personal Mojo-spin-off~!

The Bloodorange Mojo
1 Large head of Garlic, cloves seperated, peeled and roughly chopped
½-1 Tsp Salt
½ Tsp Cumin
1 heaped Tsp salt-brine preserved Green Peppercorns – you can find these in small glasses in every well-sorted supermarket
½ green Bell Pepper, roughly chopped
4 Sprigs of Flatleaf Parsley, only the really woody parts of the stems removed and roughly chopped
2-3 Blood Oranges, Juice only
Opt: ½ Jalapeno, deseeded and roughly chopped – I usually go for it, but if you’re not overly tolerant towards the spicy side of things, taste-test the mojo first before addig chilli heat to the mix.
As these things go, there’s not much to do after the prep work is done.
1) Place all of the „dry“ ingredients in a high rimmed container or a food processor.
2) Blitz them by means of a stick blender or the aforementioned food processor with 1-2 Tbsp of the blood orange juice until everything has turned into a smooth, thick paste.
3) Slowly add the juice in spoonfuls and stir until you reach a, for lack of a better word, „creamy“ smooth sauce. You can vary the amount of juice you add to your liking or the purpose of the mojo.
4) If you’re going for a salsa-type condiment or burger topping, leave it a bit thicker, if you’re using it as a kind of vinaigrette, use more juice… you get the picture. I usually go with the traditional canarian smooth-salsa-kind of consistency which is exactly where 2 averagely sized fresh blood oranges will get you.
5) Here comes the hard part… you need to taste-test it to adjust the seasoning with salt, more of the pepper and cumin. If you’ve prepped the potatoes already or have some neutral white bread at hand, use that as a sort of carrier. Since I usually prep the mojo a day in advance and never have white bread in the house, I can tell you, taste-testing the mojo as is is one seriously unpleasant experience if done first thing in the morning. Luckily I’ve made this so many times by now, I’m able to judge by simply taking a whiff. Much later in the day.
6) Once you’re happy with its consistency and seasoning, cover the bowl with clingfilm or move it into a jam jar or other glass container with a sealable lid and stash it away in your fridge until it’s needed again. I’d like to stress the “glass”-bit at this point. No matter how “aroma proof” your tupper-or-whatever-else-ware is, the garlic will burn itsself into it and you’ll most likely never be able to use that specific container for anything other than garlic’y things again. Take it from someone who learned that the hard way.
7) The flavors develop a bit as it sits in the fridge, my advice would be to prep it the evening or morning before you’re planning on serving it. See above for the consequences of prepping it in the morning.
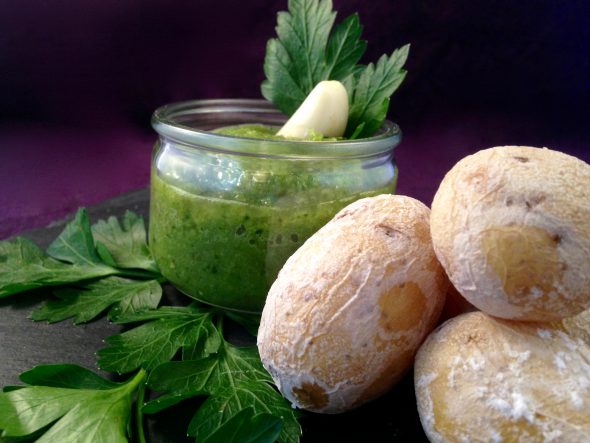
The Potatoes
Just like Mojos, Papas Arrugadas are a traditinal canarian side dish. They may look somewhat bizarre and the cooking instructions made even me take a step back at first, but, at least in my opinion, this is one of the best ways to prepare potatoes, period. Basically, apart from the occasional baked potato, it’s the only way I prep potatoes – if you have leftovers, try turning them into a potato salad… yum~!

For 1 batch you’ll need…
1kg waxy Baby or Fingerling Potatoes
400-500g Sea Salt
1) Make sure to get waxy potatoes, this doesn’t work with floury ones – as opposed to the skins of waxy potatoes the salt can penetrate the skin of a floury potato, which is why you can use slices of floury potatoes to try and save an oversalted liquid.
2) Thoroughly wash the potatoes, since these potatoes are meant to be eaten with their skins on. Make sure you don’t break the skins while removing any and all traces of soil.
3) Place them in a large pot and add enough water to cover them. Remove the potatoes and set the pot on high heat.
4) Add the salt. As the water warms up, stir from time to time to dissolve it. To see if the water is salty enough, drop a potato into it – if it starts bobbing at the surface, you’re golden. If it drops down to the base of the pot, add more salt.
5) Once your test-potato passes the swimming test, add the rest of them and bring the water to a rapid boil.
6) Turn the heat down to medium-low, cover the pot with a kitchen towel and cook the potatoes for around 15-20 mins. Use a sharp knife to see whether they’re done – if the knife goes in and out smoothly, potatoes are normally done – in this particular case they should be just a little bit on the firmer side since you’re not going to rinse them to stop the cooking process. To make sure you hit the spot, take a potato out of the water around the 15 min mark, rinse it to cool it down and have a bite to judge the remaining time they need. Repeat the process around the 20 min mark again, if it’s far off the goal at 15 mins.
7) Which brings me to… once they’re done, do not rinse them with cold water! That would take off the pretty salty crust and defeat the whole „wrinkly“ bit of the potatoes.
8) Drain off the water and place the potatoes in a very large colander or on a cooling rack. The less contact they have with eachother or something that would collect the moisture, like a plate, the better. As the moisture steams off, their skins will wrinkle and only a thin layer of salt will remain on them, which is all the seasoning they need. Interestingly enough the salt doesn’t penetrate the skins through to the inside, while it does have a huge impact on the consistency of the potatoes, turning them almost… „creamy“? I know that’s a weird description for a potato, but you’ll see what I mean once you’ve tried them.
9) If you spot a blob of salt sticking to a potato, lightly tap it onto your work surface to remove it.
10) Once the crusted skins turn white and wrinkly, usually after 15-20 mins, get ready to serve them. They’re absolutely delicious, even when they’re cooled off entirely. To save them from gathering moisture again, let them sit on the rack and cover them with paper towels once they’ve cooled off completely, if you’ve prepped them more than an hour in advance.
11) Serve them with the Mojo, toast a glass of wine to the Canary Islands and dig in!
Just on a side note… a glass of milk takes the sharpest edge off of the lingering garlic experience…
Enjoy~!
♥
