
 Time to satisfy the sweet tooth for this month! When it comes to summery desserts, the first thing coming to mind is, of course, ice cream in all shapes and sizes. In that area, fruity sorbets are, with very few exceptions, my favorite type of icy delights. I started making these regularly pretty much right after I had my own kitchen to turn upside down. Back then, I wasn’t aware of things like ice cream makers being available for normal home-kitchens, so I delved straight into the colorful world of sorbets with its seemingly endless variety of possible combinations of flavors. As an added bonus to the delicious deal, most of them are really non-fussy to make, even without an ice cream maker.
I came up wih this one when I was making a batch of Rasberry & Lime Chocolate Truffles during the few warm’ish days early this summer. Standing at the stove, stirring hot chocolate in a waterbath made me really wish for a nice bowl of something fruity, cold, refreshing and definitely non-chocolate-related… Hm! Rasberries and limes? How’s that for fruity and refreshing? As soon as the chocolates were safely set aside to cool off and set, I foraged around in my storage cupboard and, to my great surprise, unearthed everything I needed to turn the general idea of the truffles into a more summer-appropriate sorbet. Thanks to that impromptu experiment, I now have a new staple in my freezer, worthy, at least in my humble opinion, of being shared with you guys.
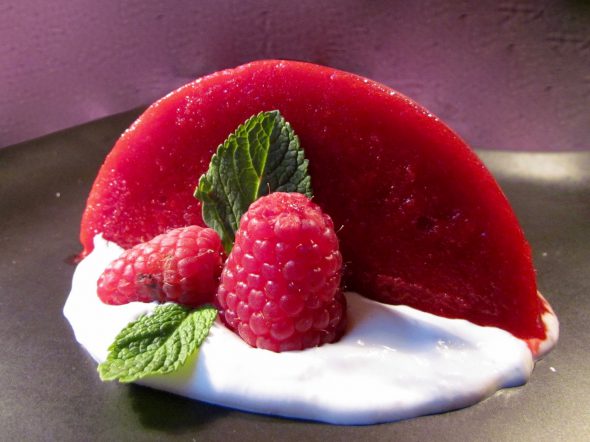
The Raspeberry-Coconut-Lime Sorbet
For a batch of 800ml-1l you’ll need:
675g Frozesn Raspberries
2 Limes, Juice of both and Zest of one
300ml Coconut Water – make sure you don’t pick up coconut milk instead
200g Fine Sugar
3 Tbsp Corn Syrup or Liquid Glucose
Coconut Flakes
Mint Leaves
1) Place the raspberries in a large mixing bowl and leave them to thaw at room temperature.
2) Once they are soft, add the lime juice and zest and use a stick blender to whizz them into a smooth and silky purée.
3) Cover the bowl with clingfilm and store it in the fridge while you’re making the syrup.
4) Add the sugar and the coconut water to a small pot set on low heat.
5) Stir the mixture from time to time until the sugar has dissolved completely.
6) Turn up the heat to medium and bring the liquid to a gentle simmer.
7) Let the syrup bubble away for 5 mins, then take the pot off the stove.
8) Stir in the liquid glucose, making sure it dissolves rather than stick to the bottom of the pot, and set the syrup aside to cool off.
9) Once the syup has cooled down to slightly over room temperature, retrieve the bowl holding your raspberry purée and stir the syrup into the purée until the mixture is well combined.
10) To remove any remaining seeds and bits of skins, strain the purée through a fine sieve into another bowl.
11) Now you have 2 ½ options to proceed:
Option 1: If you have an ice cream maker, pour the strained proto-sorbet into the container, sit back and let the magical gizmo do its job.
Option 2: If you don’t have one, like me, pour the mixture into a large, shallow container or loaf tin lined with a double layer of clingfilm or use one of those nifty non-stick plastic freezing containers, which is what I always do – the clingfilm does make the following steps a bit harder and the sorbet is easy to get out of these after the corner you’ll need to cut out to lever the following pieces out of the box has magically disappeared. Pop the container into the freezer for 30 mins, then use a whisk to thoroughly stir through the sorbet – take care not to tear apart the clingfilm though – if that happens, replace it before you go through the whisking-routine for the last time, otherwise you’d be having a hard time getting the sorbet out of the container again when you’re about to serve. Return the container to the freezer and repeat this process 7 times over – 4 hours of freezer time, 1 stir-through every 30 mins. By doing this, you’ll prevent larger chunks of ice crystals building up by breaking them down before they huddle together and turn into rock-solid fruity ice cubes. Basically, you’ll be doing the same thing an ice cream maker does, stirring the slowly freezing liquid regularly to keep it smooth. Leave it to freeze for 2 hours after the last whisk-treatment. For an extra-smooth outcome, stir through the mix every 20 mins – I personally don’t think it’s worth the effort though.
Option 2 ½: It’s not really another prep-option, just a convenient alternative to the big tin… If you have a set of mini springforms, carefully wrap the bottoms in two or three layers clingfilm before locking them into place to avoid major seepage. Fill the mixture into the springforms, creating convenient individual portions from the get-go. Use a fork to stir through in this case since a whisk wouldn’t reach into the corners. Thanks to the springform’s locking mechanism you’ll be able to pop the sorbets out really quickly and serve them right away.
Ramekins and other small containers only work well if you’re prepping the sorbets far in advance, since, when you’re taking the sorbets out of their forms, they thaw really quickly while you’re handling them. Once you’ve taken them out of their containers, wrap the indicidual portions in clingfilm to refreeze them, if you’re going down that road.
The Lemongrass Cream
100ml Light cream
1 Stalk of frozen Lemongrass
1) Make sure the cream is thoroughly chilled, otherwise it might refuse to stiffen up.
2) Finely grate the white parts of the frozen lemongrass into a fluffy heap of lemongrass snow. I always keep a couple of lemongrass stalks in my freezer since the lady at the asian food store only sells them in bulk – for next to nothing. They, unlike chillies, ginger and leafy things you usually get too much of for one go, aren’t affected by the freezing process in a noticable way and they’re extremely easy to handle when they’re frozen.
3) Place the cream in a mixing bowl and add the lemongrass dust.
4) Whip the two of them into a soft and creamy foam. Of course you can whip it up the way you like it, I personally like how the cream, whipped up just enough to keep it’s shape, freezes around the sorbet on the plate.
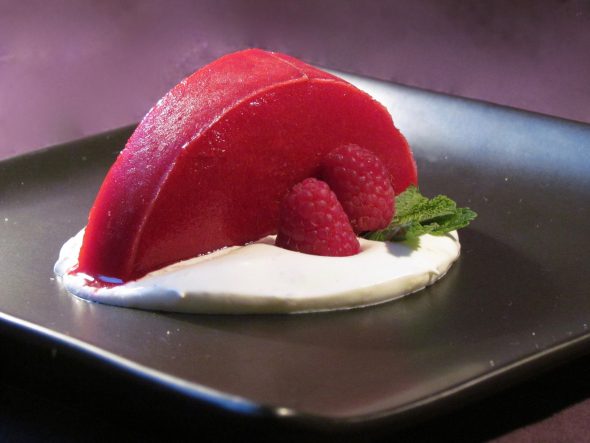
Assembling The Dish
1) Slice the sorbet into individual servings. If you’re having a hard time with this, heat up the blade of your knife under running hot water. If the container you’ve frozen it in refuses to release the prize, fill your sink with warm water and dip the container into it for a few seconds, making sure none of the water trickles inside – or simply leave it standing outside of the freezer for around 5 mins.
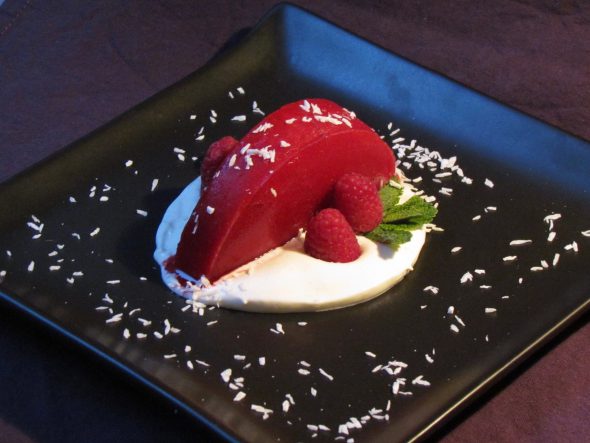
3) Place the slices on your plates and sprinkle them with the toasted coconut flakes.
4) Add some of the cream somewhere near the sorbet in order to make it freeze a little around the edges at contact with the ice. Scooping out balls of ice cream with an ice scoop works wonderfully as well, especially if you’ve left the cream at a state soft enough to run down and around the balls, solidifying as it works its way around the delicious orbs to form a pretty white coating around them.
5) Decorate the plates with mint leaves – those are not just decorative, they also add a wonderful zing to the sorbet. I discovered candied mint leaves in a candy store a while back but haven’t had the chance to return there and pick up a baggie yet – if you see something like that, pounce on it and let me know if it’s as good as I imagine it to be, especially to dot the i’s in a dish like this one~
Enjoy~
♥
