
 Today’s midweek special is one of our all-time favorites when it comes to salads. Easy to make, low on carbs and fat, crispy, spicy and refreshing, this one fits into any season, ready to satisfy our inner vampires on a moments notice. The preparation method might seem familiar to you guys in case you’ve encountered my Summer Chilli Con Carne before – well, this one is the root of all deliciously crispy evil, the „Original“, if you will.
I tweaked several of my minced beef recipes in this direction after discovering how much of an impact such a seeminly small change in the preparation method has on a dish and how easy it is to actually get a crispy texture on beef without the need for an oven or a piping hot pile of coals. So, here we go, one yumtastic round of salads, coming right up!
The Dressing
The dressing for this one acts more like a sauce for the mince – you’ll be sort-of-deglazing the pan with it after you’re through with the meat, so it’s best to prep this first. Prepping it in advance gives the ingredients some time to further develop their flavors as well, so it’s a win-win on all counts~
1 Stalk of Lemongrass, finely grated – grating lemongrass is much easier if you’re stored the stalks in the freezer
1 Tbsp Palm Sugar
2 Tbsp Oyster Sauce
2 Tbsp Soy Sauce
1 Tsp Fish Sauce
2 Limes, Juice and Zest
freshly cracked Black Pepper to taste
Well, what can I say, this one’s not exactly rocket science… My personal notebook has exactly three words written beneath the ingreadients:
1) Mix.
2) Set aside.
I usually turn a jam jar into a kind of shaker, add all of the ingredients to it, let off some steam shaking it, and pop it into the fridge until I need it again.
For once, tasting the dressing wouldn’t do you much good at this point, you’d probably think something’s gone wrong somewhere, what with it being a real kick in the guts with all the salty condiments in it. It will, however, create a wonderful, refreshing sauce once it’s blended into the meat later on. Which brings me to…
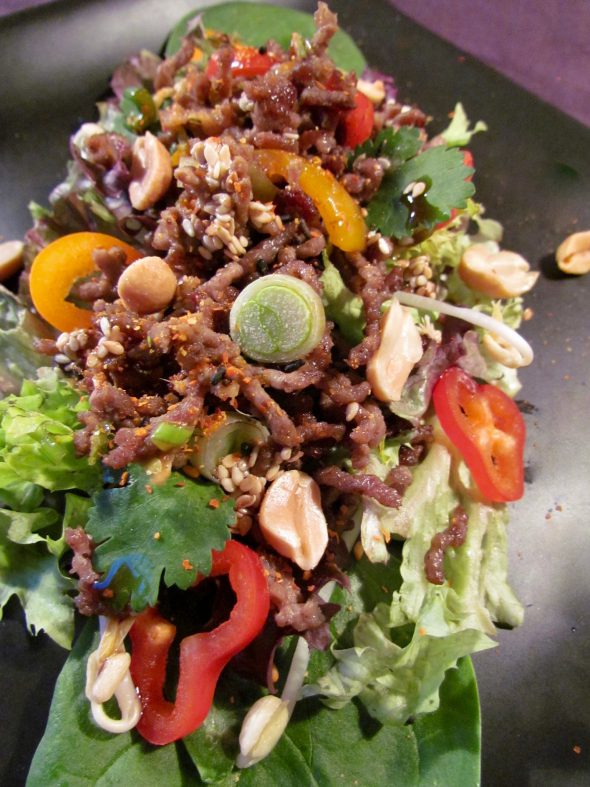
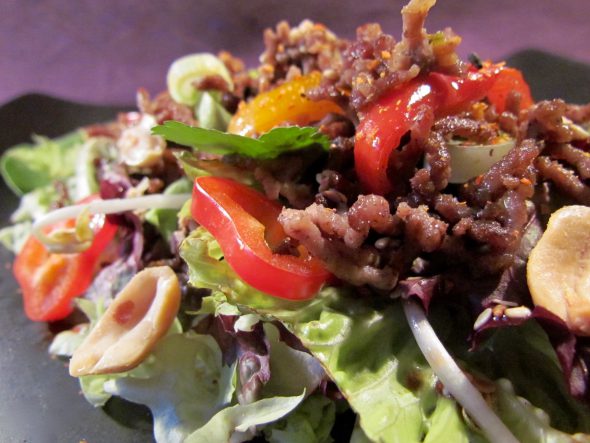
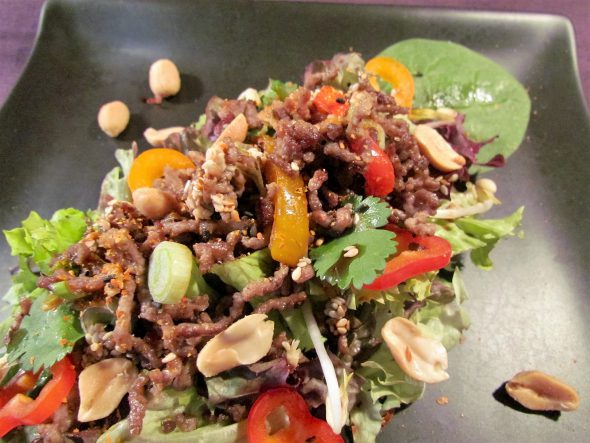
The Salad
400g lean Beef Mince
2 Heads of Baby Gem Lettuce, finely sliced
6-8 large Leaves of Thai Basil, finely sliced
1 red Bell Pepper, diced into ½ cm cubes
1 Bunch of Coriander, leaves picked
3 Spring Onions, sliced into thin ringlets
Opt: 1 Tbsp of Coriander Stems, finely chopped – this one works best if your bunch of coriander has thin stems – the thicker ones tend to be a bit bitter, so have a taste before adding them to the mix, just to be sure.
2 Tsp Sesame Oil
2 Tsp Brown Sugar
2 Cloves of Garlic, very finely chopped
5cm Piece of Ginger, grated
1 Habanero or 2 small Bird’s Eye Chillies, deseeded and finely chopped
3-4 Tbsp of Peanuts, roasted and lightly crushed – as a finishing flourish
1) Remove the mince from the fridge around an hour before you get started. This gives the meat the time it needs to edge closer to room temperature, which is necessary later on to keep the pan from cooling down too much when you add the meat to it. You’ll want the meaty kernels to crisp up and take on a beautyful golden brown color really fast, rather than have it all grey and soggy.
2) Divide it into 3-4 similar sized portions, depending on the size of your pan. This, too, goes towards keeping the temperature of the pan at its maximum, crowding the pan with a lot of meat at once would also lower it down too much for the meat to take on color. Spread out the strands of meat a little bit and give them a generous sprinkling of salt and pepper. Cover the lot with cligfilm and set it aside until your’re ready to fire up the pan.
3) Once that time has come, set a heavy-based, large pan with a fitting lid onto high meat. Pop the lid on and let it sit on the stove for around 5 mins to get it to it’s maximum heat.
4) Pick up the first batch of mince and crumble the strands into the pan.
5) Seperating the individual strands of mince while you’re adding it to the pan speeds up the process of further breaking it down into small kernels once it’s in the pan.
6) Continue to break down the meat into deliciously meaty kernels with a spatula while it’s taking on color in the pan.
7) While the meat is in the pan, tip the pan to one side from time to time and remove any fat and water that comes seeping out of it with a spoon and/or a paper towel.
8) The mince is done when the kernels start to make dry crackling noises and dance around in the pan a bit. Check the color, they should be nicely browned and crispy at this point. You might think the mince is a little too close to „burned“ at this stage, but that’s exactly where it’s supposed to be – not burned, mind you, but just close enough with its crispyness. An extra eye on the pan as the meat is getting closer to that point will help you to avoid crossing the line from crispy to burned.
9) Once that’s done, tip the mince out into a fine sieve, preferably placed over your sink or a bowl to catch the drippings, and set it aside to drip of any remaining moisture while you’re frying off the rest.
10) After your last batch of mince, wipe the pan clean with a paper towel and set it back onto the stove.
11) Set the heat to medium-low and let the pan sit and cool down for a couple of minutes.
Add the sesame oil and give it 1-2 mins to heat up.
12) Add the ginger, garlic and chilli, sprinkle them with the brown sugar, pop the lid on and leave them to caramellize for 3 mins.
13) Depending on the type of chillies you’ve used, taking the lid off of the pan and taking a good whiff of the garlic-infused chilli-mist might be slightly hazardous, so take a step back before opening it and adding the bell pepper cubes, the spring onions and the finely chopped coriander stems. Lucky are those of you with a kitchen hood. Keep some tissues close by, just in case~
14) Pop the lid back on and fry the lot for another 2 mins.
15) Time to move the mince back into the pan. Once it’s in, give everything a good stir until chillies, garlic, ginger and pepper cubes are evenly distributed throughout the mix.
16) Let everything heat through for 2-3 mins, then pour in the dressing and stir the mix until it’s well combined.
17) Take the pan off the heat, scatter the lot with the basil and coriander leaves, give the mix a quick flip to incorporate the herbs and get ready to serve.

The Avocado Topping
The avocados adds yet another texture to the deal, giving the salad more depth, and, just in case you misjudged the force residing within your chillies, provide you with a convenient fire-extinguisher – on top of being an delicious addition to the dish.
1 ripe Hass Avocado, cubed
½ Lime, Juice
1 Tbsp toasted Sesame Seeds
Shichimi-Togarashi
1) Place the avocado cubes in a shallow bowl or plate.
2) Drizzle them with the lime juice to keep them from browning.
3) Sprinkle them with the togarashi pepper blend, or simply use normal black pepper and a small pinch of salt if you can’t get your hands on this japanese speciality.
4) Unless you’re plating up right away, cover the bowl with clingfilm and place it in the fridge until it’s needed.
Assembling The Dish
1) Place the shredded lettuce leaves on 2 plates.
2) Pile up the yumtastic contents of your pan on top of them.
3) Drizzle the portions with the remaining liquids in your pan.
4) Top off the piles with the avocado cubes and scatter the peanuts on each of the servings.
Enjoy~!
♥
