
 Well, well, now that, in theory, summer’s already holding up the door for autumn at the end of august, she suddenly decided to catch up on the last couple of weeks and go out with a bang. Literally. All we can do right now is shadow-hop to the next best ice cream parlor and back again. On one of those trips a couple of days ago, I ordered a specific combination of ice creams in order to taste-test a flavor combination I’ve only seen on the Tyrian Menu up until now, Passionfruit and Raspberry. Totally wow’ed by the burst of deliciously fruity and zingy yum in my bowl, I decided I had to do something with those two lovelies.
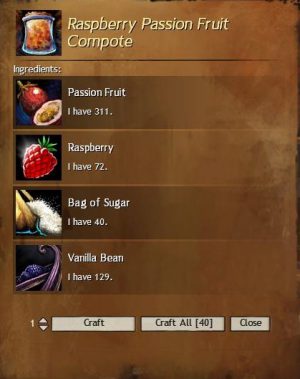
Preferably non-ice-cream-related, since that would be cheating of sorts… Hmmm. While the Tyrian Chef’s Guild recommends blending those two into a compote, the looming heatstroke, expectantly eyeballing me from the general direction of my kitchen, kept me from turning on the stove for the last couple of days, so I twisted the idea a little bit and turned it into a Passionfruit & Raspberry no-bake Cheesecake. So, here goes – easy and quick to make, one summery interpretation of Tyria’s…
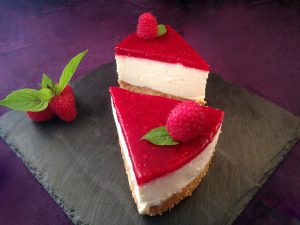
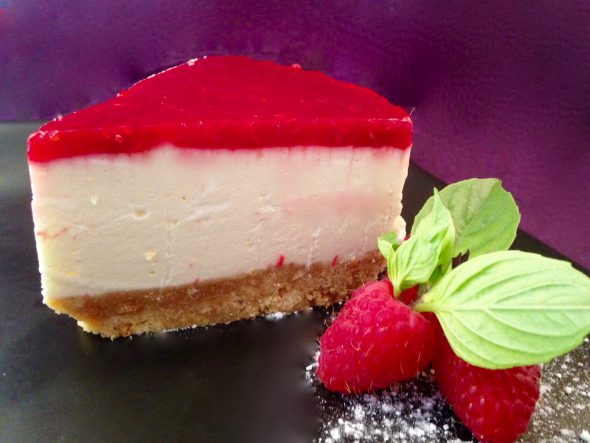
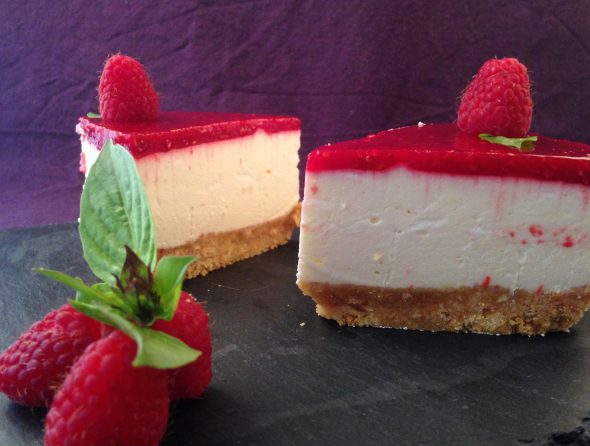
…looks a little something like this on our table this side of the screen:

The Cookie Base
125g Sugar-reduced Butter Cookies
Opt: 1 Tsp unflavored Popping Candy – this is something I picked up from a Heston Blumenthal recipe a couple of years back, and stuck to ever since, at least when there’s a zingy, summery cake filling like this one involved. It might not add to the flavor of the cake, but the looks on the faces of your unsuspecting victims… err guests! are well worth it~
100g unsalted Butter, melted
1) Work the cookies into a fine cookie-dust with the help of a pestle & mortar, food processor or zip-lock-baggie & rolling pin combo. I usually go with the pestle & mortar in this case, the butter cookies don’t put up much of a fight.
2) Place the cookie dust in a mixing bowl large enough to hold them in while you’re stirring in the butter.
3) Melt the butter in a small pot set on low heat. Leave it to cool down for a couple of mins after it has liquefied.
4) Pour the butter into the cookie dust and stir the lot until they’re well combined into a consistency resembling wet sand.
5) If you’re going with the pop-rock-surprise in the base, carefully fold them in just before turning the crumbles into a cake base during the next phase.
6) Line a small, 18cm DIA springform with baking parchment. If you, like me, prefer to use a cake ring for things like this, lock it at 18cm DIA and set it onto a lined tray or plate. I really prefer the cake ring for this since it’s easier to get the cake out of it unharmed, and in one piece. Plus, if you’ve conveniently used the plate you’re using to serve the cake on, one little tug to remove the baking parchment saves you the time and nerves you’d need to carefully lift the whole thing out of the springform and onto the plate without the base crumbling up and away.
7) Whichever cake’y tool you’re using, tip the cookie crumbles into it. Use the back of a spoon or your pestle to press the crumbs into a firm and even layer on the base of your form. Make sure to flatten and compress the outer edges as well, I tend to forget about that when im taptapping my way around the ring with my pestle.
8) Once you’re done with the base, set it into the fridge to set for 30 mins.
The Cream Filling
4 Gelatine Leaves – or the vegetarian equivalent
200g regular Cream Cheese, at room temperature – sadly, due to the Passion Fruit Syrup you’ll be creating, light cream cheese doesn’t work here, it would turn way too soft to set properly
50g Light Cream Cheese – to soothe the bad conscience at least a little bit…
50g Fine Caster Sugar
125g Light Cream, whipped to soft peaks
½ Lemon, Juice and Zest – keep the other half for the raspberry topping
3 Passionfruits, halved, pulp scraped out and placed in a small pot
1) Place the cream cheese in a large mixing bowl.
2) Add the lemon zest and the sugar and use a handheld electric whisk to beat them into a smooth and creamy mixture.
3) Have a small droplet to check if the sugar has dissolved completely after around 3 mins on medium speed. Continue to whisk for aother 1-2 mins if it’s not entirely incorporated yet.
4) Once that’s done, whip the cream up until soft peaks form and remain standing when you pull out the whisks.
5) Gently fold the cream into the cream cheese mixture. Make sure not to stir too vigorously, you’d destroy the fluffy texture you’ve just created. Take your time and fold them into eachother with a rubber spatula until they’re well combind.
6) Set the bowl aside and set the pot holding your passionfruit pulp onto medium-low heat and add the lemon juice.
7) Place the gelatine leaves in a bowl of cold water while the pulp and juice are warming up.
8) Pick up the gelatine leaves after 3-4 mins and give them a good squeeze to remove as much of the water they’ve soaked up as possible.
9) Add the leaves to the pot and gently stir the lot until the gelatine has dissolved completely.
10) Set the pot aside to cool off to just above room temperature. Since we’re not talking about a whole lot of liquid, this doesn’t take long, just about 3-4 mins.
11) Place or hold a fine sieve over the rim of the bowl holding the cream cheese mixture and strain the passionfruit & gelatine mix into it, catching the seeds and stray bits of gelatine in the sieve.
12) Give the passionfruit seeds inside your sieve a hearty squeeze with a rubber spatula to catch every last drop of the delicious juice.
13) Use the same rubber spatula to gently fold the passionfruit mix into the cheese mix until it’s well incorporated.
14) Once the mixture is evenly combined, smooth and creamy, pour it on to the cookie base in your springform or cake ring. The last time I’ve made one of these, the cream cheese blend was a bit on the thicker side of creamy – if that’s the case with your mixture, add the filling in batches, spread them out on the base with an extra eye on the rims and lightly tap the springform or plate on your work surface to pop and remove any air pockets you might have trapped inside before adding the next layer.
15) As with the cookie base, have an extra eye on he rim of the cake while you’re spreading the filling, if it’s not tightly packed around the edges, it might not set properly and fall apart when you’re trying to cut it later.
16) After adding the filling and popping the bubbles, in one or several rounds, use the back of a spoon to even out the surface of the cake.
17) Wrap the tip of your spatula or your index finger in a piece of paper towel and wipe the edges of the springform clean of any stray drops and splotches of the filling.
18) Place the cake in the fridge for 3-4 hours to set.
The Raspberry Topping
150g fresh or frozen Raspberries – I use frozen ones for things like this most of the time, the fresh ones never survive my presence long enough to make it into the pot…
1 Gelatine Leaf
1 Tbsp Caster Sugar
1 Pinch of Salt
½ Lemon, Juice only
1) Place the raspberries in a small pot set on medium-low heat and sprinkle them with the salt and sugar.
2) Add the gelatine leaf to a bowl of cold water in the meantime.
3) Once the raspberries start breaking down in the heat, give them a good stir until the sugar has dissolved completely.
4) Stir in the lemon juice and have a taste to judge whether the berries need some more sugar or lemon juice.
5) Once you’re happy with the flavors, use a stick blender to work the berries into a smooth purée. If you’d like to remove the remaining unshredded seeds, strain the purée through a very fine sieve at this point. You might loose some of the flavors though, so make sure to re-adjust the seasoning after wards.
6) Squeeze the excess water out of the gelatine and add it to the berry purée.
7) Set the heat to low and stir the berries until the gelatine has dissolved.
8) Take the pot off the heat and set it aside for about 3-4 mins to cool down a little.
9) Pick up the cake and slowly pour the raspberry topping onto its surface. Tip the cake to the sides and gently shake it to evenly cover the surface with the purée.
10) One last tap onto your work surface to remove air pockets from the berry topping and back into the fridge it goes.
11) Leave it in there for at least another 2 hours to give everything enough time to set properly.
The Tiny Version or: How To Avoid Fights Over The Last Slice
This one was an experiment of sorts – I used my 10cm DIA mini springforms to create individual cakes, just for the jollies. I, somewhat caught off guard, surprised and excited by that idea working out so well however, forgot to add the raspberry purée before popping them out of the forms and taking pics. Well, this’ll give you some idea of what I did either way…
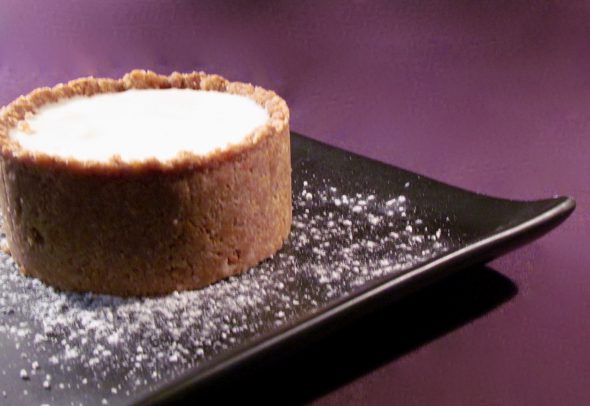
If you want to give this somewhat fiddly version a go, simply use mini springforms and firmly mold and press the cookie “dough” – double the amount of the cookie base ingredients for this version to get 4 mini cakes out of it – first onto the bottom of the form and then all around the rim with the tips of your fingers, tightly closing the seam between the bottom and the sides as you go. Proceed with the filling as usual and… don’t forget the raspberry topping~
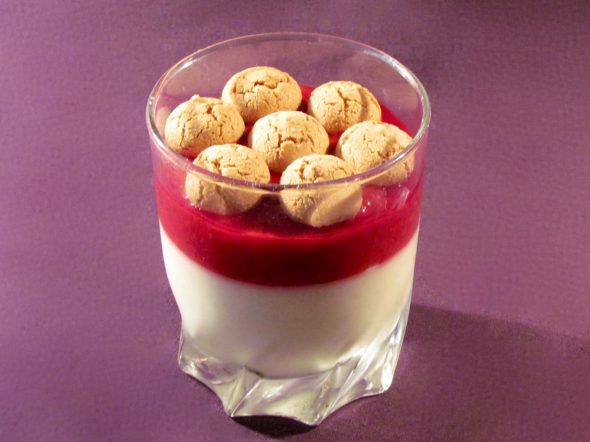
The Calory-Conscious Version or: What To Do With Leftovers
The bad boys in this one, and any other no-bake for that matter, are the cookies, sugar-free or not. So, if you’d like a decookiefied cheesecake dessert, skip the cookies and butter, feel free to use fat-free cream cheese, since stability isn’t an issue in this case, and pour the filling into decorative glasses or pretty dessert bowls instead. Going down that road was one of those things for me, discovered by accident and, in hindsight, such an obvious thing to do… Evidently too obvious for me to have thought of it before I was facing some excess material from making one of these cakes. Well, I’ve learned from that one, and whenever I’m making no-bakes now, I intentionally keep some of the filling back to turn it into a yummy dessert untainted by the raging, calorie counting beast inside my head. Since this one was a spur-of-the-moment creation, I didn’t think of using a pretty glass or bowl, but just to give you the general idea of the non-cake-cheesecake variant…
I hope you guys like my summery take on Tyria’s Passionfruit & Raspberry compote and give this one a try!
Enjoy~!
♥
