
 It’s mushroom season! Stores and markets around town are finally showing off wonderful displays of the huge variety of mushrooms growing in our forests this time of the year. After a couple of sneak-peeks into the matter, a handful of chanterelles as salad toppings here and there, just to name one, I decided to officially kick off mushroom season in my kitchen two or three weeks ago. With that idea in mind I purposefully hoofed to the next best farmers market to pick out some pretties for I-don’t-know-yet-but-there-will-be-mushrooms-in-it – just to pull out blanks as I was facing the somewhat overwhelming display of different options.
Well, not blanks, actually – I had around 20 different recipes breaking out of order, jumping up, down and around the forefront of my mind, screaming „Pick me! Pick me!“ – which, in the end, lead to me having no idea whatsoever as to what to plate up come this dinnertime. Indecision in the face of just too many yummy options and all that jazz… Shoving the hubbub in my head back into a box, I took a deep breath and had a look around the market while trying to remember what the Tyrian Chef’s Guild had to say about mushrooms – because for once, dishes off of the Tyrian Menu hadn’t immediately rushed to the front, begging for attention… which, I figured, probably meant hidden gems in there, gems hiding in plain sight, if you will. When I spotted a butcher’s sign advertising all things beef, it finally clicked – A Mushroom Burger! Exactly what I needed to soothe the headache the pushy and loud recipes had given me before, and, evidently <insert embarassingly loud stomach-growl here>, exactly what I was craving all day without being able to put a name to it! Mince in hand, I hopped over to one of the mushroom displays and, to avoid further brainfreezes and the like, quickly picked up a small basket of brown and white button mushrooms before glancing around for something to keep the burgers company on our plates.
Right next to the mushrooms I spotted a pile of wildly mixed chillies labelled „Pepperoni“. Usually I ignore that kind of basket, simply because the term „pepperoni“ in a context like that normally translates into taste- and spice-free plate decorations with no other redeeming qualities to speak of. This time however, my eyes zeroed in on a shiny red lantern, innocently blinking up at me. „Habanero!“ I thought, yay’ing in my head. Mixed with fresh jalapenos and poblanos, blending into the huge basket of the aforementioned average peppers. Someone was going to have one hell of a rude awakening if they assumed these were just a weirdly grown version of the others in there. I still wonder if one of the people working at that stall had some sort of beef with a couple of customers and put serious chillies in the mix without labeling them properly… Anyways, I know my chillies and, with a couple of habaneros and jalapenos in hand, my GW2 inspired dinner plans came together beautifully.
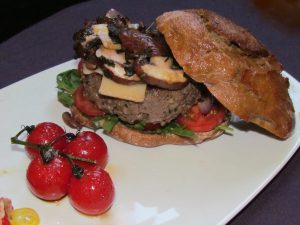
These items off of the Tyrian Menu…


…turned up on our plates like this:
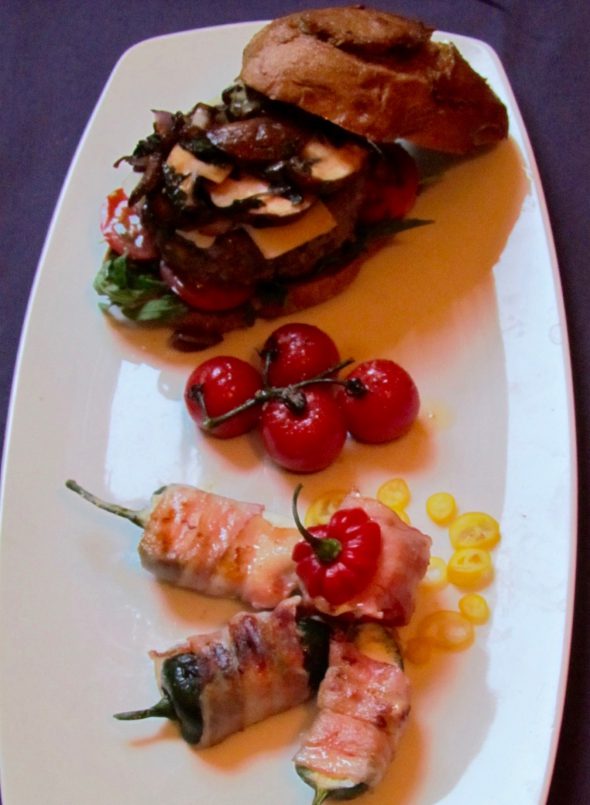
I know some of today’s pics are a bit blurry, but… I was really hungry! Ravenous, shaking hands and all~!
For 2 servings, you’ll be needing…
The Mushrooms
200g Portobello Mushrooms
1 Tbsp Sage Butter
Nutmeg, Salt, Pepper
1) This component is pretty straightforward. Wipe the mushrooms with a pastry brush to remove the odd bits of soil – don’t wash them under running water. Depending on the type of shroom they soak up any liquid like you wouldn’t believe.
2) Cut the mushrooms into 2-3mm thin slices.
3) Fire up a heavy-based griddle on high heat and add the mushrooms in one layer – do it in batches if they don’t fit in all at once. Season them with salt, pepper and a few scrapes of fresh nutmeg and mark them up on both sides.
4) Turn off the heat and add the butter. It will melt in the residual heat of the pan. Flip the mushrooms and use a paper towel to remove excess liquids to keep the shrooms from turning soggy..
5) Take them out of the pan, place them in a bowl, cover it with aluminum foil and set them aside until you’re ready to assemble the burger.

The Burger
2 Rye Sourdough Buns
400g freshly ground Beef
½ Bunch of Rocket Leaves
Opt: 1 large Tomato, thinly sliced
30g Gruyere Cheese, thinly sliced or coarsely grated
2 Tsp Mild, Herbed Dijon Mustard
Salt, Pepper
If you’re new to the concept of homemade burgers, make sure to check out my Burger-101 here, otherwise you might find some of my instructions rather peculiar…
Just like last time, I’ll be picking up the prep at the „after“ stage – after your beef, hand-picked and ground or not, has been minced. If you grind it yourself, make sure to retain the thready structure as it comes out of the grinder.
1) Place a double layer of clingfilm on your work surface and brush out the wrinkles and air bubbles between the sheets.
2) Start tightly stacking up your strands of mince – be careful not to break up the strands too much in the process. Since the goal of this whole exercise is to create a log of beef mince off of which you’ll be cutting the individual burger patties in the end, your stack of meaty threads should end up with roughly the diameter of your buns – as the stack will be compressed in the next step, make sure its a bit longer and wider than your bun at this point.
3) Add a generous pinch of salt and pepper after every layer to make sure the patties are well seasoned throughout.
4) As for the length of the log, aim for a pattie-height of roundabout 2cm – as this is considered to be the „comfort zone“ of a burger, the size where the average person can get a bite off of everything without having to dislocate their jaws. Again, add another cm or 2 during the stacking process, since it will be compressed in a bit.
5) If you’re aiming to get 2 patties out of your „log“, you will end up with thick disk rather than a log, which makes the stacking and compressing bit a bit of a fiddly affair – but it’s well worth it!
6) Once you’re done stacking the meat strands, tightly wrap the stack into the clingfilm and start twisting up the ends of the clingfilm in opposite directions to compress the meat inside.
7) Have one of your buns in easy reach to check and fit the DIA of the log to be slightly wider than the DIA of the bun – since the meat will shrink a little bit in the pan or on the coals, it should end up being a perfect fit for your buns this way.
8) Closing in on the measurements you’re aiming for, lets say 2/3 of the way, prick the clingfilm with the tip of a sharp knife to release the air trapped inside. Carefully give the ends another 2-3 twists to squeeze out as much air as possible, then add another layer of clingfilm to close off the potential escape routes for the meat inside and finish fitting the proto-patties to your burger buns.
9) Once done, place the compressed mince in the fridge and let it chill through for at least 3-4 hours. During that time, salt and pressure will work their magic and bind the strands together into a perfect, melt-in-your-mouth pattie.
10) As burger o’clock is approaching, around 30 min earlier, remove the log/disk from your fridge and use a very sharp knife to cut it into the amount of patties you’re aiming for, while the clingfilm is still tightly wrapped around the meat.
11) Place the disks on a plate lined with baking parchment and carefully remove the clingfilm.
12) Gently pat the cutting edges and surfaces to shape the disks into „real“ burger patties, closing up the occasional air pocket trapped between the strands.
13) While doing this, make sure to keep the grain of the meat in line in order to bite down on it rather than against it – which would turn melt-in-your-mouth to chewy.
14) Lightly press your thumb down into the middle of the pattie to keep it from puffing up in the pan.
15) Set a large pan onto high heat, close the lid and let it sit there to heat up to its maximum temperature for around 5 mins.
16) Add a spash of heat-resistant oil, rapeseed or sunflower oil works perfectly fine, to the pan.
17) Gently set down the patties into the pan with the help of a spatula – watch out for oil splashes as the burgers hit the pan.
18) If you’re going with a larger number of burgers, keep the number of simultaneously sizzling patties to around 2 or 3 in order to keep the temperature of the pan at its max – proceed in batches if you need to.
19) Keep them sizzling for around 45 seconds on the side that first hit the heat, then start flipping them every 20-30 seconds in order to kick-start the caramelization process, „Maillard Reaction“ for the collectors of chef’y terms amongst you guys, and keep it going in order to get a wonderfully crispy coat around your burgers.
20) Assuming you went with the 2cm-rule-of-thumb, the entire process will take around 3 mins for a medium-rare result – once they’ve rested.
21) If you’re aiming for a different core temperature, add around another minute for each stage – 3 ½-4 mins for medium, 4 ½-5 min for well-done. Usually I’d mourn the poor cow that ended up as a well-done burger, but I’ve got to admit, after I snoozed at the wrong point of pan-time, I pulled out a pair of slightly past medium-done burgers and found them to be, while far from my definition of „perfect“ surprisingly …edible thanks to the grain still obligingly falling apart once bitten down on.
22) Once their time on the heat is over, top them off with the cheese, place the burgers on a warm plate and carefully cover them with a sheet of aluminum foil – make sure it doesn’t stick to the cheese on top. Set the plate aside and give the burgers around 4 mins to R&R.
23) Meanwhile, give the pan a quick wipe with a paper towel, slice the buns in halves and pop them, cutting surfaces facing down, into the pan to toast for 1 min.
24) Take the pan off the heat, pick up the bottoms of the buns and place them on your work surface.
25) Brush them with ½ Tbsp of mustard each, arrange the rocket leaves and totally optional tomato slices on top. On that note… can someone explain to me why so many people that normally like tomatoes despise them once they pop up on a burger?
26) Gently place the cheese-topped patties on top, and spoon the mushrooms on top.
27) Brush the lids of the buns with the remaining mustard and close this yumtastic deal!
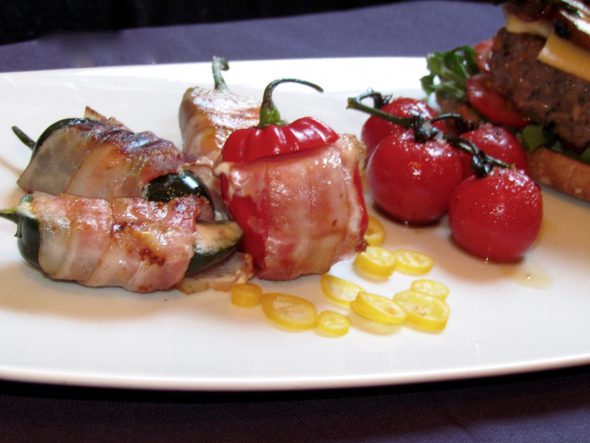
The Poppers
In order to have them done at the same time the burgers are ready to be bitten into, you’ll have to multitask these – have them filled, blanketet and ready to hit the pan at around the same time the meat hits the pan.
8 Jalapenos
4 Habaneros – for the pro’s! Have a glass of milk nearby, just in case…
50g Mild Goat’s Chream Cheese
100g Cream Cheese
12 Strips of thinly sliced Bacon
Well, I know my poppers don’t look as pretty as they could. I simply don’t make them often enough to see much sense in investing money in one of those nifty pepper popper mold pans/trays. Only when I reviewed the pictures I realized I could have used the blowtorch to crisp up the bacon on top rather than risk the mess of oozy cheese in the pan by turning them over. Oh well, hindsight being 20/20 and all that.
1) Blend the cheeses in a small bowl until they’re well combined. I used goat’s cheese for the first time a few years back in a batch I tried to make with fat reduced cream cheese which turned out to be way too runny when heated up. Not only did the goat’s cheese do an excellent job at thickening the mix perfectly, but it added just a tad of acidity to the whole thing to lighten up the bacon. If you don’t like goat’s cheese in general, I’d advise you to give this one a try or simply use more normal cream cheese.
2) Cut the chillies in halves and remove the seeds – or cut off the tops and carefully roll them between your palms to loosen the seeds and remove them through the top.
3) Move the cream cheese mixture into a piping bag and fill the chillies. If you removed the seeds through the top make sure you leave no air bubbles inside or mentally prepare to take a quick step back from your pan at any sign of a wet popping noise coming your way~
4) Wrap half a strip of bacon – if you halved the chillies – or an entire strip – if you left them whole – tightly around the peppers, locking in the cheese as tightly as possible.
5) Fry them on medium-high heat, constantly turning them, until the bacon is perfectly rendered and has crisped up nicely all around.
6) Keep them warm until you’re ready to serve.

The Tomatoes
These, too, should be hitting the pan at the same time as the poppers and the meat in order to be ready at exactly burger o’ clock~
2 Stalks of 5-7 Cherry Tomatoes
1 Tbsp Olive Oil
1 Tbsp of Balsamic Vinegar
1 Pinch of dried Oregano
Salt
1) This is usually done with the help of an oven – a searing hot griddle works as well though. Use the tip on a sharp knife to score the top of the tomatoes near the stalk. This will prevent the tomatoes from bursting.
2) Set them into a preheated, dry griddle set on medium-high heat and wait for 2-3 minutes, before drizzling them with the olive oil.
3) Add the balsamic vinegar a minute later and baste the tomatoes with the “dressing” pooling in the griddle for 2 minutes.
4) Dust them with a pinch of salt and oregano and take the pan off the heat.
5) Keep them warm until you’re ready to serve, baste them again just before serving.
6) Plate up, dig in and…
Enjoy~!
♥
