
 Wooooh! Today, we celebrate, we feast, we drink! A historic event has come to pass! Nahdala’s Kitchen went live exactly one year ago, today~! What a perfect day to share a dish perfectly capable of defining the term “Crowd Pleaser” – a classic Beef Wellington with you guys. And the perfect opportunity to re-define a dish off of the Tyrian Menu accordingly.
Ever since I’ve started eyeballing this particular recipe at my station, feeling that slightly disturbing urge to bark at my screen like a Pavlovian dog…

…I knew I had to pick up the idea for a truly celebratory dish somewhere down the line. As I’ve mentioned before, my mother presents me with the perfect shiny, delicious toys for my birthday every year – last year’s edible toy turned out to be a wonderful beef fillet and full access to her kitchen. The first thing that came to mind, with the image of the Celebratory Steak on the Chef’s Guild’s Menu ghosting around in my headspace, was a bacon-wrapped Châteaubriand in desperate need of being prepared and eaten at our earliest convenience. To everyone’s surprise, the delicious kitchen-showdown had a hard time fitting into our combined schedules though. May turned into June without me being able to pick a recipe for it. June turned into July and weekends got clogged with garden parties, family birthdays and other things of that sort. August came and went, way too hot to think of a large chunk of meat. September and October flew by, and all of a sudden, November neared it’s end as well. Finally, everyone involved found a very convenient weekend to be free for a family dinner-extravaganza – the time to call in on my birthday-fillet-kitchen-shindig happened to arrive just a couple of days after hubby’s and my mother’s birthdays, turning the whole event into a triple birthday of sorts – so, all of a sudden, there was a crowd to be pleased. The more, the merrier, I say! I scrapped the Châteaubriand idea and moved on to hammering out the details on my ideas and tweaks for a leave-the-fillet-in-one-piece, decadent centerpiece, a Beef Wellington.
I admit, this dish kind of scared me a little, what with it being such a huge deal in restaurants and quite the assortment of components that are perfectly capable of ruining your day… but it actually turned out to be a breeze! It takes quite a bit of prep work, I’ll give you that, but other than that, it’s not as hard to pull off as you might think if you’ve never tackled something like this before – no reason not to treat yourself with a round of Wellingtons! Huzzah!
Oh and just in case you’re not sure what “Beef Wellington” translates to on your plate, it’s a beef fillet happily sitting in some form of pâté – classically a mushroom-based one – and puff pastry, baked to crispy, juicy, tender deliciouness. You could go totally overboard with the filling, with Foie Gras and Truffles for example, but the concept remains the same. Puff pastry and something to keep the meat juicy, wrapped around a fillet.
Before I tell you what exactly you need to do for tomorrow’s Wellington, here’s a little Fillet-101, a rough guide of sorts to help you along in case this is your first round with a whole fillet.
101.1) The fillet, a whole tenderloin, is located beneath the sirloins, running along the spine in the general vicinity of the animal’s kidneys. Given their position, these muscles do little work whatsoever, so they are, of course, the most succulent and knee-buckling tender piece of meat out there, THE prime cut – and therefore the most expensive cut you can get your hands on.
At first glance, the price tags on these beauties might seem slightly offensive, but there’s several things to consider. Not only is a fillet the leanest – 3-4% fat – and most tender cut, there’s only two of them to be found in each animal. Two fillets of about 3-5 kg depending on the breed and age of the animal. One of the reasons my hackles start to rise when I see huge stacks of fillets in a butcher’s display and not much else of the cows that gave their lives for said stack…
At a second glance however, a fillet segmented into its different cuts, can turn out to be a true bargain on your wallet as well as your dinner table in most cases anyways – unless you plan on wow’ing 6-8 people at once with it disguised as a Wellington. With enough freezer space, a very sharp knife and a few well placed swipes of that blade you can prepare your tummies for several white-tablecloth quality, prime-cut dinners.
101.2) Lay the fillet out on a cutting board in front of you horizontally, the thick side to the left, the thin end on the right.
101.3) The thick end is called head or butt-tender. If you seperate this portion off right at the point where it narrows down into the more or less cylindrical middle section, you can further break it down by slicing off the larger side piece – which, diced into bite-sized pieces, is the perfect morsel to dip into a Fondue broth or, very thinly sliced, the perfect dot on the I for a soup – simply add it to your bowls before pouring the soup on top, it’ll be perfectly poached once you dig in a minute or so later. Cut into bigger chunks, this piece is also a wonderful option for quick versions of Beef’y stir-frys, Stroganoff and curries – it only needs a few minutes in the pan and a couple more in the sauce. The same applies to the smaller side section, but, thanks to its irregular shape and thickness, you’ll probably have to flatten it out – gently! – before slicing it into shape for it’s quick trip through the pan or broth.
101.4) The somewhat irregular piece of about 2-4cm between the head and the thick centerpiece is your first Tournedo. When you’re buying ready-prepped Châteaubriands, they’re often wrapped in a thin layer of fat or bacon and tied up with butcher’s string – in most of those cases, this part isn’t sliced off as a separate cut but wrapped into shape with the rest. Not that it matters taste-wise, but since we’re working towards getting the most out of your tenderloin, I thought I’d mention it. The same goes for the piece at the other end of the Châteaubriand, although you can segment that one into 2-3 more Tournedos before hitting the true Filet Mignon.
101.5) The next section, the thickest, double-layered part of the fillet is the Châteaubriand. This is usually cut into two dinner-for-two Châteaubriand barrels of about 400-500g each. As I’ve mentioned before, this piece is followed by a segment of 4-8cm that can be cut into 2-3 Tournedos of around 100-150g or wrapped into shape again with the Châteaubriand itself.
101.6) At the end of the Châteaubriand, just before the thin end narrows down into the tip, you’ll find a cone-shaped piece – the Filet Mignon. This is usually cut into several thinner steaks of about 100g each. It’s also the piece you’d be using for a Carpaccio. Earlier, I called it the “true” Filet Mignon. When I asked my trusted butcher for a couple of Filet Mignons a couple of years back, he told me that, most of the time, Fillet Steaks of any part of the whole tenderloin were labeled “Filet Mignon” – or “Tournedo”, for that matter – but anatomically speaking, the part that’s actually not fit to be cut into several, similar sized steaks is the real Filet Mignon. Again, since they’re all parts of the same fillet, names don’t make that much of a difference.
101.7) The tip of the fillet is what you’re looking for when your inner vampire rises, screaming at the top of it’s lungs and demanding something along the lines of a Steak Tartare. Sure, a second-long visit in the pan will provide you with absolutely delicious minute- well, second-steaks, but to me personally this rare gem is best appreciated in a raw kind of context.
101.8) You might have noticed that, the thinner the tenderloin gets, the more raw the classic uses for it get. That’s not, at least not only, due to the meat itself getting thinner and thinner, but also due to the fact that the very tip is pointing towards the head of the cow and therefore, sitting deep inside the animal, it’s doing absolutely nothing in the weight-carrying or movement business – so it’s a melt-in-your-mouth morsel by definition.
There you go – one single piece of meat, divided into 7-9 dinner’s for two… or one yumtastic mushroom, herb crêpe, cured ham and puff pastry wrapped package of pure delight – today’s Beef Wellington.
Alright, enough foodology and cow anatomy, let’s get this celebration on the road~!

The Beef Wellington – Part #0: The day-before Pre-Prep-Work
1 Whole Beef Tenderloin, roughly about 3kg
3 Large Sheets of Clingfilm
1 Piece of Butcher’s String
One of the reasons for the Fillet-101 will present itself to you at this point. In order to pull out an evenly shaped and therefore evenly cooked Wellington out of your oven at the end, you need the set the irregular cone of the fillet into shape first. I think, if you order a Wellington at a restaurant, they only use the Châteaubriand segment of the fillet to sidestep the extra work and to have an easier time portioning them down, but we’re going big today~!
1) To prep the tenderloin for the gig, spread out a double layer of clingfilm on your work surface – make sure it’s long and wide enough to wrap up the fillet.
2) Place your fillet in the lower third of the sheets with the smoother side – the one that’s previously been covered by a thin silver skin – facing up, and neatly tuck the tail end underneath the center portion. How big a portion you’ll have to tuck in depends on the shape of the fillet. The goal you’re aiming for here is an evenly shaped cylinder – as even as you can get the fillet without using unnecessary force and damaging the meat in the process.
3) You don’t need to bother yourself with trussing up the whole thing with butcher’s string, but one little knot will help you a lot tomorrow. Slide a piece of butcher’s or kitchen string underneath the tucked in tail portion. Once you’ve reached the center of that piece, gently tie it to the upper part and snip off the ends of the string.
4) Tightly roll up the fillet in its new clingfilm skin and twirl up the ends, pressing it into a sausage-look-a-like log of an equal diameter throughout.
5) Carefully prick the clingfilm with tip of a sharp knife – avoid cutting into the meat beneath though – to release any air bubbles trapped inside, then wrap the log up in another layer of clingfilm.
6) Tie up the ends of the clingfilm to firmly keep it in place.
7) Gently place the wrapped up fillet in your fridge overnight and… do try to resist getting up in the middle of the night and turn it into Carpaccio~!
The Beef Wellington – Part #1: The Mushroom Duxelles
“Duxelles” is a chef’y term for a herbed mushroom paste, made by basically dehydrating large amounts of fresh mushrooms to intensify their flavors and to make them more manageable in the coating-business. A quick warning ahead: there’s dried mushrooms involved, so you need to take care of those 2-3 hours ahead of time.
800g Wild Mushrooms, roughly chopped – we used a blend of brown button mushrooms, chanterelles and king oysters
5 Dried Morels
5 Dried Porcini Mushrooms
2 Tbsp Extra-Virgin Olive Oil
2 Sprigs of Thyme, leaves picked
2 Shallots, very finely chopped
2-3 generous Scrapes of Nutmeg
1 Tsp Salt
½ Tsp freshly cracked Black Pepper
1) Pop the dried mushrooms into a small bowl and cover them with 250ml warm water. Set the bowl aside for about 2-3 hours, giving the mushrooms enough time to soak while providing you with a delicious mushroom stock.
2) Divide the chopped up mushrooms into 3-4 batches.
3) Hunt down the dried mushrooms in their bowl and squeeze out any excess liquid – make sure to catch this mushroom-tea in the bowl again and safely stash it away for later, sauce-related use. Add them to your piles of chopped fresh mushrooms.
4) Place each batch in your food processor and whizz the mushrooms up into a wet-sand kind of state before tipping them out into a bowl and moving on to the next round.
5) Add the oil to a very large pan – or two smaller ones – and set it onto medium heat.
6) Sautée the shallot cubes until they turn translucent.
7) Add the mushroom sand, sprinkle the lot with the thyme leaves, nutmeg, salt and pepper and give everything a good stir to distribute the seasoning.
8) Evenly spread the mixture across the surface of the pan and leave it to get up to speed with the heat.
9) As soon as the mushrooms start to release the fragrant liquids trapped inside them, stir them from time to time.
10) If you see an amount of mushroom water worthy of a spoon gather in the pan, push the mushrooms to one side with a spatula, tilt the pan and scoop out the liquid – move it into the pot you’ll be using for your sauce later for a mushroomy head-start~!
11) After 5 mins on medium heat, turn the heat up to high and cook them for about 10 mins, stirring occasionally, until all the excess moisture has poofed out, leaving behind a kind-of-creamy, comfortably spreadable paste – a consistency similar to an olive tapende, if that helps. Make sure it’s “dry” enough, meaning: no liquids seeping out of the paste at a gentle nudge.
12) Have a taste and adjust the seasoning with more nutmeg or salt if necessary. Tip the duxelles out of the pan onto a large tray and spread them out again.
13) Place the tray in a cool spot of your kitchen to steam off and cool down for the time being.
The Beef Wellington – Part #2: Mushroomy Herb Crêpes
150g Plain Flour
2 large Eggs
1 Tsp Extra-Fineugar
½ Tsp Fine Sea Salt
4-5 Sprigs/2 heaped Tbsp of fresh Parsley, very finely chopped
1 Tbsp freshly picked Thyme Leaves
150ml 3,5% Milk
50ml of your Mushroom Soaking-Water
1 Tbsp Melted Butter
30-40g Butter for the pan
1) Sift the flour into a large bowl and sprinkle in the salt and sugar.
2) Press a well into the center of the flour and crack in the eggs. Top them off with the herbs and get ready for a bit of a workout.
3) Pick up a whisk and have a go at the eggs. Once they’re well beaten, they’ll start grabbing onto the sourrounding flour.
4) Continue the whisking-exercise while adding the milk, butter and mushroom stock in a slow and steady stream.
5) Keep going until the batter is wonderfully smooth, glossy and entirely lump-free.
6) Cover the bowl with a kitchen cloth and set it aside for about 45 mins.
7) Once the time’s up, set a large pan of about 23cm DIA on medium heat.
8) Brush it with a dab of butter and pour in just enough dough to cover the bottom of it in a very thin layer – tilt the pan to spread the dough out evenly. If the crêpe sets before you’ve covered the entire bottom, turn the heat down before tackling the next one.
9) The crêpe will tell you when it’s time to flip it over – with a slight curl around the edges and a dry topside. This will happen about 45-60 secs into the process – flip it over and give it another 30-45 secs on the second side.
10) The crêpes are done once both sides are a creamy, light golden brown. Rinse and repeat~
11) Stack them up on a warmed plate as you go, seperated by paper towels to keep them from sticking to eachother.
12) As you’re working your way through the dough, have a measuring eye on the fillet and the size of your crêpes – you’ll need them to cover the fillet, sides included, in a thin but even, preferably gap-free, consistent layer. Make sure you make enough or large enough crêpes for the task. If you get the feeling you need more due to the weight or shape of the fillet in question, whip up another batch of batter and leave it to rest while you’re dealing with the first one – at this point, little to no resting time will have to do.
13) Once you’re through with the dough, cover the plate with a sheet of baking parchment and set it aside.

The Beef Wellington – Part #3: The Red Wine & Mushroom Jus
2 Tbsp Olive Oil
4 large Shallots, finely diced
10 Black Peppercorns
1 fresh Bay Leaf
1 fresh Sprig ofThyme
600ml Dry Red Wine – Open a bottle of wine. Pour one glass into the cook, and the rest into the pot~ I used the usual Campo Viejo Tempranillo again. Yum~my!
500ml Beef Stock
150ml Mushroom Soaking Water or Mushroom Stock
Any Mushroom juices from the duxelles
1 Splash of red wine vinegar
You know, up until a few years ago, I used to laugh at the silly instruction to “pour one glass into the cook and the rest into the sauce” a lot of chefs keep giving their readers or viewers, smug grin firmly in place, when they’re about to cook up a sauce. But at some point, having just had a heated discussion about wine-based sauces, I realized that this instruction tells you exactly which wine to use. Unless you’re sitting on a gold mine, you probably wouldn’t “just” have a leisurely glass of a 50€ and up bottle on any afternoon in the kitchen. You also probably wouldn’t drink a glass of some random budget swill, with or without something to strangle the acid with – and even if you could force it down, you’d know that you can’t possibly turn crap into gold by intensifying the taste in a sauce… This “rule” nails down your favorite comfort-zone wine, the one you would merrily pour yourself on a cosy evening after dinner. If you’re not that much of a wine-person, ask someone in the know for a little advice. A good, full-bodied, dry red wine that can hold it’s own against a steak, intense but smooth enough to double as a companion for a long bookworm- or movie night, is what you’re looking for. If something goes wrong or you can’t find a wine fitting that description, you could use Red Port instead and juggle with the seasoning – kind of a different outcome in general, but at least the margin of things that can go sour – literally – while traversing the seemingly endless world of wine, is hugely diminished. Anyways… the sauce!
1) Add the oil to a pot large enough to hold all of the liquids and set it onto medium-high heat.
2) Pop in the shallots along with the peppercorns, bay and thyme leaves and cook the lot for about 5 mins, stirring frequently, until the shallots turn a light golden brown.
3) Deglaze the pot with the vinegar and let it bubble away for a few mins until it’s almost completey evaporated.
4) Stir in the wine and bring it up to a rapid boil and leave it to bubble until it’s reduced down to about 1/3 of its starting volume.
5) Pour in the stock and bring the mixture up to a boil once more.
6) Turn the heat down to medium-low and leave it to merrily simmer away for about 1 hr, until it reaches a syrupy, glossy consistency.
7) Strain the sauce through a fine sieve back into its pot to remove the remains of your herbs.
8) Have a taste and adjust the seasoning if necessary. Keep the sauce warm until it’s time to plate up~!
The Beef Wellington – Part #4: The Tenderloin
The tied-up Tenderloin Log
A very generous Pinch each of Sea Salt and Black Pepper
3 Tbsp Olive Oil
5-6 Tbsp Grainy Dijon Mustard
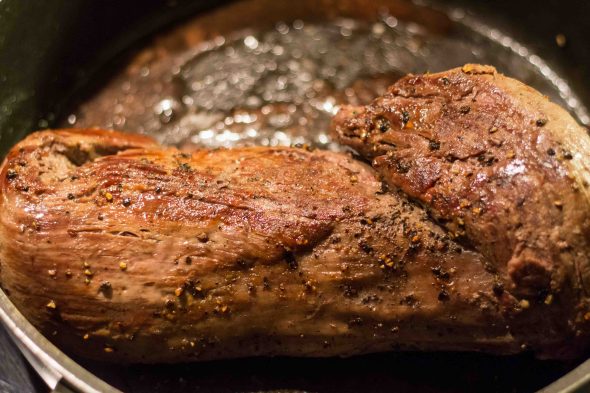
1) Heat the oil in a very large, heavy-based pan set onto high heat – make sure the pan is large enough for the fillet to fit in. Cover the pan with a lid and give the temperatures about 3-4 mins to rise.
2) Take the fillet out of the fridge and release it from its sticky prison.
3) Generously season the log with a healthy dose of salt and pepper all around.
4) Ditch the lid and place the fillet inside. Keep turning it over in the pan every 30-45 secs until you’re looking at a nice and even sear on all sides. It’s all about the sear right now, so don’t keep it in the pan for too long, otherwise the inside will start to cook before it’s supposed to.
5) Take the fillet out of the pan and place it on a cutting board, the seam of the tucked-in piece facing down, to rest and cool down again. Remove the string you’ve tied the tail up with, while you’re at it.
6) Once it’s back down at room temperature, snap on a pair of CSI gloves and give the fillet a gentle mustard-grain rub. Try to cover the entire piece with an even layer of the mustard – a few grains will slip off, but you can tuck them in with the rest later. Set the fillet aside again for a little while longer.

The Beef Wellington – Part #5: Assembling The Big One
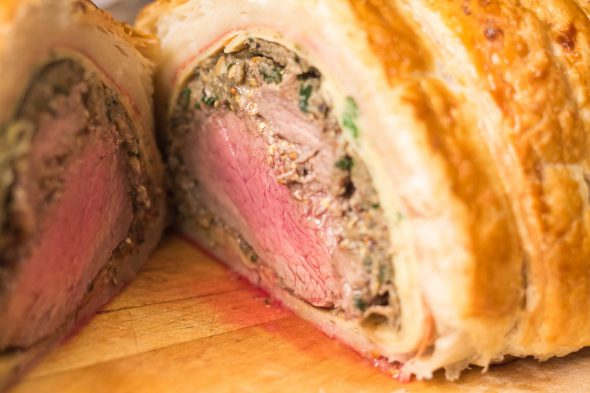
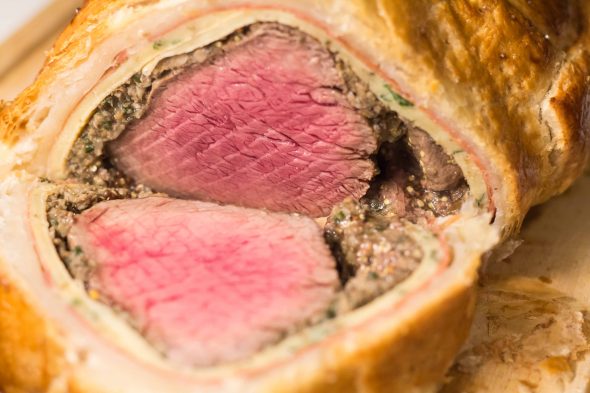
Now for the interesting part… the part with a catch. During the following steps, you’ll be wrapping the fillet in 4 different layers of yum. The “catch” is that I can’t give you exact sizes and measurements for each layer since they all depend on the length and thickness of your fillet. While tackling these steps, keep your goal in mind – a cross section of the finished Wellington will show you neatly closed, tightly sealed circles of the following layers firmly hugging the fillet in the center: Puff Pastry → Parma Ham → Herb Crêpes → Mushroom Duxelles → Grainy Mustard → Beef Fillet.
The seared and mustard-rubbed Tenderloin
12-16 Slices of Parma Ham
The Crêpes
The Mushroom Duxelles
600-700g Frozen Puff Pastry – I’ll get to the why of the weight and it’s frozen state in a bit. For now, make sure it’s a high-quality dough made with real butter rather than some butter-substitue or oil. Or make your own puff pastry~
1) Spread out a layer of clingfilm on your work surface – you’re going to use it to wrap up the fillet in the crêpes, so make sure it’s wide enough to fit the length of the fillet.
2) Arrange the crêpes on the clingfilm, edges overlapping, in a sort of blanket capable of snugly surrounding the whole fillet – 2 rows of 3 or 4 crêpes next to eachother, edges overlapping, should do it, but if you’re not sure, gently set the fillet down on the blanket to check it it’s a fit.
3) You need about 3-4cm of “excess” blanket at the upper and lower rims as well as on the sides in order to end up with a tightly fitting skin once the fillet and the duxelles are trapped within.
4) A few small gaps between the crêpes won’t hurt much – that’s where the ham comes in in a little while. If you find your crêpe blanket to be too small to wrap around the fillet no matter how hard you try, one of the “things that can ruin your day” I’ve mentioned in the beginning, cook up a few more.
5) Pick up the ham slices and gently smooth the first couple of slices out over the seams of the crêpe blanket.
6) Use the rest to close up the gaps between the crêpes and the other ham slices, creating another neat layer on top of the first, a seal, if you will.
7) Cover this layer with a double-layer of clingfilm and, with the help of something flat and heavy like a baking tray, gently press the layers together.
8) Carefully flip the blanket over so the uncovered side of the crêpe layer is facing up again. A second pair of hands or a slip-and-slide with two large baking trays or cutting boards will keep the neat blanket from breaking apart again.
9) Remove the clingfilm covering the crêpe-side facing up now.
10) Once the crêpe layer is prepped, pick up your duxelles and carefully spread them out on the herb crêpes in an even, compact layer, leaving the “overlap”, meant to seal the whole deal, free. A quick fillet-hover will help you to make sure the upper and bottom edges of the duxelle layer will line up nicely once you roll in the fillet, completely covering it.
11) Once that’s accomplished, gently place the fillet, seam facing down again, in the center of the double-layered blanket.
12) Using the clingfilm for leverage, roll up the lot up as tightly as possible without squishing the duxelles out at the sides.
13) Fold the ends of the ham-and-crêpe blanket over the sides of the fillet and use the loose edges of the clingfilm to keep them in place for now by smoothing them over the crêpe-flaps and tucking them in under the newly clad log. Set it aside for a few moments to deal with the last layer, the puff pastry.
14) Move your puff pastry out of the freezer and place it in the fridge about 2hrs before getting started on this step. The rule of thumb for puff pastry is: work it cold, bake it hot, so keep it as cold as possible for as long as possible – entirely frozen through bits of pastry won’t get you anywhere, though.
15) If you’re using a single, large sheet, fresh or frozen, lay it out on a fitting tray lined with baking parchemnt as soon as it’s thawed enough to be manageble without breaking it and place it in the fridge that way. If the tray you’re going to use to bake the Wellington fits into your fridge, use it at this point to shave off one step.
16) Now, I have to admit, I didn’t have much of a hand in the pastry business – this was my mother’s handiwork. You see, one of her signature dishes is a pork tenderloin prepared in a similar way. Different filling, less crêpe, mushroom or ham related chichi, but basically the same idea. Since I haven’t dealt with puff pastry much, I was happy to delegate this task in her capable hands, so I’ll recap what she did at this point.
17) Rather than one large sheet of puff pastry rolled out to fit the size of the fillet, she used postcard-sized sheets pf previously frozen pastry, arranged them in a rectangle perfectly fitting our blanketed fillet, with the edges of the single sheets overlapping eachother by about 1cm. With a few hearty pushes of her fingertips, she neatly welded the edges together, providing us with what we needed – a puff pastry rectangle long enough to wrap around the fillet bundle with about 3-4cm to spare, and wide enough to have an overlapping rim of about 6-7cm to be used to tightly seal in the fillet from the sides.
18) If you’re going with a single sheet, these rough measurements, completely dependant on the size of your waiting proto-Wellington, are what you’ll have to wrestle your pastry into.
19) Whichever path you took, now’s the time to wrap up the whole deal. Carefully remove the clingfilm around your wrapped up fillet-bundle and place it in the center of the puff pastry sheet.
20) With the baking parchment as a convenient lifting-tool, tightly smooth the pastry-edge nearest to you over the log. Make sure not to trap any air pockets inside while rolling the half-clad log over to the other side of the sheet, firmly fitting this last layer to the interior.
21) Use the far side of the baking parchement to gently roll the Wellington back into the center of the tray so the pastry-seam is facing up.
22) Pinch or pleat the seam with your fingers to tightly seal it – artistically inclined individuals may commence going wild on decorative measures at this point.
23) Firmly smooth the edges of the dough hanging off the sides of the Wellington down across the ends of the interior, fold them inwards as if you were wrapping a gift box and trim off the excess pastry after leaving a rim of 1-2cm.
24) Pinch, roll or pleat this rim the same way you’ve treated the seam on top and seal off the sides as well by doing so.
25) And, for one last time, place the tray in the fridge for about 30 mins. Giving it time to set at this point will help the indivisual layers to stay in shape rather than slip around the fillet in places – you could proceed to the oven-bit right away but you shouldn’t keep it in this state for longer than 30 mins to avoid major mushroom-leaks leading to soggy pastry.
The Beef Wellington – Part #6: The Finishing Line
1 Large Egg Yolk
1 Tbsp Milk
1) Preheat your oven to 200°C.
2) Once the temperature’s ready, add the egg yolk and the milk to a small bowl and whisk them until they’re well combined.
3) Lightly score the pastry along the lenth of the log with a very sharp knife.
4) Use a pastry brush to evenly gloss over the entire log, sides and crevices included, with a thin sheen of eggwash.
5) Place the tray on the middle rack of your oven and turn off the fan.
6) Bake the Wellington at 200°C for 15-20 minutes until the pastry is biteably golden-brown and crispy.
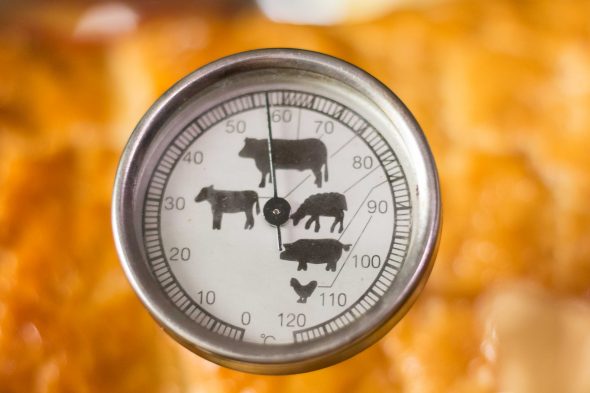
7) The core temperature of your fillet should have reached 55°C by that time. Should the pastry threaten you to burn before the fillet inside reaches that core temperature, cover it with aluminum foil.
8) Remove the tray from the oven once you’ve hit the 55°C mark, tuck it in beneath a sheet of aluminum foil and give it around 10 mins to rest.
9) During that time, the core temperature will rise up to 57-58°C, your mark for a perfectly rosé fillet.
10) Get your crowd to the table, carve up the Wellington into 3-4cm thick slices and serve it with the sauce.
11) While the pastry and the filling are kind of a built-in side-dish already, a fresh and spritzy garden salad makes a good companion for the beef. My dad took care of that and an additional, yumtastic chanterelle gratin, while we were fussing around with the serious meat business at the other end of his kitchen.
And that’s it! One delicious, formerly scary, big-name dish de-mystified, coming out of your oven and giving of mouthwateringly intense wisps of steam~! As you can imagine, my mother and I were standing in the kitchen for a couple of minutes in total silence, staring at the surface the first cut had exposed, grinning like the prime poster-children for the Happy Camper’s Association.
Enjoy~!

I know, this has been a very lenghty post, even by my standarts, but I just had to try to go into every little detail to take the somewhat scary edge off of the whole Wellington-deal~! It’s so worth the work and I truly hope you guys give it a go in the near future!
By the way, I just realized that, by some weird coincidence, my first post after Nahdala’s Kitchen went live a year ago, was a recipe for a baby-version of this one, with a little twist – if you feel like starting with something a little “smaller”, check out my Lamb Wellingtons here~!
♥

Congrats on your first anniversary! The dish is suitable to celebrate it! Mouthwatering :-9
LikeLiked by 1 person
Thank you! 🙂
LikeLiked by 1 person
Pingback: Smoked Salmon & Herb Crêpes with Apples and Beets – Nahdala's Kitchen