
 Ah finally, my annual early-year “excuse” to go full tilt in the chocolate business with a summery set of chocolatey goodies and proceeding to shamelessly stuff unsuspecting peoples faces with the results of my work has arrived! Happy Easter everyone~!
As always, I tried to cram all of the summery chocolate ideas that had made an appearance in my headspace over the winter months into one delicious Box of Chocolates for my friends and family, but a silly bout of the flu had the bad taste of haunting me at an extremely inconvenient time – cutting my planning-and-shopping-prep-time short. Not that I’m skipping things, mind you, I merely had to settle for the easier but no less yumtastic options of the bunch. Here’s my Easter Nest-o-Yum~

~Le Menu~
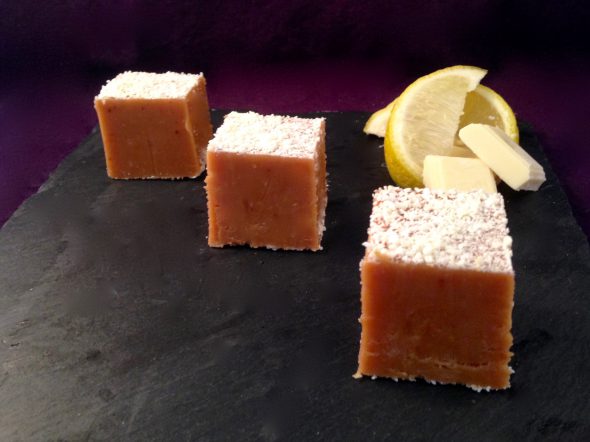
Lemon Fudge Bites
Poppy Seed and Lemon Chocolates
Cassis Truffles
Elderflower and Hibiscus Chocolates
Spicy Cashew & Mango Bites
Since we’re so close to the gig already, I’ve picked one of my crowds favorites for you guys today – it’s a real quick-fix-yummy to make without much of a fuss, especially if you’re in the process of preparing a family feast already! So, here goes~!

The Lemon Fudge
400ml Sweetened Condensed Milk
225g Fine Caster Sugar
40ml Liquid Glucose
60ml runny Honey
125g Butter
20ml Lemon Extract
1 Heaped Tbsp of Candied Lemon Zest, plus some extra for dusting – you can find these in the baking section of pretty much every supermarket. Do yourself a favor though, don’t take a whiff of the freshly opened package, they smell terrible! I went through 3 or 4 different brands before I gave up trying to find a difference. All of them gave off that lemon-scented cleaning-detergent odor inside their baggie, but a couple of minutes in contact with fresh air, and most importantly at contact with the hot fudge, they ditch the bitter and sour candied zest stench and develop their wonderful lemony aroma. Maybe this is just me and my horrid memories of the blobs of candied lemon stuff people insist on ruining their fruitcakes with…
180g White Chocolate, roughly chopped
20g White Chocolate, finely grated
Fleur de Sel
1) Set a heavy-based pot onto medium-heat and add the sugar, liquid glucose, honey and condensed milk.
2) While the lot is making it’s way up to a gentle simmer, keep stirring the mixture with a wooden spoon to help the sugar to dissolve and blend into the sticky mixture without burning.
3) As soon as you don’t get the grainy feel of undissolved sugar through your spoon anymore, add the the butter in teaspoonfuls and keep stirring until the most recent addition has completely dissolved before adding the next.
4) Once all of the butter has been incorporated into the mix, give it a couple of minutes to get back up to temperature and bubbles start rising again.
5) Leave the mixture to simmer for around 6-8 mins until the gentle blipping noise of the rising bubbles bursting on the surface turns into a more forceful, wet pop.
6) At that point, pick up a whisk and get back to constantly stirring the fudge again and keep at it until it starts changing its color from an off-white, cream’ish hue to a light golden caramel.
7) Once that’s the case, keep stirring until your whisk starts pulling the proto-fudge away from the sides of your pot, leaving behind streaks and lines on the surface that will stay visible for a couple of blinks before sinking back into the mix.
8) To see if the consistency’s right, in case you’re not certain about the other indicators, dip the backside of a spoon into the mixture, give it a couple of seconds to cool off and drag the tip of your finger through the dot – if the streak left behind holds it shape, you’ve hit the mark, if the fudge flows back to close the gap, keep at it a little longer.
9) Stir in the extract and the lemon zest once the hot fudge has reached the right consistency and keep at it until they’re well incorporated into the mix.
10) Now start adding the bits of chocolate in batches, stirring until each load has dissolved and blended in.
11) The consistency will change again at this point, thickening up and making your efforts to blend everything into a smooth and even goo a bit harder.
12) Once you’re done with the last batch of chocolate, pick up a spoonful and let the fudge slide back into the pot. If it comes off your spoon in sheets, crinkling up before it melts back into the lot, you’re golden.
13) Line a brownie tin or an equally wide and shallow, heat-proof container with a sheet of baking parchment and set it onto a flat, stable and equally heatproof surface.
14) Pour in the hot fudge, give the tin a hearty thwack – not too hearty, you don’t want to send the piping hot contents of the tin flying across the room – onto your surface to remove air pockets inside the fudge and lightly shake the tin in order to smooth out the surface.
15) Leave it to settle down for around 10 mins.
16) Lightly dust the surface with Fleur de Sel flakes and gently press them into the fudge – just deep enough to make them stick to it – with the help of a balled up paper towel.
17) Place the tray in a cool spot for 3-4 hours to cool off completely.
18) Once it’s at room temperature again, tightly wrap the tin with clingfilm and pop it into the fridge to chill overnight – make sure there’s nothing giving off distinct aromas inside unless you wish to tweak your fudge’s flavoring! Both chocolate and sugar just love to take on surrounding aromas.
19) Release the fudge from it’s prison the next day and cut it into bite-sized pieces with a heavy knife.
20) Lightly blend the finely grated chocolate and the additional zest in a small bowl and dust the bites with the mix before setting them into an airtight container lined with a sheet of baking parchment.
21) If you keep them in the fridge, sealed up tight with the exception of the time you need to nab a few bites, they’ll keep for 2 weeks.
Enjoy~!
Oh, by the way… I’ve just recently been able to shed some light on one major headscratcher that had been bugging me since I was old enough to doubt the whole Easter-Bunny story. Sure, the Egg-thing I got, even as a small kid, what with the whole Mother Nature coming to life in spring – or the rebirth of Christ for Christians. What I didn’t get was the connection between a bunny and the painted eggs… Anyways, while digging through a couple of medieval kitchen notes and recipes a while back, I came across an ancient custom, by far pre-dating the religious twist to the whole Easter shindig. Back then, any sort of loan, physical help or other favors given during the harvest and winter months were customarily called in and repayed as soon as Spring had truly arrived and taken root sometime after the Spring Equinox. That way, the ones in debt were able to satisfy their creditors with the first bounty the herds and fields held around this time of the year. Lambs, rabbits, greens, chickens or their monetary value and… well, eggs. The eggs were customarily marked or painted with the “signature” of the debtor to avoid any confusion as to who was paying his debts with the package. A little bit of color and a pinch of how-customs-and-traditions-develop-over-the-ages, and there you have it~
