
 All right, so the “real” winter has nosed its way in – the one without the sparkly decorations, festive mood-inducing drinks, foods, gatherings and all that jazz. Not that I’m particularly downed by the holidays being over, but I have to say, the great outdoors in all its grey-on-grey splendor is looking a lot more gloomy than it did just a couple of weeks ago. Oh well… as I’ve mentioned before, there’s one surefire way – at least for me – not to succumb to the general greyness of days like these:
I cook up something bright and sunny to keep the gloom outside! Now, today’s winter-blues repellant is a real two-pronged attack in that area, bringing bright colors as well as summery aromas and spices to the table~ Here’s how to light this little midwinter-sun on your dinner table for two:

The Apricot-Barberry & Rosemary Chutney
This one’s quite delicious on its own or with a slice of cheese, so feel free to make a double-batch and store half of it in a sterilized jar. Prepping it 1-2 days in advance is also an option, just keep in mind that you’ll need it to be warm once the chicken comes out of the pan. Speaking of the chicken and freshly made chutney – make sure to have your mind set on the side dish and the time you’re planning to allow the chicken to soak up the saffron-honey marinade. That way, with the goal of having everything ready at the same time, you can safely set the chicken-pan onto the stove at the almost-ready stage of the chutney.
100g Dried Apricots, thinly sliced
300g Fresh Apricots, pitted and diced into ½ – 1cm cubes
50g Barberries
2 Cloves of Garlic, very finely chopped
1 Tbsp Ginger, finely grated
1 Tbsp Olive Oil
2 Shallots, finely chopped
1 Tsp Coriander Seeds
150-180ml Water – depending on the juicyness of your apricots
80ml Cider Vinegar
60g Light Muscovado
½ Fresh Habanero, deseeded and very finely chopped
3-4 Sprigs of Rosemary, needles picked and finely chopped
½ Lemon, Juice
½ Tsp Cinnamon
1 Tsp Salt
1) Set a large pot onto medium heat and drizzle in the oil.
2) Add the shallot, coriander seeds and garlic cubes and sauté them until they start to soften.
3) Once that’s the case, add the rosemary, ginger and chilli, give the lot a quick stir – from a safe distance that is, those habanero bits do bite – then sprinkle the lot with the muscovado sugar and close the lid for 2-3 mins, allowing the sugar to get the melting process on the road.
4) Pour in the lemon juice and stir up anything attempting to stick to the bottom of your pot with a wooden spoon.
5) Pop in the fresh apricots, sprinkle them with the salt and close the lid again – once they hit the heat, they’ll start “sweating” out some of their juices which will turn the brown sugar into a thick syrup in just a matter of minutes.
6) After about 3 mins, pick up a wooden spoon and gently fold the apricot bits into the mix.
7) Deglaze the contents of your pot with the vinegar and water, give everything a good un-sticking stir, turn the heat up to medium-high and bring the lot to a boil.
8) As soon as the proto-chutney is merrily bubbling away, add the cinnamon, dried apricots and barberries before reducing the heat to low.
9) Keep stirring the chutney regularly until the bubbles have settled down to a gentle simmer, then keep it at that for 10 mins with the lid on.
10) Take the pot off the heat, take off the lid and allow the dried fruit to soak up most of the liquids remaining in your pot, turning into a thick and sticky chutney in the process.
11) Have a quick yet very careful test-bite of the hot chutney and, if necessary, adjust the seasoning with salt, chilli flakes or lemon juice.
12) If a peek at the “chutney” in your pot reveals an abundance of liquids after those initial 15 mins, set the pot back onto low heat and keep at it with your wooden spoon.
13) As always, the chutney’s done when it passes the spoon test – dip the back of the spoon into it, give it a few blinks to cool down on the metal and drag your finger through the dot. If the sidelines of the finger-streak stay put, you’re golden. If they flow back into the gap you’ve created, the chutney needs some more quality time on the stove.
14) Once the chutney’s done, keep it warm for the time being, dinner’o’clock is right around the corner~!
The Saffron-Lemon Chicken
All right, one thing before we get going with the main event: you should decide upon the side of your choice and get it ready’ish – the chicken doesn’t need a lot of time to be yumtastic and ready to be devoured. You might wonder why I’m leaving that decision up to you in this case… well, it’s simple. I’m having a hard time deciding on that one myself! I’ve been cooking this one up on several occasions and twisted it up with several sides and almost all of them worked out famously well! After quite a number of repeats, I narrowed down the list to a Top 3 to make the choice easier for you guys – These are my favorite sidekicks to this dish, fitted to various occasions and seasons:
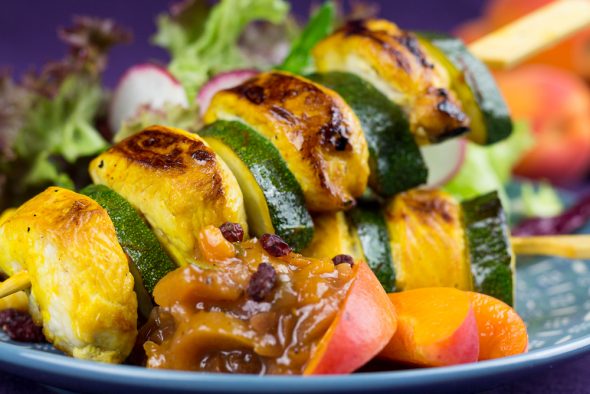
Opt 1: Zucchini Disks for Skewers – great for a summery, outdoorsy or even BBQy scenario.
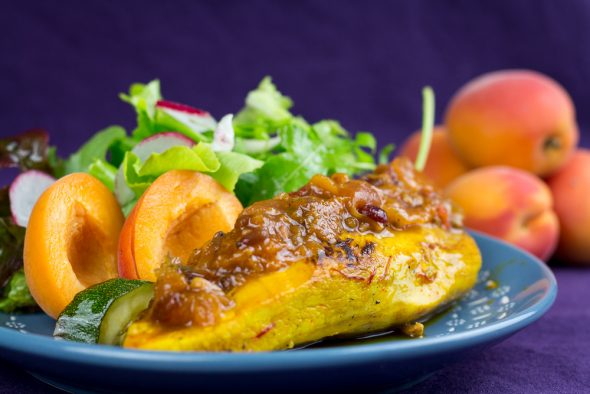
Opt 2: A simple Garden Salad with Lemon Vinaigrette – the all-year-round light, quick and easy crowd-pleaser
Opt 3: Wild & Brown Rice with Pinenuts – the wintery comfort-food option, spiced with a dab of cinnamon, chilli and a bunch of very optional raisins or cranberries mixed in.
If you’re going with the salad or rice options, get them ready to be dressed and plated up before the chicken hits the pan. The zucchini-skewer option, of course, needs to be prepped in advance – I’ll get to that in a bit. Anyways, here we go~
2 Chicken Breasts, ~200g each – Remember to take the chicken out of the fridge about 1hr prior to pan-time~!
1 Lemon, Juice and Zest
1 Pinch of Saffron Threads
1 Tsp of Honey
Coconut Oil
Salt, Cayenne Pepper
1) Pick up a small bowl and place the saffron threads inside.
2) Douse the threads with 1 Tbsp of warm water and allow them to soak for about 5 mins.
3) Add the honey to the by now bright orange water along with the lemon zest and a very generous pinch each of salt and cayenne pepper.
4) Whisk the lot until the honey has dissolved completely.
5) Very carefully treat the chicken breasts with a butterfly-cut and flip them open.
6) Place them between two sheets of clingfilm and gently tap them out into two disks of (mostly) the same thickness throughout – about 1 – 1 ½ cm will do nicely.
7) If you’ve decided to go with the salad or rice side, you’re as good as done.
8) Simply brush the disks with about ½ of the saffron-honey glaze and allow them to marinade for any amount of time between 5 and 15 mins.
9) If you’re considering to prep this a bit longer in advance, seal the chicken in an airtight container after dousing it with all of the marinade and keep the container in the fridge until its time has come.
10) Now, if you’re going with the skewer option, slice your zucchini into disks of roughly the same thickness in order for them to be done at the same time as the chicken.
11) Once you’re done fitting the thickness of the two, it’s time to cut the chicken into smaller pieces of roughly the same size/shape of the zucchini in order to make sure both the chicken and the veg touch the hot grill or pan at the same time.
12) If you’ve got yourselves a bunch of extraordinarily thick zucchinis, you may want to slice the disks into half moons or any other shape that will make eating the skewers possible – without the need to unhinge your jaws – before pulling your knife on the bird.
13) Thread the yummies onto wooden skewers – preferably soaked in water for about an hour to keep them from burning.
14) Once that’s done, proceed as above with the marinading bit – the same rules for an overnight-stay in the fridge apply as well.
15) Set a large, heavy-based pan onto medium heat and add the coconut oil once the pan has reached its maximum temperature.
16) Fry the disks or skewers for 3 mins on the first side before turning them over for a 2 min ride on the second.
17) While the pan is doing its job, whisk the lemon juice into the remaining glaze and add another pinch of salt while you’re at it.
18) Generously brush the freshly fried chicken with the updated marinade, place them on a warmed plate and cover them up with a sheet of aluminum foil for a 5 min R&R period before slicing them up into bite-sized bits or simply into halves.
19) To finish the dish, simply cover the chicken in as much of the warm chutney as you like…or have, nestle the piles on plates beside the sidekick of your choice and…
Enjoy~!
♥

Nice recipe
LikeLiked by 1 person
Thanks! I’m glad you like it~
LikeLiked by 1 person
I think I’ll just move in with you guys. Do you take lodgers? 🙂
LikeLiked by 1 person
Hehe sure~! Our couch is the most comfy place in the world to crash after a yumtastic dinner 😀
LikeLiked by 1 person
Booking tickets…. 🙂
LikeLike