
 Romantics, lovers, chocoholics, rejoice! Valentine’s Day is nigh~! While basically everyone I know is firmly rooted on the rather jaded “It’s just a holiday for the greeting card / flower / chocolate industry” side of the matter, exactly the same people also spend the exact same holiday trying to hide the fact that they’re doing something of the exact same shape, size and color the “hopeless victims of the ad-powered machinery” do for their loved ones.
For a long time, I’ve simply raised an eyebrow at this merry dance from afar and got busy looking forward to our own little version of the holiday – for hubby and me, it’s a convenient excuse rather than a solid reason to have a scrumptuous dinner out at our fav Thai place – and, in a tipping-my-hat-to-the-clichée-kind of preparation for the day, making a hubby-special-chocolate. Uh… handmade chocolates, fitted to the tastebuds of someone special and, possibly, a special occasion? As soon as I actually noticed The Obvious jumping up and down right in front of me wearing nothing but a wicked smile, I realized that, considering my penchant for conjuring up boxes of chocolates regularly, I had the perfect tool to snap my friends out of their uncomfortable love-hate relationship with Valentine’s Day at hand. Because nothing says “I love you” like a Box of Chocolates made by the giver~!
“And how exactly is a kitchen that looks like Willy Wonka had a nervous breakdown in it romantic in any way?!” I’ve been asked… and I have to admit, the question, exasperatingly unromantic as it is, isn’t that bad after all. You see, most of the people I know, sitting at the source so to speak, never go deeper into the chocolate business themselves than asking me to make some for them, which I’m totally fine with. To help them maintain the whole “personal” point of the Valentine’s Chocolate deal, I could also teach them how to make them right then and there or come to the rescue if something goes terribly wrong. Sadly I can’t just zip around the planet and make chocolates for everyone – despite the fact that I would absolutely love to do so – since cheap ways to travel through time and space have yet to be invented as far as I know. So I thought I’d pick a beginner-proof recipe for today, so everyone, no matter how unfamiliar with homemade chocolates in particular or the interior of a kitchen in general they might be, can produce a delicious batch of chocolates for the upcoming Lover’s holiday. Going with ready-to-use empty chocolate shells like the ones in this recipe only requires you to prep the ganache filling and pipe it in – they’re a pretty fail-safe way to ease into the whole business of homemade chocolates. Oh and, always keep this very important and memorable phrase in mind: “Don’t panic~!”

The Cassis Truffles
50-60 Round or Heart-Shaped Chocolate Shells – I use “Medium-Sized” shells, but I suppose not all suppliers measure their sizes the same way, so you might have to adjust a bit. They should come nestled in the mould-sheet they were made in, with the opening facing upwards. Don’t take them out of the tray, simply place the whole plastic tray on a large cutting board for now.
200g mild Dark Chocolate, at least 70% Cocoa Solids, finely grated
100g of the same Dark Chocolate extra to seal the shells
Alt: Lids/Closing Disks for the Shells – I’ll get to those in a few blinks
100g Milk Chocolate, finely grated
6 generous Tsp of Desiccated Blackcurrant/Cassis Powder – like the chocolate shells, you’ll find desiccated fruit powders like this one at Pâtisserie (online) Specialist Stores
150g Heavy Cream
6 Tbsp Creme de Cassis – a High-Quality Blackcurrant syrup works deliciously well as a booze-free alternative~
60g Butter
1 Vanilla Pod, seeds only
Fleur de Sel
Alright, before we get started, a few words on the “Alternative” shell-closing chocolate lids.
Some online Pâtisserie suppliers sell the shells and fitting “lids” for the openings in the bottoms as a set, some sell them extra and some don’t even mention the relation between them. If these are really your first chocolates of this kind, I recommend getting the fitting lids as you order the shells, since there’s one thing that can go wrong, downgrading the difficulty from “absolutely” fail-safe to “pretty” fail-safe:
If you’ve never worked with a chocolate ganache before, you might not notice the signs of it being – and remaining – too runny to be sealed up before it’s too late to initiate counter-measures. While a silky, oozy filling is actually quite delicious if you’ve actually intended for it to turn out that way, it just won’t do if it catches you unaware – unsealed, this ganache will loose its fruity aroma very quickly, go stale and, thanks to the cream, bad within a matter of 2-3 days. With a large batch like this… So, closing disks! Normally you would seal the chocolates by filling up and closing the holes at the bottom of the shells you’ve used earlier to pipe in the filling with a – for lack of a better word – “chocolate cork”. If the ganache didn’t set properly, the liquid chocolate would simply sink in rather than set like a knob of wax in a bottle. If you take a look at these openings, you’ll notice them to have a – in a circular-hole kind of way – t-shape, designed to hold a lid in place and keep it from sinking into a liquid filling. Pop the seal in, cover and seal the edges with a dab of chocolate, problem solved – Solidly-fail-safe status reached~!
Another side-note… Cassis aka Blackcurrant, while being my favorite for this setup, isn’t everyone’s cup of tea. The best swap-outs, in terms of general crowdpleasing points as well as ingredient-availability, would be raspberry and redcurrant.
Now, lets get down to business~
1) Add the cream and butter to a heatproof bowl and get a waterbath going for it – as usual, make sure the bowl doesn’t touch the surface of the water.
2) Set the pot onto medium-low heat and slowly stir the mixture to make sure the butter blends right into the cream as it melts.
3) Once the butter has dissolved, stir in the vanilla seeds and the cassis powder until they’re perfectly incorporated into the creamy mixture.
4) Turn the heat down to low and leave the mixture to infuse for 10 mins. Keep an eye on it though and don’t let the cream work up a boil – the filling wouldn’t set if the cream gets too hot at this point.
5) Stir in the liqueur and turn the heat back up to medium-low.
6) Add the grated chocolate, both milk and dark, in tablespoonfuls and gently stir each addition with a rubber spatula until it’s completely dissolved and incorporated into the flavored cream. Going too fast at this point might end up in the ganache splitting up on you, so a little patience will save you from having to clean up a greasy, sticky and just plain frustrating mess.
7) After the last batch of chocolate has met its fate, take the bowl off the waterbath and slowly stir the mixture for 2-3 mins to help it cool down without setting around the edges of the bowl.
8) Set the bowl aside and allow the ganache to cool down to room temperature.
9) Once that’s done, transfer the ganache into a piping bag.
10) Sprinkle a couple of fleur de sel flakes into each shell.
11) Pipe enough of the mixture into your shells to fill them up by ½.
12) Once all of them are filled halfway, gently tap the tray holding the shells onto a flat and stable surface to pop out any air pockets trapped inside.
13) Fill the shells up to just below the inner rim of the opening and repeat the tapping-action.
14) Give the filling about 2-3 mins to settle down, pop bubbles rising to the top with a toothpick, then check the filling-levels inside the shells once more.
15) Should escaping bubbles have left some openings behind, fill them up and place the tray in your fridge for 3-4 hours.
16) Once the filling has set, melt the remaining 100g of chocolate, allow it cool down to room temperature and drip it into the openings, filling them up to the upper rims, before smoothing over the surface to seal the chocolates.
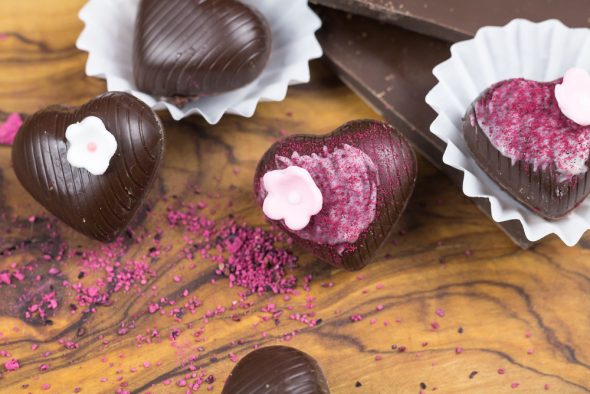
17) Pop them back into the fridge to set overnight. Now you can flip them over to hide the openings and go bonkers decorating the surface of the chocolates with anything from fruit-powder, sugar pearls and chocolate drippings to edible gold leaves. Nestle them into the chocolate version of muffin paper cups once you’re satisfied with the looks of your chocolate gems.
18) Here’s a little hint for the ones lacking the patience to fiddle around for an extended period of time: some suppliers sell already decorated, painted or sugar-gem-dotted shells. The ones I’m familiar with expect you to pay quite some quid for those, though… Another simple wrap-up, so to speak, is: spoon some cocoa powder into a small bowl, dot your palms (CSI Gloves, my friends…) with some liquefied/cooled chocolate and gently roll the chocolates between your palms to sticky them up with the wet chocolate. Drop them into the cocoa bowl and roll them around until the stickiness has been dried and covered by an even coat of cocoa powder~
19) Neatly tuck them into a pretty box and enjoy the fruits of your chocolatey work on a wonderful Valentine’s Day with your special someone~!

♥

These look amazing! Love the combination of Casis and chocolate.
LikeLiked by 1 person
Thank you~! I’m so happy I hit the mark with the cassis combination for your tastebuds 🙂
LikeLiked by 1 person
Looks too yummy 🙂
LikeLiked by 1 person
Thank’s a lot~
LikeLiked by 1 person
How lovely! I could eat the lot all to myself (and probably would).
LikeLiked by 1 person
Hehe~ I’d strongly advise against eating ~60 of them all at once, but this is one of those rare chocolate-occasions where I actually dig in too 🙂 at least until either hubby (also greedy about these) or my conscience (shere self-preservation) step in before things really get out of hand~
LikeLiked by 1 person
Reblogged this on hocuspocus13 and commented:
jinxx❤xoxo
LikeLiked by 1 person
Thanks a lot~
LikeLike
Reblogged this on Hālau ʻAha Hūi Lānakila.
LikeLiked by 1 person
Thank you very much~!
LikeLiked by 1 person