
 Weeeee~! It’s here! Despite the lack of general Christmasness in it’s usual places around town, the gig is undeniably close! Since, for obvious and understandable reasons, the world outside fails at truly being Holly and/or Jolly, both states are something to be grown, nourished and cherished on the inside – all the more reason to get excited about the whole thing, in a way~ And what better seed is there to tick all the boxes in that regard than chocolate?
Since I won’t be going through the usual 3-day chocolatey box-of-chocolates chocolate bash for the season this year, I thought I’d finally face a related and just as sticky task I’ve been putting off for two years for you guys instead… Tackle a stack of notes – written, re-written, re-rewritten during the making with chocolatey fingerprints to prove it, revised, discarded, added to, lost and then summarized in two different languages (two and a half, if you count Culinary French. Three if you count cursing in French and Latin. Four if you count the illegible scrawl that could be… Clingon?) – and try to revert them back to a legible, sane and actually re-creatable recipe within the limitations of space, time and human physique.
First Word of Warning: Don’t Panic. These are actually fairly easy to make once you see the full picture.
Second Word of Warning: While they don’t need a lot of effort, they do need a lot of downtime – time for the individual layers to set before you can add the next one. If you can freely manage your time, I’d recommend setting an hour to 1 ½ hours aside for these in the mornings and evenings of 2 days. One “date” for each layer and one for the finishing touches.
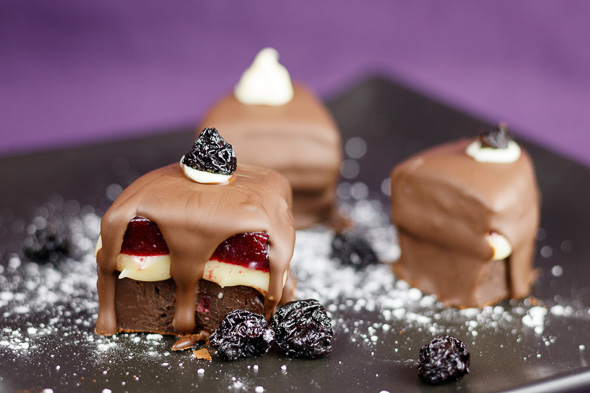
Third Word of Warning: The “mini-gateau” you see in some of the pictures? If you go that way, skipping the chocolate-shell work in the process, make sure everyone around knows not to chow down on it as if it was, in fact, a fluffy cake. Alternatively remind them to put their lead stomach lining on before going to town with a cake fork…
And on that note, let’s begin~! These amounts will net you roundabout 70 deliciously creamy, chocolatey, fruity and simply gateau’y filled chocolate shells.

As you can see, I used fancy tree-shaped shells for these. When I ordered them, I assumed that, since they arrived nestled in two trays rather than the usual 1-layer tray, that they would be bigger than the classic spherical ones in the volume kind of context, but that was only marginally the case – that’s one half of the why behind the “roundabout 70 chocolates”. The other half is the mini-springform option I mentioned. I had planned to slice the 8cm DIA “cakes” each into 8 slices and “seal” them into cake-slice-style bites with a chocolate drizzle/coat. Alas, things don’t always go according to plan – with that kind of diameter, these three layers are just too much/high/heavy for the slices to stay stable and neatly stacked. Quarters work really well but they also break the boundaries for the “traditional” deliciously-decadent-one-bite-treat definition of a chocolate. For some people, at least. As usual, that strategic decision is all your’s to make, though~! Just for the record: mixing the methods, I ended up with 4x 8cm DIA cakes and 35 christmas tree shells in one go and 72 shells on another go using the amounts listed below.
Here we go!
The Black Forest Gateau Chocolates – Layer #1
Ugh… I’m sorry, but there’s one more “Before we get started” in an admittedly long string of similar roadblocks… I promise, this is the last one! With the springforms and a general idea of “Stability” in mind, I started layering these in a slightly-off order, so that, in the end, the one I assumed would be the most unstable, ended up on top of the springform variant. If you’re going with shells only, feel free to layer them in whichever order you fancy since, with significantly smaller amounts within each shell, all layers, once properly set, stay where they belong for an appealing 3-layer bite-surface.
70-75 Dark Chocolate Casings/Shells of your choice
Alt: 6-8 8-10cm DIA mini-springforms or dessert rings
250g Dark Chocolate, finely grated
100g Milk Chocolate, finely grated
130g Heavy Cream
20g Cocoa Nibs
20g Cocoa Powder
80g Butter, diced into 1-2cm cubes, at room temperature
1) Place the grated chocolate in a heatproof bowl.
2) Add the cream to a small pot sitting on medium-high heat and bring it up to a gentle boil.
3) Pour the piping hot cream onto the chocolate and wait for about 30 seconds.
4) Grab a rubber spatula and gently stir the mixture until the chocolate and cream have turned into a thick, smooth and silky ganache.
5) While you’re at it, add the butter cubes and work them in, one cube at a time.
6) Set the bowl aside for 3-4 mins until the temperature of the ganache has dropped to guesstimated or measured 40°C.
7) Fold in the cocoa nibs until they’re well distributed throughout the ganache.
8) If you’re going cake-style, you can evenly distribute the ganache into your lightly-oiled-and-parchment-lined springforms.
9) If you’re going with the chocolate casings, wait until the ganache has dropped down to 30°C inside the mixing bowl, then transfer the glossy goodness into a piping bag.
10) A few moments after the transfer – usually, cleaning up the mixing bowl in question does the time-trick – the ganache should have reached the magic 27/28°C that mark the perfect time to pipe the mixture into the shells to fill them up by 1/3 without melting the shell in the process.
11) Slide the tray holding the chocolate casings onto a baking tray or cutting board, grab a firm hold onto both and tap them onto your work surface a couple of times to pop out trapped air bubbles and, in case you’re using fancy-shaped casings, evenly distribute the filling inside each shell.
12) Cover up the tray with a muslin cloth or something equally light, breathable and dust-repelling and store the tray in a cool place outside of the fridge and out of the way of potential cooking aromas. Keep the tray well-hidden for 8-10 hours, over-day or over-night, whatever fits your schedule best.
The Black Forest Gateau Chocolates – Layer #2
350g White Chocolate, finely grated
130g Heavy Cream
20g Honey
50g Butter
50ml Kirsch or Cherry Hooch of your choice – you could actually go with a milk-/cream liqueur as well, to boost the general Cream’iness of this layer.
1) Place the grated chocolate in a heatproof bowl.
2) Place the cream in a small pot sitting on medium-high heat and bring it up to a boil.
3) Take the pot off the heat and whisk in the honey and the butter right afterwards.
4) Slide it back onto the stove and allow it to lightly bubble up again.
5) Pour the hot mixture onto the chocolate and work everything into a smooth ganache with a rubber spatula.
6) Look for the 40° mark again, then stir in the booze.
7) Look for the 30°C mark again to transfer the mix into your piping bag and add the next layer to your springforms or shells, filling them up by another third.
8) And again, tap, wriggle, cover, hide, wait for 8-10 hours, over-day or over-night.
The Black Forest Gateau Chocolates – Layer #3
20g Fine Baking Sugar
1 1/2g Apple Pectin – if your supermarket/grocery store fails you, the next-best organic/natural foods store will have it
250g Black Cherry Jam or Jelly – I prefer cherry jam because for some reason, it always has a more intense cherry flavor than jelly… a matter of personal preference, I guess~
15ml Ginja, Cherry Liqueur or Cherry Spirit
1) Sift sugar and pectin into a mixing bowl.
2) Add the jam/jelly of your choice into a small pot sitting on medium-low heat and allow it to warm up just enough to liquefy.
3) Stir 3-4 Tbsp of the melted jelly into the sugar bowl and give it a good stir to otivate the sugar to start to dissolve.
4) Tip this pre-warmed sticky mixture into the pot holding the melted jelly. Stir until everything is well combined.
5) Turn the heat up to medium-high and allow the mix to bubble up.
6) Once it reaches the boiling point, blink twice, then slide the pot off the heat and allow the lot to cool down to, you might have guessed, 30°C.
7) Stir in the cherry hooch of your choice and transfer the mix into your trusty piping bag.
8) Top off the Gateau chocolates with this last yummy layer – if you’re handling shells remember to only fill them up to the inner/lower rim of the chocolate casing in order to neatly close it off later on.
9) And once more, we tap, wriggle, cover, hide, wait for 8-10 hours, over-day or over-night.
An old PE teacher just appeared in front of my mental eye, telling me to “smile if it hurts” during the nth repetition of her attempts to kill us all off before reaching 8th grade.
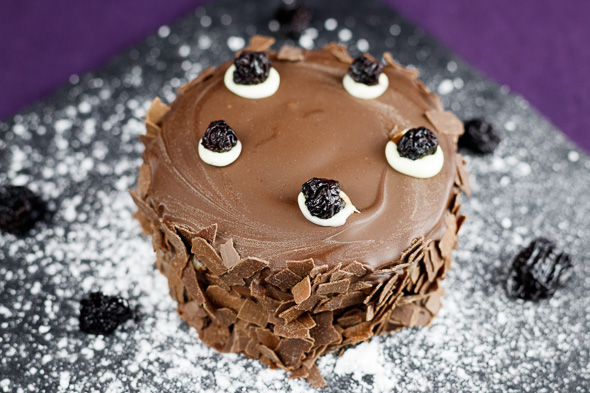
The Black Forest Gateau Chocolates – Finishing Touches
Step 1: Coating Time~! This the last mandatory step!
Cake-Style: 300g Milk Chocolate, melted and at room temperature
One-Bite Morsels: 300g Dark Chocolate, melted and at room temperature
Step 2: Deco Time~! Aaaaall fun and games!
Cocoa Powder
A handful of soft-dried black cherries, chopped into 75 decorative bits
Zebra chocolate curls
Chocolate flakes to cover the sides
White chocolate to act as “cream”
Edible glitter spay in gold, green or red
Edible sugar pearls to match the look
Anything else you can think of that makes your treats either look like Christmas Decorations or a mini version of a classic Black Forest Gateau
1) To seal the cake-style, release them from their tins/rings and place them on a cooling rack.
2) Pour a spoonful of well-tempered chocolate into the center and, using the back of your spoon, spread it out and over the edges.
3) Use a palette knife to convince the dripping chocolate to evenly cover the sides of the “cake” and add more chocolate when/where it is necessary to form an even coat.
4) If you’re gunning for the full-on Gateau look, grab a handful of chocolate flakes and maneuver them onto the still-wet sides of the cake at an angle in order to keep the top clean. I always feel like I’m wearing oven mitts when doing stuff like that, so… good luck.
5) To seal the casings, simply fill up each shell to the upper rim of the shell and remove any excess with the blade of a sharp knife right away to avoid unsightly bumps.
6) Aaaaaand one last time: wait until the chocolate coat has set. Usually 2-3 hours in a cool spot will do the trick.
7) And then… deco time! Go wild, go with my ideas, don’t deco at all and dig right in… go wherever your whim takes you, as long as you have fun and enjoy the whole enchilada~
After all, <insert William Shatner’s voice here> It’s a holly, jolly christmas. Best time of the year…
Enjoy~!
PS.: To those of you who have been requesting this one from my Christmas Box’o’Chocolates 2018 – I’m sorry, I’m sorry, I’m sorry, I’m sorry, I’m sorry, I’m sorry, I’m sorry and at long last, here you go!
To those of you, who actually have limits to the chocolatey sweetness they can stomach in a single bite – I’m sorry, I’m sorry, I’m sorry, I’m sorry, I’m sorry, but basically it’s a “condensed” Black Forest Gateau. And like hiking up the peaks of said forest, practice makes perfect~
And to each and every one of you – Happy Holidays! Peace, love and happiness to all of you~ Be merry and stay healthy (apart from a well-deserved chocolate overdose, of course~!
♥

