
 Like I mentioned last week, I really enjoy a nice piece of saltwater fish from time to time. In some cases, tuna and salmon for example, I prefer the fish to be raw. What better way to treat oneself when the mood hits, than with a batch of delicious sushi… We have an extraordinary sushi bar nearby, but sadly all the grade-A ingredients and craftsmanship of the resident sushi master are kind of lost on hubby – despite his announcements to try this-and-that next time, his mistrust of water creatures makes him order the teriyaki chicken roll every time. So sometimes I get busy rolling myself to suit both of our tastes without the limitations of a restaurant’s menu. The only thing I can’t get my hands on is sashimi-grade tuna for myself… Oh well.
Unless you’re gunning to match or surpass the skill and craftsmanship of a sushi master, making sushi at home really isn’t that hard once you get the hang of it – given you didn’t needlessly skimp on the ingredients (dealing with low quality nori is one surefire way to drive you up the wall). The idea for this particular roll popped into my head when hubby and I, once again, simultaneously shot right for the carpaccio starter at a family lunch shindig. While we were waiting I was going over the non-fishy options for the sushi platter I had planned for the next weekend. The groan that escaped me in a holy-facepalm moment was loud enough to raise some eyebrows around the table, but I had other things on my mind. Beef carpaccio, kobe beef, sushi platter… waaaait a minute! How did this one never occur to me all those years we’ve been eating carpaccio every chance we got? After a long, exasperated sigh and a quick shopping trip I came up with these to rectify that oversight:
I made 2 rolls/8 pieces as a starter for hubby and me, so these amounts you see here will net you 2 generous starters or 1 main dish.
The Rice
The rise and fall of your sushi heavily depends not only on the quality of your ingredients but on the rice. Sushi in it’s most basic form, the Nigiri sushi, basically consists of a blob of rice with a thin slice of fish nestled on top of it. As always, the fewer ingredients you use, the better they need to be individually, but rice especially can turn out extremely boring or even unpleasant if it’s not seasoned well. Theres a huge variety of powdered or bottled „sushi spices“ around these days, from basic types to fancy spice blends I never really got the point of. The problem with the instant stuff, for me, is that it never really hits the point. If you’ve had some experience with those and are happy with the results, stick to it. Leery of rice as I am, I can only nod at sticking to whatever works in that department. Going down the homemade-seasoning road works best for me, so here’s what I usually do:
Rice Seasoning
80g Sugar
30g Salt
100ml Rice Vinegar
1) Pour the rice vinegar into a small pot and slowly warm it up on low heat.
2) Add the sugar and salt to the vinegar and stir until everything has completely dissolved.
3) Stored in an airtight, previously sterilized bottle this seasoning will keep for about a month. You need around 20-25ml of it for 150g uncooked rice.
Rice Preparation
75g uncooked Sushi Rice
90ml Water
2-3cm piece of Kombu – Kombu is a special type of kelp. It’s a natural flavor enhancer and, if used correctly, adds the je-ne-sais-quoi we also know as „Umami“ to dishes. Most of the bigger asian stores have some in stock by now – look for wavy, firm sheets or thick, gnarly strands of dark green …well…it kind of looks like plastic. Or just ask your shopkeep to point you towards it.
10-15ml of the rice seasoning
Sushi Rice is a special type of short-grained sticky Japonica rice which needs a bit of special treatment to keep it from being too gluey in the end. There are several different cultivars that play a huge role in a sushi master’s secret stash of knowledge, but unless you want to delve deep into the art of sushi making, you should be on the safe side by simply buying a packet of rice labeled „Sushi Rice“. I personally haven’t settled on any particular brand yet, one thing I’ve noticed though is that the instructions on the backs of the packages wildly vary from brand to brand. At some point I just asked a japanese friend of mine for advice because all the different methods started to annoy me. Here’s what she told me and what I stick to:
Sushi Rice 101
101.1) First order of business: washing the rice to remove the (lots and lots of) excess starch. Since the grains are more brittle than one might think, this has to be done very carefully. You could place the grains in a fine sieve and just hold it under running water until the water coming out of the sieve is absolutely clear. Another option is to place the grains in a large bowl, fill it with cold, clear water, gently stir the grains with your fingers and change the water every couple of turns until no starch clouds puff up in the water as you’re „massaging“ the grains.
101.2) Second step: cooking the rice. The incredulous look my friend gave me when I told her I didn’t have a rice cooker pretty much told me everything I needed to know. If you have one, use it. So far everyone seems to be over-the-moon happy with their rice cookers. If you, like me, have to resort to less gadgety methods like using a simple pot, she suggested a rice:water ratio of 1:1,2 – 100g rice and 120g water or 1 cup rice and 1,2 cups of water – no matter which method of measuring you use, just use the same one for both rice and water. You can also go with a 1:1 ratio but make sure to check on the rice every once in a while in case you need to add some more water.
101.3) For this recipe, add 75g sushi rice and about 85ml water to a pot with a fitting lid. Keep the lid off for now. Let the grains soak undisturbed for around 10 mins.
101.4) Set the pot onto your stove and turn the heat to medium. Bring it to a low boil – this should take about 10 mins from cold to bubbly – and let it simmer away for about 30 seconds once it reaches the boiling point. Cover the pot with the lid now, take it off the stove for 2-3 mins and turn the heat down to low. At this point, add the Kombu for a flavour boost if you have it – just make sure the rice isn’t boiling anymore – Kombu can sometimes give off a bitter taste and turn liquids into a gluey mess if it comes into contact with temperatures above 100°C. Set the pot back on to the stove and let it steam/soak for around 10-15 mins until the rice has soaked up all the liquids.
101.5) Take the rice off the heat, remove the Kombu and gently stir in the seasoning. Once you’re done, replace the lid with a clean kitchen towel and set the rice aside to steam off for another 10 mins.
101.6) To keep the rice from lumping up now, gently spoon it into a wide plastic container, loosen and spread out he grains without squishing them and get ready to feel a little silly – you’re going to fan the rice down to room temperature. Use a wooden paddle or, like me, a pretty venetian paper fan, to do so. If you’d just let it cool down slowly while it’s still huddled in the pot, the starch contained in the grains would work its magic and transform the grains into one huge ball of ricey goo, nothing you can work well with.
101.7) Cover the rice with a kitchen towel again and get ready to roll. Literally.
The Rolls
1 small Cucumber, peeled and seeded, cut into sticks fitting the width of the nori
1 Avocado, peeled, pitted and cut into sticks as straight as possible
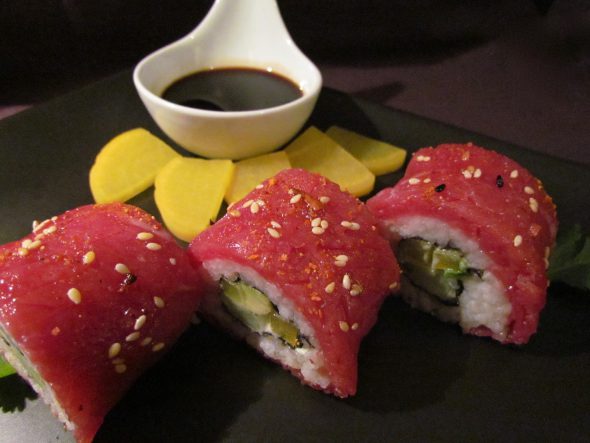
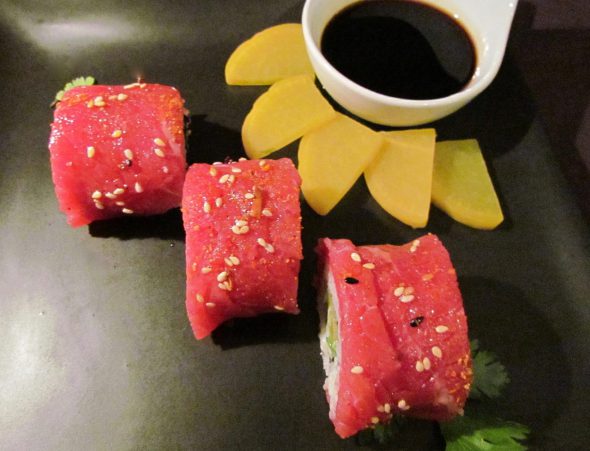
Pickled Daikon, cut into sticks the same size as the cucumber
1 spring onion, whites and light green parts halved lengthwise and cut to fit the width of the nori
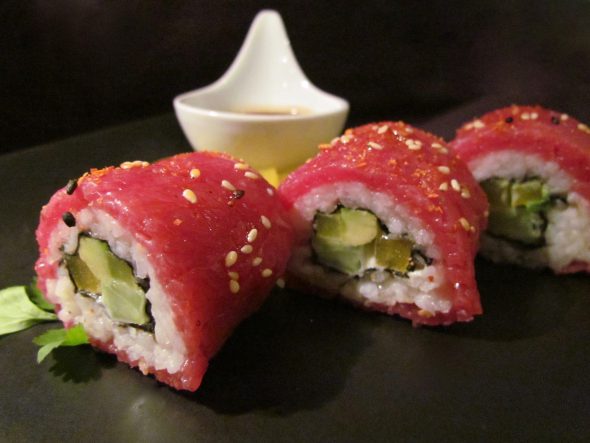
200 g Beef Carpaccio
1 Nori Sheet
125-150g cooked Sushi Rice, the amount the steps above net
1 Tsp Wasabi Paste
1 Tsp Crème Fraîche
1 Tsp toasted Sesame Seeds
1 Tsp Chilli or Sesame oil
Togarashi Pepper
1) Tightly wrap a sushi mat in clingfilm and straighten it out. If you don’t have one of those, spread out a piece of clingfilm large enough to comfortably hold the nori on a clean kitchen towel.
2) Bring together the short sides of the nori to determine the middle and slice the sheet in halves with a sharp knife.
3) Place the first piece on your mat/clingfilm, rough side facing up. Line up bottom rims of mat and nori.
4) Moisten your palms with a few drops of rice vinegar and pick up some rice. Evenly spread the rice on the nori and lightly press it down to make it stick, about ½ to 1cm thick. The rice will soften the nori, so be gentle as you go in order to avoid the nori ripping.
5) Leave about ½ cm of the nori rice-free at the bottom rim. This will make it easier to line up and seal the „ends“ of the rice cover later.
6) Once your layer of rice is nice and even, carefully flip the nori over, so the rice side is facing down. Make sure the rim you didn’t cover with rice is at the bottom again.
7) Gently spread some of the wasabi paste and crème fraîche on the nori, top to bottom.
8) Line up your fillings to the bottom rim in the bottom third of the nori. At this point you could stack and arrange the fillings in different ways to create patterns on the cutting surfaces of the rolls. To determine how much of the fillings you’ll need or how high you’ll need to stack them, lift the bottom rim of the nori a little with the help of your mat and complete the „ring“ in your mind. The fillings have to be packed tightly to keep the rolls from falling apart, so take care to line them up neatly right from the start.
9) Once you’re done, slide your thumbs under the mat or clingfilm/towel combo and hold down the fillings with your index and middle fingers.
10) Tightly roll up the sheet with the help of your sushi mat until the rims of the rice coat meet – the rice-free lower end tucked inside so it can act as a kind of seal once it comes in contact with the nori at the other end. Firmly press down on the roll while it’s still in your rolling-helper, evening out dents and bumps, making sure the roll is actually round. Just don’t squish it.
11) Repeat this with the second roll and set them both aside.
12) Arrange the carpaccio slices in 2 rectangles matching the size of the nori sheets you’ve just rolled up, rims overlapping by 1/3, on 2 lightly oiled sheets of clingfilm. Scatter a pinch of togarashi on each carpaccio blanket.
13) Place each of the rolls at the bottom end of the carpaccio blankets and again, with the help of the clingfilm, tightly roll them up, completely covering them in the carpaccio slices as you go.
14) Dab your sharpest knife with some rice vinegar and trim the ends of the rolls. Wipe the blade with a moist paper towel and dab it with vinegar again.
15) Slice each roll in 4 or 6 similar sized pieces, repeating the wipe-and-dab routine after every other cut.
16) Scatter some sesame seeds on the individual pieces and arrange them on serving plates – flip them to show off pretty cutting surfaces if you like.
17) Serve with pickled ginger or daikon and the teriyaki sauce.
The Teriyaki Sauce
250 ml Mirin
500 ml Chicken Stock
225 ml water
250 ml Soy Sauce
200 g Sugar
35 g Cornstarch
1) Pour the mirin into a small pot set on medium-high heat and bring it to a boil. Let it bubble away for 15 seconds.
2) Add the other liquids to the pot and give it a good stir.
3) Stir in the sugar and keep stirring until it has completely dissolved.
4) Bring the mix to a low boil again, this time let it bubble lightly for about 2 mins.
5) Spoon out 2 tbsp of the liquid into a small bowl and dissolve the starch in it.
6) Stir this back into the sauce again. Once it reaches boiling point again, reduce the heat to medium-low.
7) Let it simmer until the starch works its magic and everything comes together. This shouldn’t take longer than 2-3 mins.
8) Fill the sauce into sterilized bottles once it’s cooled down a little. Piece of good news: if you keep it in the fridge and don’t throw breadcrumbs or something into the bottles, the sauce keeps indefinitely – or until you’ve used it up.
I hope you guys like this one and, maybe, discover the fun in making sushi from time to time! Enjoy
♥
