
 „42!“ some of you might think at the mention of a „Heart of Gold“. And yes, you’re correct. For those of you who might jump to the conclusion that I’m loosing it, here’s a perfectly sane explanation.
The starship Heart of Gold is the hottest commodity in the universe, powered by a prototype of the faster-than-the-speed-of-light Infinite Improbability Drive, thanks to which the ship „passes through every conceivable point in every conceivable universe almost simultaneously”. The core of the Infinite Improbability Drive, which was invented „following research into finite improbability, which was often used to break the ice at parties by making all the molecules in the hostess’ undergarments leap one foot simultaneously to the left, in accordance with the theory of indeterminacy“ turns out to be the Golden Ball of Prosperity, hence the name „Heart of Gold“. Oh, and 42 is the „ultimate answer to life, the universe and everything“, by the way.
To wrap up the crazy, these are references to and quotes from „The Hitchhiker’s Guide To The Galaxy“ written by Douglas Adams.
The point of it all: the golden core. Back when I was about 12-14 I went to Italy during the summer holidays, visiting a family friend a couple of times. One of the things I was looking forward to return to the next year was a large stuffed type of pasta, looking like an UFO, with a golden liquid oozing out once I cut into it. Since I was reading the Hitchhiker novels during one of those visits, calling them „heart of gold“ made much more sense to me than trying to learn and remember their actual name. As much as I loved them, the pasta-will-make-you-blow-up-to-the-size-of-a-walrus/no-carbs media brainwash kicked in and I didn’t touch any form of pasta for the next decade. I still don’t, unless it’s something worthy of cutting my intake by half for 2 days – something like this.
I usually avoid wheat in all shapes and sizes for several reasons. First off, I don’t like things without flavor on their own. If the pasta bit is unavoidable for some reason I hunt down pasta, made from other flours, that actually contributes flavor and texture to a dish as opposed to just… being there. Spelt or buckwheat pasta, for example, adds a wonderful nutty note to dishes, without the odd/off texture wholegrain wheat or rye pasta occasionally has. In this case though, given the mild flavor of the ricotta, plain wheat flour really is the only way to go.
My second reason to skip wheat pasta is a nutritional one. Refined wheat flour basically looses most of its nutrients and fibers during the refining process, leaving behind pure carbs and not much else. Unless you’re an athlete, from a nutritional point of view, anything made from refined wheat flour is pretty much useless, empty calories if you will. Without the fibers it doesn’t even keep you sated for as long as you would expect, looking at the calory count – added sugar, salt and fat basically blowing your bloodsugar out of proportion for no good reason and making it plummet below your starting point quickly thereafter, which leaves you with the munchies and an unsatisfied feeling around your middle.
Now don’t get me wrong, pasta isn’t unhealthy per se, it’s just one of those things best consumed in moderation, refined wheat or otherwise. Anyways, stepping off the soap box now, it’s time for my biannual dose of pasta! And a particularely tasty one at that…
The name „Heart of Gold“, at least in this particular case, translates to:
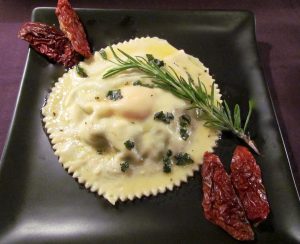
Ravioli with Ricotta-Spinach and Poached Egg Yolk Center
When I made these for hubby to photograph I was honestly at a loss as to how to plate them in a pretty way. Somewhat embarassed I carried in the plates and he burst out laughing „So we’re having stranded jellyfish today?“ before he got ready to dodge… If you want them smaller/prettier and if you’ve got a set of nerves steely enough to deal with seperating quail’s eggs on you, that’s the way to go.
For 4 Servings – 1 per person as a starter – you’ll need…
The Dough
200g Pasta Flour (Type 00)
2 large Eggs
A Pinch of Salt
Polenta for dusting
Olive Oil
1) Sieve the flour into a bowl, and press a hollow into the middle with your knuckles.
2) Crack the eggs into it and sprinkle them with a pinch of salt, then add a tsp of olive oil.
3) Start stirring them into the flour with a fork until rough crumbs start to form. If you’ve never done this before, you might think the lumpy mess in your bowl might be beyond saving, but it’s actually supposed to look like that. The lumps will loose their stickyness as you keep working them into the flour and turn into floury, large crumbs.
4) Once the crumbs appear dry enough to handle them with your hands, tip them out on a lightly floured work surface.
5) Rub your hands with a few drops of olive oil and start kneading the dough, pushing it forward with the heels of your hands and tugging it back with your fingertips, until it’s silky and smooth, with an elastic spring to it, much like play-dough.
6) If the dough turns out too dry – dry, floury flakes will form on the dough’s surface as you go if that’s the case – rub the ball of dough with a little bit of olive oil and work it into it. If the dough keeps sticking to you and stays somewhat squishy, dust it with a tbsp of flour and get back to kneading. Don’t get carried away with the additions of oil or flour, going slow and steady, spoon by spoon, wins the race here, even if you think your dough resembles a bowl of soup rather than something that could possibly hold together a filling at some point. Flour can react in weird ways in my experience, balling up from soggy to bone dry in the blink of an eye.
7) Once you’re happy with the dough, roll it into a ball, wrap it in clingfilm and let it rest for about 30 mins to give the gluten a chance to relax from the beating you’ve just given it. This will give the dough back it’s elasticity which will make it easier to work with once you’re ready to roll out the dough into thin sheets.
8) Unwrap the dough, divide it into 2 balls, one just slightly larger than the other, and place them on a lightly floured surface again. The larger one is going to be the „cover“ layer, snugly wrapping around the filling and sealing it to the „base“ layer.
9) Roll out both balls into long sheets with the thickness of two playing cards stacked on eachother. The „cover“ will be stretched out a bit as you fit it around the filling, so make sure you don’t roll them out too thinly. The „base“ sheet should be wide and long enough for 4 disks of about 12-13cm DIA – that is if you’re using normal chicken eggs – if you’re going with quails eggs, 8-12 disks of 5-6cm DIA should fit in.
10) Mark the four base discs of 12-13cm DIA on your „base“ layer with a drinking glass, serving ring or cookie cutter – just press it into the dough to mark the rims but don’t cut through all the way.
11) Use a sharp knife to cut the dough sheet into four single, square sheets, each with a ring marked in their middle.
12) Cut a sheet of baking parchment into pieces fitting the size of the dough squares you’ve just prepared. Dust them with a little bit of polenta to keep the dough from sticking to the parchment later. Carefully place the dough on the parchment squares – this is the only way to move the rather thin dough with it’s rather heavy filling into the water without major fuss, mess or …anger management issues for those of us with a short fuse.
13) Now divide the second sheet of dough into four squares as well. Make sure they are large enough and shaped to cover the bases you’ve just created, overlapping the rims of the bases a little – keep the height of your filling in mind.
14) Set the doughy business aside, out of harm’s way, and move on to the filling.
15) Just on a side-note: if you feel like skipping the homemade-dough, an easy way to do so is to buy fresh lasagna sheets – a well-sorted supermarket or an italian delicacies store should have them in stock. If you’re going with „normal“ fresh pasta dough you might have to roll it out a little thinner after letting it get up to room temperature – they usually are a bit thicker and firmer than the lasagna sheets and rip or break more easily while you’re easing them around the filling.
The Filling
400g Baby Spinach, cleaned and the larger stems removed
125g Ricotta
1 Tbsp Olive Oil
1 Shallot, finely cubed
Opt: 1 Clove of Garlic, finely chopped
40g Parmesan, freshly grated – keep a little more nearby to adjust the seasoning
½ Lemon, Juice and Zest
1 large Egg
A Pinch of Nutmeg, freshly grated
Sea Salt and freshly cracked Pepper to taste
4 large, really fresh Egg Yolks – catch the eggwhites in a small bowl, you’re going to need some of it to glue together the rims of the ravioli later
This is one of the easiest pasta fillings I know, and one of the most delicious in my opinion. Just a word of advice though, since its taste is entirely based on very few ingredients, their individual quality is really important for the result. I was faced with that reality once when I thought grabbing discount ricotta was a good idea. It turned out grainy and completely devoid of any taste.
1) Re-check the spinach for any traces of soil and odd bits.
2) Set a very large pan or heavy-based pot with a fitting lid on medium heat. Sautée the shallot cubes in the olive oil until they turn translucent.
3) Add the spinach leaves and drizzle it with the lemon juice, then firmly cover the lot with the lid. Unless you’re in posession of ridiculously large kitchenware you will probably have to add the spinach in batches. It wilts quickly though, so the first batch won’t overcook until the last batch is done too.
4) Steam the spinach leaves until they’re wilted, folding in the resisting leaves on top of the pile – this takes about 2 minutes.
5) Move the steamed spinach into a sieve to drain out any excess liquids. Press it down into the sieve with a ladle or your hands to make sure it’s as dry as steamed spinach gets.
6) Tip the spinach out of the sieve onto a cutting board and roughly chop through with a heavy knife. If you see a lot of liquids pooling on your cutting board, give the spinach another good squeeze. Place the chopped spinach in a large mixing bowl.
7) Add the ricotta, lemon zest, parmesan, egg and a pinch each of nutmeg, salt and pepper. Give the mixture a good stir until everything is evenly distributed.
8) Now here comes the hardest part… tasting and adjusting the filling without snarfing down the whole bowl. My advice (and mantra to myself): Pull yourself together! Taste and adjust the seasoning, so the people you’re making these for actually get something delicious to eat as well!
9) If the filling still appears to be somewhat too wet – if a small heap on a spoon doesn’t hold it’s shape – stir in more parmesan if the flavor of the filling can take some more of it, or simply squeeze out a little more of the runny stuff on the rims of your bowl as you’re spooning the filling into a large piping bag.
10) Move the filling into a large piping bag and set it aside to cool down to room temperature.
11) Seperate the eggs – carefully slide the yolks into small, individual bowls and collect the eggwhites in a shallow bowl.
12) Set them aside and get your dough squares and filling ready.

Assembling The Ravioli and Finishing Touches
4 Pinches of Fleur de Sel
4 Tbsp of Butter
1 Tbsp of Sage Leaves, roughly chopped
or 1 Tsp of Lemon Zest
1) Have a good look at the egg yolks in their bowls to judge their height and diameter. Pick up your piping bag and pipe a „nest“ of sorts, just wide enough to hold the yolks onto the disks you’ve previously marked. If you’re using large eggs, this roughly translates to a 3cm wide and 2-3cm high wall/nest of filling around a center circle of 2-3cm for the yolk in the middle of the disk with an empty ring of around 2-3cm from wall to the marked rim of the disk.
2) Gently let the yolks slide out of the bowls into their nests, make sure not to break them in the process – they would seep through the dough and filling and ruin everything in their vicinity. Remove the filling, carefully wipe the base clean and start over with that particular nest if that happens. Carefully adjust the wall of filling with your fingertips to snugly enclose the yolks. Also make sure the yolk doesn’t peek out over the wall, it migh break while you try to close it in with the „cover“ sheet. Try to align the tops of the nest and the egg yolk to the same height.
3) Sprinkle the yolks with a pinch of fleur de sel.
4) Lightly brush the rims of the bases with a dab of eggwhite. Start covering the bases and filling with the „cover“ sheets, starting at one corner and working your way to the opposite corner while closely fitting the cover over and around the filling and pressing out all possible air pockets as you go. Firmly press down on the rims around the filling to seal the two sheets together and thin them out a little so the entire raviolo comes out of the water cooked evenly. Pay some extra attention to this process, air bubbles inside the ravioli might cause them to burst open in the hot water.
5) Smaller tears, crinkles and weak spots in the cover can easily be mended by eggwhite-glueing fitted strips of the leftover dough over them. Not the prettiest solution, I suspect, but it does the trick.
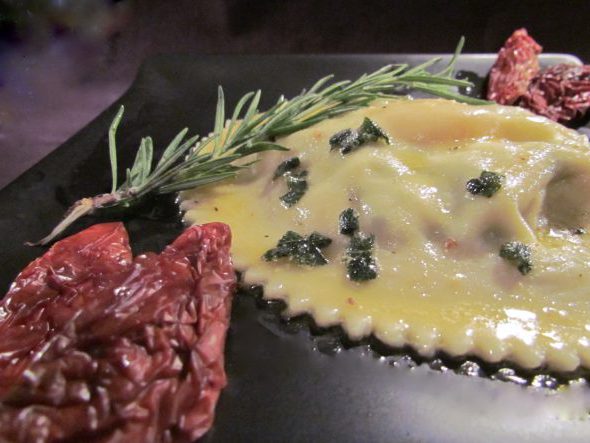
6) Now cut out the ravioli with the same serving ring or glass you’ve used to mark their shape at the beginning, or – if you’re more adept at using a dough-cutting wheel than I am – use one of those for a potentially pretty rim. As you can see, I failed that potential and wobbled the rim out of, rather than into, a circular shape instead.
7) Bring lightly salted water to a boil in a wide pan. The amount of water you’ll need depends on your equipment. Fill the pan or pot just high enough to submerge the ravioli and have around 1-2cm water on top of them. You don’t want to give them too much space to bounce around but you’ll need the 1-2cm to determine whether they’re floating up to the top when they’re done or if they’re just being moved around by the currents of the water. Once the water comes to a boil, turn down the heat to medium and wait until the bubbly situation inside the pan calms down to a gentle simmer.
8) Carefully pick up the parchment/pasta constructions and gently submerge them into the water one by one. You might have to finish them off one by one or in pairs, depending on the width of your pan – make sure the ravioli do not touch inside the water since they might stick to eachother and rip. The parchment will stick to the raw dough for a couple of seconds and then slide out from under it at a gentle tug once the dough has firmed up just enough. Even if you see the parchment coming loose instantly, leave it in for a moment until the pasta starts floating on its own – it won’t be sticky enough anymore at that point to attach itsself to the bottom of the pan.
9) The ravioli take around 4-5mins to poach in the simmering water and will float towards the top once they’re done. If you want to make sure the dough is cooked through, add a strip of the leftover dough, pinched down to the thickness of the outer rim of your pasta, to the water and bite-test it after 3mins to determine the remaining time needed.
10) Meanwhile melt the butter in a small pan on medium heat. As soon as it’s completely melted, add the sage or lemon zest and a pinch of salt and let it sit on the heat to brown for a couple of mins.
11) Carefully take your UFOs out of the hot water with a slotted spoon. Wipe the bottom of the spoon with a paper towel to remove some of the water, and set them onto your serving plates.
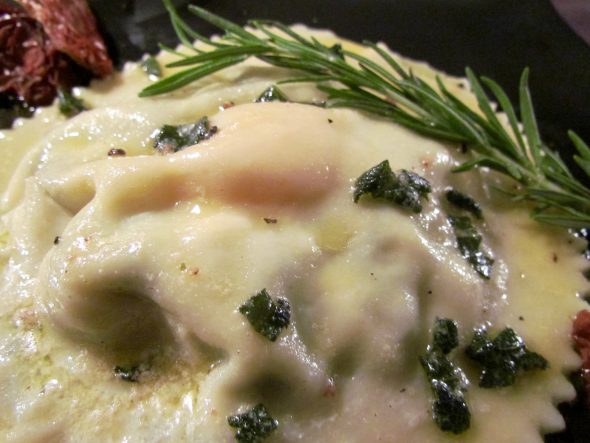
12) Stir one or two tbsp of the cooking water into the butter and drizzle the blend on top of your Ricotta & Spinach Ravioli with a Heart of Gold~
Enjoy~!
I actually use the exact same filling, sans egg, to roll in a thin layer of filo pastry, just enough to keep it together ( 2/3 of the pasta calories saved right there! teehee), and pan-fry it until the pastry crisps up. ( 2/3 of the mess and the prep time gone right there as well!). Not really a sophisticated starter to present to guests though, I guess…
♥
