
 Just a couple of months ago, two of our friends moved away. As „away“ as it gets actually – they moved to Argentina. Ever since they raised that topic I’ve been rubbing my hands and practicing my Evil Plan Chuckle™ while waiting for the BBQ season to come closer. One of my absolute favorites, condiment-wise, is the argeninian Chimichurri which goes exceptionally well with anything you could possibly throw onto hot coals. That’s me… a food-geek, if you will, drop the name of a country on me and I start flipping recipe pages in my head.
At their Bon Voyage dinner, they told me „Vegetarian“ is the ancient Inka term for „Bad Hunter“, and having an honest-to-god slab of meat with basically anything argentinian is a must. I shoved the somewhat disturbing visual of a T-Bone steak next to my cup of morning coffee out of my head and continued down the „What else will you guys pounce on as soon as the plane touches down?“ line of inquiry. Among other things they dropped „Something remotely green, an alibi-veggie“, „Oranges“ and „Lots of chillies“ on me. Hm. This, I can work with! And thanks to something I stumbled over in GW2 and never fully grasped the concept of – I’ll get to that later -, I had something to play with, too! So I sat down, had a nice glass of argentinian red in their honors and a good look at the Chef’s Guild’s recipe list. I don’t know if the devs intended this, but I basically found everything our friends mentioned at the Chef’s station – minus the Chimichurri. So, the things they picked, I cooked and Tyria provided further inspiration for were:


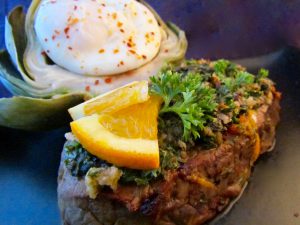
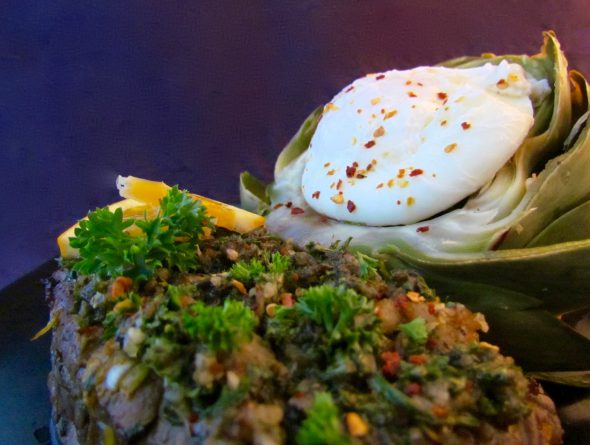
And this is what I’ve turned those into:
Orange marinated Fire Flank Steak, Roasted Artichoke, Poached Egg and Chimichurri

Both the steak marinade and the Chimichurri are best prepared the night before you’re going to plate them up, that way all the flavors get to be at their full potential when it’s time to serve.
The Steaks
2x 200g Flank or Rumpsteaks
10g Butter
1 Sweet Orange, Juice and Zest
3-4 Tbsp Olive Oil
1 small Red Onion, roughly chopped
1 heaped Tsp Brown Sugar
1 Tsp dried Parsley
½ – 1 Scotch Bonnet (depending on how much you can take)
1) First off, zest the orange and either wrap the „naked“ orange in clingfilm or press out the juice into an airtight container for later use. You might feel like adding some of the juice to the marinade right away, but believe me, that’s not such a good idea. Too much citrus acid will cure the meat, much like a Ceviche, and toughen it up while it’s in the marinade. I’ve tried it once with an orange I’d thought to be very sweet… the result was pretty good taste-wise, while not really being more intense in the orange department, but the texture of the meat was off. The orange juice will not go to waste though, I’ll get to that in a few steps.
2) Add the zest, red onion, sugar, parsley and scotch bonnet to either a blender jug, food processor, pestle & mortar or stickblender-friendly container and blitz them into a smooth and thick paste while slowly adding the oil in a steady steam.
3) Place the steaks in an airtight container large enough to fit them both in without having to stack or squish them. Pour the marinade on top of them.
4) Gently turn the steaks in the marinade to cover them from all sides. Spread out the marinade on top of the steaks evenly, lock them in, place the container in the fridge and let the marinade do it’s thing over night.
5) Take the steak container out of the fridge an hour before firing up the pan.
6) Place a heavy-based pan on high heat and let it sit there for around 5 mins until the temperature inside it at it’s max.
7) Brush the marinade off of the steaks back into the container. You don’t need to thoroughly clean off every last bit of it, just make sure you don’t add large blobs of it to the pan – they might burn and/or have an unpredictable effect on the cooking time.
8) Sprinkle the steaks with a generous pinch of salt and place them in the pan. Add the butter and give the pan a light shake to distribute it.
9) Usually I would point you to my Steak-101 for references to cooking time and the pressure-test and tell you to fry the steaks the way you like them, but in this case I highly recommend going with the flip-the-steaks-every-15-seconds method – the brown sugar in the marinade will create a beautiful crust that way.
10) While the steaks are sizzling, juice your orange, pour the juice into a small bowl and stir 1 tbsp of the marinade into the juice.
11) Once the steaks have reached your preferred state, move them out of the pan onto a plate.
12) Deglaze the pan with your orange-marinade mixture and let it simmer down to about 2-3 spoonfuls – this will take little to no time, thanks to the piping hot pan.
13) Drizzle the meaty orange-jus onto your steaks, cover the plate with aluminum foil and let them rest for 5-8 mins.

The Chimichurri
2 Tbsp Sherry Vinegar
Alt: 1 Lime, Juice – I personally prefer the Sherry Vinegar, but lime juice is a good replacement
4 Tbsp Extra Vergine Olive Oil
½ Bunch of Oregano, leaves picked and very finely chopped
1 large Bunch of Parsley, very finely chopped
2-3 Cloves of Garlic, finely chopped
Opt: 1 small Shallot, finely cubed – I left it out in this case since there’s already onions in the steak marinade and I didn’t want to end up with onions-galore on our plates.
1 Tsp dried hot Chilli Flakes
or: ¼ – ½ fresh Habanero for the pros, seeds removed and finely chopped
½ Tsp Sea Salt
1 Tsp dried Parsley
½ Tsp dried Oregano
½ Tsp dried Tyme
Well, as with most of the best condiments, shopping for the ingredients is the „hard“ part. My personal notebook, below the list of ingredients on this one, reads: Chop, mix, chill. Essentially, that’s all there is to it. I have a few pointers for you guys though.
1) Finely chop the fresh ingredients, parsley, oregano, garlic, chilli and – if you’re using it – the shallot and place them in a small airtight container. If you’re going with dried chilli flakes, pop them in as well at this point.
2) Add the vinegar, salt and oil and give everything a good stir. If you’re using a lime instead of the vinegar, add a bit of zest as well to emphasize the lime zing.
3) Close the lid and pop the container into the fridge over night to give the herbs the time they need to develop their flavors.
4) Around 4-5 hours before serving-time, have a taste of the proto-chimichurri. Decide on additional salt and chillies, then add the dried herbs – oregano, thyme and parsley. Fresh oregano can be on the in-your-face side of things – if it’s overwhelming the parsley, leave out the dried oregano and add a few more sprigs of fresh parsley instead or add some more dried parsley.
5) Stir the lot until they’re well combined and set the container back into the fridge. The dried herbs will soak up some of the liquid and bring all of the fresh ingredients together in the next couple of hours.
6) Just before topping the steaks off with the chimichurri, have another taste and adjust the seasoning with more vinegar/lime juice and salt if necessary. I usually fold in another sprig or two of freshly chopped parsley, just for cosmetic reasons.
7) This one turns out a little different every time, depending on the intensity of the herbs. The list above is what I always start with, though. Adjust it to your taste as you go along. If you’re not as tolerant towards chillies, keep in mind the steaks have some kick to them as well and take it slowly, use milder chilli flakes on this one – the sharp tang of the sherry vinegar turns up the heat of the chillis quite a bit.
8) A traditional Chimichurri is the south-american parsley version of an italian Pesto, meaning: usually there’s more liquid, oil in this case, in it. For it to work as a topping for a steak I ditched a couple of tbsp of oil. I also didn’t grind or blitz the herbs as finely as it’s usually done – first and foremost because I really prefer it this way and secondly – again – for the topping’s sake.
9) To get the traditional texture, use a pestle & mortar set or a food processor to turn everything into a smooth and even paste, then slowly stir in the oil until you reach a pesto’ish consistency, somewhere between a vinaigrette and a herby mayonaise.
The Artichokes
Now this is where I ran into the lack of concept-grasping ability problem I mentioned earlier. Until I saw the recipes for stuffed and roasted artichokes in the GW2 recipe list I would have never even thought of preparing artichokes that way. The way we usually eat them is simple: whisk up 2-3 of your favorite dipping sauces, cook or steam the artichokes whole until the petals come off easily and use them as semi-edible spoons for the dips, working your way through to the heart of the thistle. After removing the „hay“ – the innermost, small and prickly leaves – continue. Perfect fingerfood, that. Besides that version I’ve only gone with the roasted stems-and-base version of roasted artichokes 2 or 3 times – cutting off all the petals seems like such a waste… Anyways, with the roasted artichoke recipe and icon in mind, I went with a sort of hybrid between my usual petal-spoons and the roasted stems this time.
2 Artichokes
½ Lemon, Juice
20g Butter – 10g for the pan, 10g for brushing
1 Clove of Garlic, bashed
1) Cut the stems of the artichokes about 1-2cm below the outer rim of petals and remove the small, gnarly petals near the bottom.
2) Set them into a large pot and add water until the artichokes are suberged in it by ¾. They float, so hold them down to judge the amount of water. I always try to use a pot thats just big enough to fit the artichokes in with a little bit of wriggling, wedging and pushing – that way they stay in place rather than bounce all over the place and cook unevenly. If you don’t have that option, check on them while they’re cooking and turn them upright again if necessary.
3) Add a generous pinch of salt to the water and bring it up to a slow boil on medium-high heat.
4) Now, I wish I could give you a timeframe for the cooking time, but I really can’t. Artichokes come in such a vast variety of sizes and cultivars, it’s impossible to nail down a specific time for this. The only reliable way to determine how far along the are – at least the only way I know – is to lightly tug a petal about 2-3 rows behind the outer rim of petals. If it comes out easily, they’re done. If you need to apply a little more force, you’re close. Bite into the soft, lower part to determine if that assessement is correct and take it from there.
For the dip-scoop version I always use big, pale green artichokes with a base roughly the size of my fist. I start the petal-plucking trial-and-error phase after they’ve been in the hot tub for about 20-25 mins and take another turn every 5 mins. Usually they’re done somewhere between 30 and 40 mins. The small ones I’ve used used so far used to take between 10 and 20 mins. So you see, a large margin of possible error here, any specific time I could give you wouldn’t be more than a crude guesstimation on my part.
5) Once they’re done, dump them in ice cold water to stop the cooking process and keep their color vibrant. As soon as they’ve cooled off, take them out of the water, turn them upside down and shake or squeeze out as much of the water as possible.
6) Get your lemon juice ready, place the artichokes on a cutting board and use the sharpest knife at your disposal to cut them in halves. Brush the cutting surfaces with some of the lemon juice immediately to keep them from turning an unsightly brown.
7) Now for the tricky bit. Use a short veggie knife to cut along the bottom rim of the frizzy, hay’y portion of the artichoke. If you hit the sweet spot the knife should almost do it’s thing on it’s own. If not, you will feel the resistance of the strawy leaves.
8) Grab the purple-tipped leaves, the outer rim of the frizzy part, and the fine, white hay and pull. If you’ve done a good job with the knife, the entire inedible, tear-shaped portion should come out in one go. If not, you’ll have to fiddle around a bit to remove it all. Brush the newly exposed parts with lemon juice again.
9) Repeat this bit with the other artichoke halves and set them aside.
10) Set a large, heavy-based pan or griddle on high heat.
11) Add the first knob of butter, sprinkle it with a pich of salt and let it melt.
12) Once that’s done, add the artichoke halves to the pan, cutting surface facing down.
13) Roast them for about 5-7 mins until they’ve taken on some color. Remove them from the pan and set them on a cooling rack.
14) Turn the heat to medium and add the second knob of butter, the crushed garlic and a squeeze of lemon juice. Infuse the butter with the garlic for 3-4 mins, then remove the garlic.
15) Evenly drizzle the artichokes with the infused butter – make sure some of it gets between the outer leaves as well.
16) Set them aside for now and move onto the eggs.
The Poached Eggs
Ah, poaching eggs. A science on it’s own. At least, you can make one of it, if you wish, but in my book there’s not much to it. Really, really fresh eggs and the right temperature are the key to a deliciously plump, juicy, pretty-in-white globe.
2 L Eggs, very fresh
2 Tsp Salt
1) Pour about 15-20cm of water into a small pot set on medium heat.
2) Add the salt and stir until it’s completely dissolved.
3) Crack the eggs into individual small bowls or ramekins.
4) Have a close look at them. You should be looking at a yolk sitting on a sort-of plateau of translucent eggwhite. If the eggwhite isn’t fresh enough it won’t keep it’s shape around the eggyolk, it will be a watery puddle running outward without a discernible border. You’ll see what I mean after having a peek at the eggs. If the eggwhite is trying to escape, ditch the egg, have a word with the one who sold it to you, claiming it’s fresh and get another one. If you see the „plateau“ rimmed with a little bit of runny liquid, use a meshed spoon or fine sieve to carefully drain the excess water, before sliding the rest back into the bowl.
5) Bring the water up to 80°C. Use a probe for this, in this case the right temperature is very important. If the water isn’t hot enough, the eggwhite will simply dissolve into the water – that’s also the result of eggs that have been sitting for too long. If the water is too hot, the eggwhite might stiffen up before it wraps itsself around the yolk. If the water is way too hot, as in „boiling“, the rising bubbles will simply rip the egg apart.
6) Time to poach. Take this one egg at a time to avoid creating a mess.
Now, there’s several techniques you can use to poach the eggs:
• Add a Tsp of vinegar to the water. You can do this no matter which technique you’re going to use for the rest of the process. The acid helps the eggwhite to firm up more quickly – just make sure you use a mild vinegar, otherwise the egg might take on a vinegary aroma.
• Place a saucer or small plate roughly the DIA of the bottom of your pot inside, the bottom of the plate facing up – this will prevent the eggwhite coming into contact with direct heat and sticking to the bottom of the pot. This also works with all of the following strategies.
• Strategy 1: Stir the water into a whirlpool before sliding in the eggs. If you’re going down this road, give the water a good stir for a merry runaround, hold the bowl/ramekin holding the egg as close to the surface of the middle of the whirlpool as possible, and gently let the egg slide into the water. The whirling currents will tug the solidifying strands of eggwhite into shape around the yolk if you’ve been fast enough.
• Strategy 2: Slide the eggs onto a fine slotted spoon and submerge them into the water, then remove the slotted spoon as soon you the eggwhite has firmed enough to float on it’s own, until they’re ready to be taken out again.
• A combination of any or all of the above.
I personally go with the vinegar, whirlpool and half of the slotted spoon approaches since there’s no such thing as a saucer in my kitchen. I add a few drops – probably not a whole teaspoon-ful – of vinegar to the water, send it spinning, add the egg and as soon as the whirling slows down, set a slotted spoon into the pot to act as a kinda-sorta saucer and easy exit route.
7) Whichever way you’ve sent the egg swimming, poach it for 4 mins.
8) Carefully slide a slotted spoon beneath it and take it out of the water. Dab the bottom of it with a paper towel to remove the excess water.
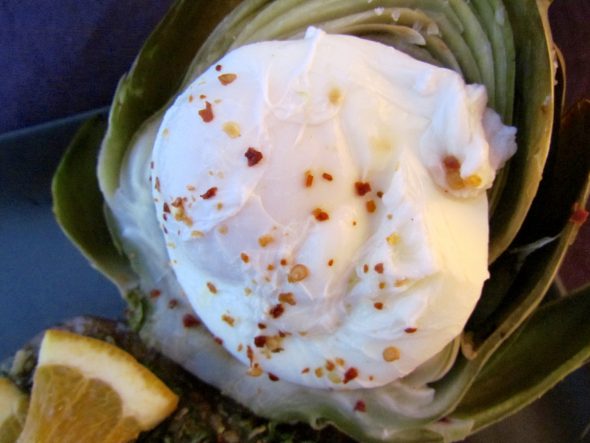
9) Set the poached eggs into the hollowed out middle of your artichokes, minding the pointy leaves.
10) Sprinkle them with a crack of your pepper mill and a few grains of fleur de sel.
11) Place them on your plates and get ready to serve.

Assembling The Dish
1) Release the steaks from their resting blanket and top them off with a generous dose of the Chimichurri.
2) Divide the remains of the Chimichurri into bowls or heaps to put the artichoke petals to good use later on.
3) Place everything on a plate with the artichokes, and don’t forget to bring an extra bowl to dispose of the used artichoke spoons.
Here’s a quick timeline for this one:
1) Prep the Chimichurri and the marinated steaks and let them chill in the fridge overnight.
2) Cook the artichokes.
3) Once they’re taking their ice bath, fire up the pan for the steaks.
4) Take the artichokes out of the water, squeeze out the remaining water, cut and brush them.
5) Introduce the steaks to the pan and start up a second pan for the artichokes.
6) Once it’s hot, pop the artichokes in.
7) Give the steaks your undivided attention until it’s time to take them out.
8) Deglaze the pan, take care of the sauce, cover the steaks and let them rest.
9) Get the water for poached eggs going.
10) Finish the artichokes.
11) Poach the eggs.
12) Plate up.
13) Dig in and…
Enjoy~!
♥
