
 It’s time for a sweet bite again! This one is as healthy as it gets, more of a power-snack than a sweet, actually. Brain-Food, if you will, which is closely related to how I came up with this one in the first place. During the nightmarish depths of exam-prep hell I could really feel myself burning through any and all sugar reserves in my body. Not wanting to resort to unhealthy or useless types of sugar-boosts, I dug up a dried-fruit-and-lots-of-seeds truffle recipe I had picked out – and forgotten about – months before.
The recipe came with a hilariously long list of around 20 different ingredients, but I desperately needed a distraction anways, so I made my way to one of the organic food stores in town known for stocking a huge selection of all things seedy-and-nutty.
As soon as I entered the dried goods and nuts section of the store, I couldn’t help but cringe back from a crate filled with bags, plastered with violently bright neon stickers. After making sure they wouldn’t attack me anytime soon, I edged closer to see what on earth deserved to be packed up as appalingly as this. Linen sacks of… whole walnuts, shells and all. I could almost feel the stormclouds gathering above my head. „100% VEGAN!!!“ „100% VEGETARIAN!!!“, the first neon badges screamed at me. Both tags? Really? It’s nuts. Inside their shells. How stupid do they think their customers are? „100% ORGANIC!!!“ Ok, I’m in an organic food store… what about those painfully annoying neon badges? The excessive caps and exclamation marks? Are they organic, too?
„THE NEW SUPERFOOD!!!“ I lost it. Snapped. Dropped my shopping basket right then and there and stormed out of the store, royally pissed off.
Nuts are healthy? Who knew! Walnuts? They’ve have been around since long before the first humanoids discovered the benefits of opposable thumbs – as evidenced by 60-65 million years old fossilized remains of early walnut trees and their fruit – and have been used in several culture’s traditional medicine for centuries, researched as a possible cancer cure even, but suuure, that’s one brand new discovery of a totally new product! Grrr. I’m going to wrap this up now, before I go bananas over it again.
I suppose that uncharacteristic outburst of temper goes to showing just how close to a meltdown I was during that last stretch of exam-hell – normally, in full control of my appreciation for heavy sarcasm, I might have simply laughed out loud and gone my merry way. Usually I simply ignore products with overly bubbly advertisement of its vegan or vegetarian properties, inwardly curse the same ads on obviously vegetarian products to hell and back again – do they really have to put that stamp on vegetables as well..? – and clamp down on the rising urge to go medieval on those people declaring things left, right and center as „superfood“ these days. Constant bombardement by agressive hype-marketing basically reducing customers down to mindless drones – one more reason for me to shop at the farmer’s market instead, right there.
Anyways, since I still needed something sweet but healthy, I marched to my usual hunting grounds, and decided to give the attempt at tackling the ridiculous ingredient list a do-over. I ended up with… a bag of dried dates and a bag of walnut halves. Needless to say I crawled into bed and skipped the rest of the day. Once I had cooled off again, I decided to go find out what could be done with what I could forage from my storage cupboard and the meager results of my „shopping“ trip the day before. What I came up with is a perfect example of the metaphorical phoenix rising from the ashes. With the original recipe crumpled up and thrown out, these simple but delicious bites have turned into an often requested crowd-pleaser over the years, a staple in all of my chocolate-and-sweets boxes and, since there’s no chocolate involved, a perfect treat during the hot months. Here goes!

Walnut & Date Bites
Depending on how small you want them, these amounts will net you 15-20 bites
100g Walnuts, shelled and halved
150g Soft dried Dates, pitted
50g Firm dried Dates, pitted
1 Tbsp Almond Butter
1 generous Pinch of Fleur de Sel
Opt: 1 Tbsp Water
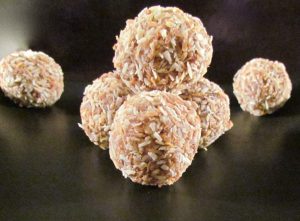
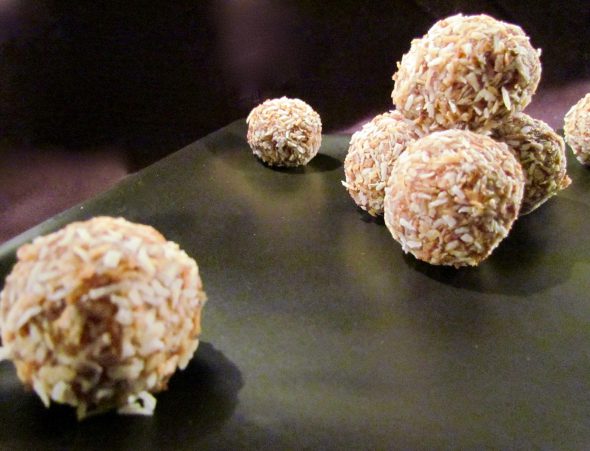
5-6 Tbsp dessicated, unsweetened Coconut Flakes
1) Chop up the dates with a heavy knife. The soft ones don’t have to be chopped up all that much – they will break up some more as you work them into the dough. Dice the normal ones as finely as you can, though. This is a messy one, but nothing a pair of CSI gloves and a bit of cold water can’t remedy. Place the chopped stickies in a large mixing bowl.
2) Toast the nuts in a large pan set on medium-low heat without any additional oil. Flip them over from time to time and remove the bits of their thin skins bursting off in the heat as they would burn before the nuts themselves are toasted. This can take anything in between 10 and 20 mins, depending on the water and oil contained in the nuts in front of you. Just keep an eye on the pan and flip them over regularely until they’re nicely golden all around. By the way, you might think you can avoid the skin-burning bit by using blanched walnuts – I know, I did – it doesn’t work well though, at least in my experience. They’ll end up missing a lot of flavor and lacking the crunch you’re looking for.
3) Once they start giving off small crackling noises, carefully break them up into smaller pieces – if you started with halves, break them into quarters. This will release their contained water a little bit faster and provide an additional surface to toast. Don’t go breaking them into too small bits though, their outsides would burn before they’re actually toasted through.
4) As soon as you’re closing in on the finishing line, sprinkle them with a pinch of coarse sea salt or Fleur de Sel and give the pan a good flip to distribute it.
5) Move the nuts into a pestle & mortar while they’re still warm and gently crush them into smaller bits. Don’t crush them too finely or even go grinding them into walnut flour, you’ll want something to bite inside your… „bites“. This one is yours to judge, really – I personally, starting with walnut halves in the pan, roughly break them into roundabout 6 pieces, with smaller bits naturally cracking off into the blend. If you’re not sure how big or small you’ll want your crunch, ball up a couple of walnut shards and a pinch of the dates and have a test-bite. Be prepared to resist the allure of „test-biting“ your way through the whole batch though~!
6) Pour the crunchy bits into the bowl holding the chopped dates.
7) Add the almond butter and knead the mixture as if it were a normal, floury dough until everything is evenly distributed. Since the dates are quite the sticky bunch, the „dough“ might appear to be a little too wet and soft for comfort, but don’t worry. The mixture is supposed to be soft and sticky – it will set and the coconut flakes will take care of the rest.
8) To check for the right consistency, pick up a small piece and roll it up into a ball. If the surface has a shine to it but the ball keeps its shape when set upon a flat surface, you’re golden. If it’s unable to resist gravity, sagging and oozing apart, add some more walnuts to the mix. If the ball appears to be on the firmer side of things, crumbly and resisting your efforts to roll it into an even globe, add a splash of water, thoroughly knead it into the dough and try again.
9) Divide the dough into 15-20 portions. Firmly roll each of them into a tight ball in your hands and set them onto a tray or plate lined with baking parchment. Set the tray aside for the time being and get the coconut flakes going.
10) Place a small pan on medium-low heat and scatter the base with the coconut flakes. These toast and crisp up really fast, so don’t go wandering, leaving the flakes unsupervised. Once you notice their color changing, flip the pan regularely until the whole batch is toasted golden and the aromas wafting up to you make you daydream about a nice, sunny beach, palm trees and a tacky, yet tasty drink sporting a stylish paper umbrella.
11) Move the flakes into a bowl and set it aside to cool off to room temperature.
12) To finish off the bites, roll them through the toasted coconut flakes to evenly coat them all around. Lightly press this first layer of flakes into the surface of the bites and re-roll/-shape them in necessary. Roll them through the flakes again, picking up a second layer and closing the sticky gaps in the coating, and set them back onto their tray.
13) Once all of the bites are coated, place them in the fridge, uncovered, for 2 hours to set and firm up a little.
14) Move them into an airtight container and store them in the fridge – somewhere in front for convenient access~!
Enjoy~

One more thing about the walnuts, no rant involved this time, just a shopping tip. Most stores and supermarkets have a section dedicated to dried goods, fruit and nuts, that sort of thing. They also have, in most cases, a section dedicated to baking ingredients and goodies. You can find stuff like walnuts and dates in both sections, the only difference, at least when it comes to walnuts, is the price. While some of the items you can find in both areas, cranberries or raisins for example, show huge differences in quality, the „baking“ walnuts are just as organic, untouched by sugar or anything else that doesn’t belong on a walnut, tasty, shelled and conveniently halved as the rather expensive ones in the dried goods section. I’m talking roundabout half-price here. Snoop around a little when you’re at the store the next time and try out some things – the nuts haven’t let me down yet. Dried fruit, on the other hand, have shown mixed results – terrible cranberries, yumtastic raisins and apricots…
I just realized how long my rant was, compared to the relatively short recipe… Sorry about that! Just ignore the crazy lady in case you don’t agree with her ramblings~. Oh, and yes. <insert straight face here> These bites are vegetarian. Vegan, too…? Not sure about the sea salt. I think, if you skip toasting the nuts you could even slap a Paleo sticker on the box.
♥
