
 From time to time, running around the Trader’s Forum in Lion’s Arch can be lethal. Lethal to dinner plans, that is. On my way to the Trading Post nearby, a lonely banquet table, filled with Chocolate-Omnomberry Cakes caught my eye… and wouldn’t let go. Of course, for once, a sweet, chocolate’y treat was exactly what I was craving at that moment, damned be the beef-related results of my shopping trip earlier that day!
I don’t think I’ve ever been that quick to jump into less comfy clothes to storm towards the next best bakery with a chocolate cake on my must-have-now list. Actually, I don’t think I ever bought a chocolate cake before… which was exactly what popped into my mind right when I was halfway out the door already. Quickly sobering up from that uncharacteristic episode of sweets-frenzy, I closed the door again and decided that, if I’m hit by an unfamiliar and therefore totally unexpected craving, I should be doing something about it myself and use the source of it as inspiration~! After all, no bakery I know could possibly satisfy Omnomberry-needs. After digging up a somewhat obscure recipe – listing “Nuts” and “Chocolate” without further specifying which kind, just to name one of the oddities – I had been playing around with for a while, I sat down and gave it a thorough overhaul to make it work Tyria-Style. So, thanks to the gentle soul planting down a Giant Chocolate-Omnomberry Cake for the hatchlings in the Quaggan Ponds, this one…

…made me come up with this
Again, dried cranberries served as my version of omnomberries – combined with dark chocolate… yum! And the best thing about it: No oven needed! Here goes…
The Chocolate-Cranberry Tarte
120g 85% Dark Chocolate
30g 50% Milk Chocolate
65-70g Butter
3 L Eggs
1 Pinch of Salt
80g Fine Caster Sugar
120ml Light Cream
3 Tbsp Self Raising Flour
30-40g dried Cranberries
3 Tbsp dessicated Coconut Flakes
1) Brush a large, roundabout 25-28cm DIA, heavy-based pan with a tight-fitting lid with a light layer of vegetable oil.
2) Evenly sprinkle the bottom of the pan with the coconut flakes and tilt the pan in order to get some flakes to stick to the sides as well. Once the bottom and about 2cm up the sides of the pan are evenly lined with flakes, set the pan aside for the time being.
3) Separate the eggs – place the eggwhites in a large mixing bowl and gently slide the eggyolks into a smaller bowl.
4) Set up a waterbath – bring a pot of water to a gentle simmer on medium heat and pop a large heatproof mixing bowl on top. Make sure the bottom of the bowl doesn’t touch the surface of the water in order to keep the chocolate from overheating. Add the butter and the chocolate to your bowl and slowly melt them while stirring from time to time.
5) Once the ganache is smooth and silky, take the bowl off the waterbath and set it aside to cool down a little.
6) Meanwhile, add 40g of the sugar and the salt to your eggwhites. Use an electrical whisk to beat them on low speed until the sugar has completely dissolved. Once you’re not getting a grainy feel though the whisks anymore, set them to high speed and keep at it until the eggwhites turn into a stiff fluff. Set the bowl aside and return your attention to the ganache.
7) Add the cream, the eggyolks and the remaining 40g of sugar to the chocolate ganache, one after the other and, with your whirr-o-matic, whisk until each addition is well incorporated into the mixture.
8) Sprinkle in the flour, and, before picking up the whisks again, fold it into the mix with a rubber spatula. I stress the “before” since I’ve just recently ended up with only my feet peeking out from under a thick cloud of flour, having forgotten all about that step in the heat of the moment…
9) Once the flour is well blended into the dough, set the electrical whisk aside, pick up your spatula again and gently fold the eggwhites into the mixture, making sure not to squish the pretty bubbles more than absolutely necessary to incorporate them into the ganache.
10) Pour the mixture into your prepped pan and set it onto medium-low or 1/3 of your stove top’s maximum heat.
11) Dot the surface with the cranberries – some will sink into the dough a little, some all the way down to the bottom, some will get stuck somewhere in the middle. Evenly distributed fruity morsels, the easy way.
12) Pop on the lid and make sure it’s firmly closed.
13) “Bake” the tarte for around 20-30 mins.
14) Check up on it from time to time and remove the moisture gathering on the inside of your lid with a kitchen cloth. Be careful not to tilt the lid to either side while you’re taking it off to dry – you don’t want the drops to gather together and splash down into your pan, ruining the tarte in the process. Furthermore, be quick with this step in order to keep the temperature high inside the pan. If you take the lid off for too long, the tarte will sink in on itsself before it had the chance to set properly.
15) Have a first toothpick-check after 20 mins. Poke it into the middle of the tarte and quickly pull it back out – if no crumbs are sticking to it, the tarte is done.
16) If you’re looking at a bunch of wet bubbles on top of the tarte after 25-30 mins, increase the temperature a notch, close the lid again and have another look-see after 5 more mins.
17) Once the infamous toothpick comes out of the dough clean, remove the lid, take the pan off the heat and let it steam off while it’s still inside the pan for 3 mins.
18) Line a large cutting board with a sheet of baking parchment and carefully but quickly – it’s still soft at this point, so it can easily break apart if you’re either too slow or too rough with it – turn the tarte out onto it.
Since the pan I’m using for this kind of thing is a rather heavy one I usually need hubby’s help with this step – quickly slamming a heavy pan onto a cutting board while growling a quick prayer to any available dieties in the cake- or pan-business makes a considerable amount of noise, which once eliminated any and all chances I had at surprising hubby with a freshly made cake… oh well.
19) Have a peek at both sides of the tarte once it’s cooled down a little, check which side is prettier and turn it over again, if necessary for a pretty visual.
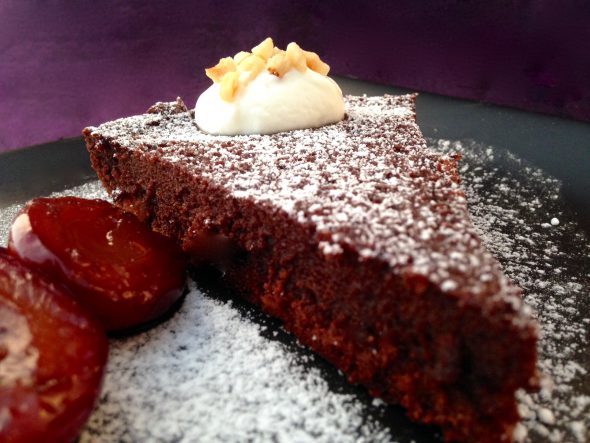
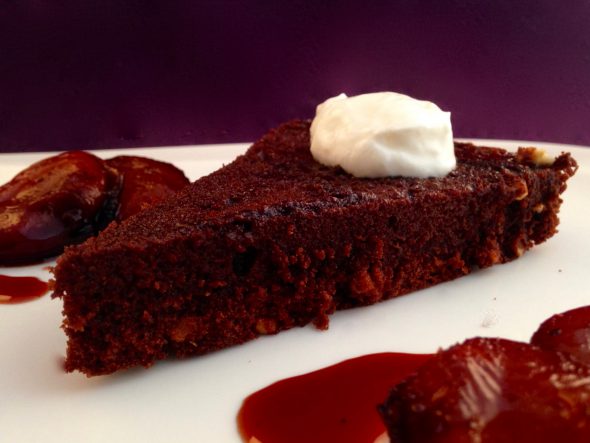
20) Dust the tarte with icing sugar and dig in~!
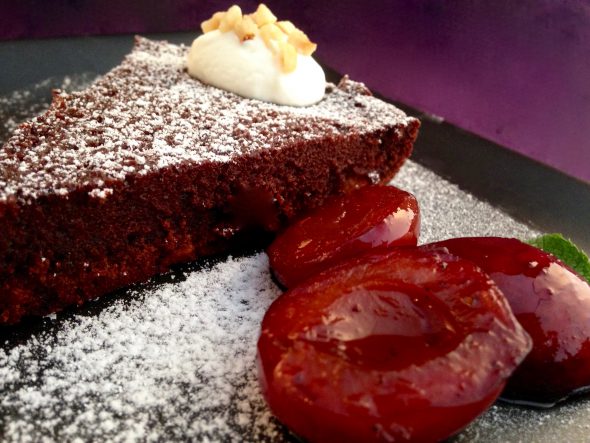
Oh, wait… hold your horses for a couple of minutes longer… if you can! In case you’re wondering about the plums cozying up to the slices in my pictures – I needed a juicy and fruity counterweight to the, for my standards, excessive amounts of chocolate crammed into one slice of cake, so I simply popped 3 pitted and halved ripe plums into my griddle, cutting surface down, deglazed the pan with a few glugs of Marsala wine, added 2 tsp of light muscovado and left the liquids to simmer down into a syrup, nicely coating the plums. Not really a “recipe” per se, but there you go. Ta~dah.
Enjoy~
♥

Looks scrumpcious Nahdala. I really admire gaming people like you that have the time to do these neat things like this.
Keep up the delicious work.
LikeLiked by 1 person
Thank you Vincent!
LikeLike