
 You guys didn’t really think I’d go to a fantastic place like Madeira and come home empty-handed when it comes to food-related things! I know, it took a few weeks, but you can’t rush a delicious meal, or the recipes for it, right? Anyways, during the first couple of days on that wonderful island, I really thought I’d return without showstoppers in my recipe notebook – not because the food was bad, mind you, almost everything we had was absolutely delicious – but because the traditional Madeiran cuisine we indulged in is a very no-nonsense one.
Fresh espada – swordfish, grilled whole, salt, butter. Roastbeef, thinly sliced, on garlic-buttered Bolo de Caco – the islands signature bread. Freshly caught prawns, grilled, salt, garlic. Fillet of beef, hot stone, salt, pepper. That list goes on and on. All eyes on the product, no fuss on top or next to it.
That sinking feeling in my stomach while trying to ignore the still empty pages vanished on our third day, on a hiking trip to the Valley of the Nuns – that sinking feeling remained, but this time the roughly 650m high, ridiculously steep cliff we found ourselves standing on, was the culprit. Up there, peeking over the edge, or in my case, clinging to a lamp post, we couldn’t help but notice that someone obviously mentally challenged had, at some point a couple of hundred years ago, decided it was a bright idea to pickaxe some sort of “path” into the cliff, down into the valley. Guess what… Evidently I haven’t been a mountain goat or lizard in a previous life. But, eventually, we managed to peel ourselves off of the cliff down below unharmed and found ourselves in a beautiful forest. Having gotten used to the various types of palm trees, bananas and overall sub-/tropical fauna, suddenly staring at a very familiar type of forest with chestnut-, pine-, beech- and occasional cherry trees, was an odd experience.
Something began scratching at a hidden trap door somewhere in my head…

Yep, down there… That’s Curral das Freiras, ~450m above sea level, roundabout 650m below us.
Once we had arrived in the little village and collected ourselves again on firm ground, we headed towards a little restaurant nearby to have a go at the valley’s signature products: chestnuts, honey, ginja – a cherry liqueur which is traditionally served in chocolate cups – and beef. Since hubby insisted on spidering back up that insane cliff afterwards, we skipped the liqueur with the promise of buying a bottle on our way out and focused our full attention to the other specialities. After we shared a portion of – yet again, simple but oh so yum! – roasted chestnuts coated with the valley’s bees work, hubby dug into his roastbeef bolo with relish while I nearly choked on a piece of chicken that had obviously begun a miserable life in the Sahara desert and died from dehydration after crossing the Atlantic ocean. Once I got to the filling it got better. Way better! Creamy chestnuts and slices of cured ham made up for the bone-dry bird quite nicely, and that chestnut-cream sauce…
The trap door in my head started to creak open…
Later that day, back on top of the recently mastered cliff, we realized that we had forgotten all about the Ginja. Hmmm. That forest. Cherries. Chocolate. Birds. Chestnuts….
The trap door slammed open. Out came a bunch of ideas, wickedly grinning and waving banners showing the Valley of the Nuns and the Black Forest, this place reminded me so much of, at me. Ha! I usually don’t like saying “This place looks just like <insert name of other place here>” since, well, every place is unique. The odd contrast to what we had seen the days before, that around-the-corner-central-european type of forest nestled away in a gorgeous valley on an island covered in tropical and subtropical fauna, just struck that kind of nerve, I suppose. That, and the lost potential of the stunningly tasty ingredients, conjured up the whole gamey-bird-nuts-and-fruit imagery of classic winter dishes from around our corner of the world, I think.
Just to highlight that contrast, you can find this seaside panorama 19km away from the Valley of the Nuns. Just for the record, that’s the Cabo Girao, one of Europe’s highest sea cliffs, clicked from the upper left corner of the seaside promenade in Funchal.

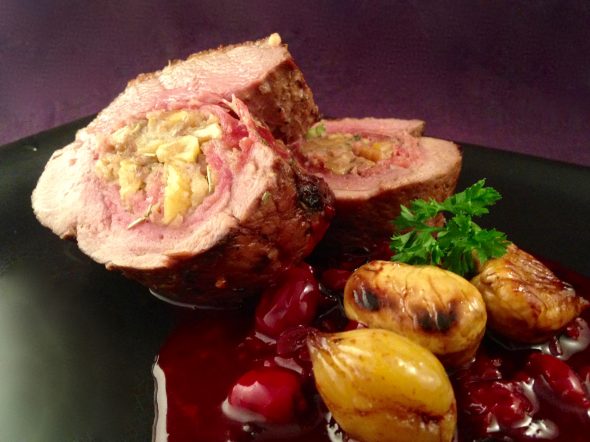
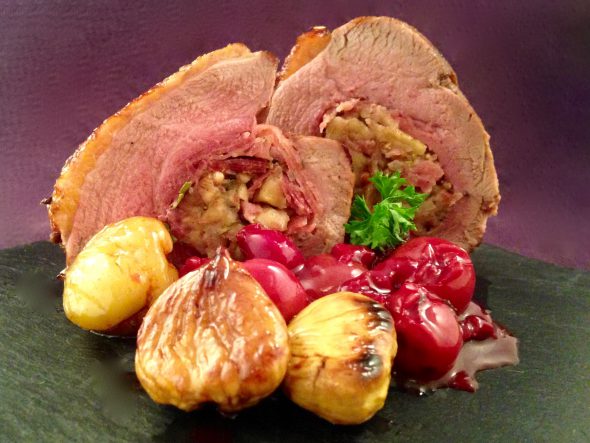
When I started hammering out the details on this recipe back home, I had a pheasant or a bunch of quails in mind to fill the “gamey bird” spot in the lineup, but, for once, my butcher and the local hunters failed me – I wasn’t able to get my hands on either. So I went with the obvious can’t-go-wrong-with-this-one option, a duck. Since I’ve made a Tyria-inspired stuffed duck breast not too long ago, I decided to go with the “other” method of stuffing one of these beauties. Check out the Bacon and Date Stuffed Duck recipe if you’re interested in another possible method of preparation. This one’s the less fiddly way, one large breast instead of two small ones and a pocket, cut into the meat from the side, for the filling instead of a “tunnel” – less fiddly, but absolutely yumtastic and just as pretty nonetheless~!

The Duck
450-500g Duck Breast – 1 male breast should hit that weight
22 roasted Chestnuts, shelled and de-furred – 10 for the filling, 10 for the side, 2 as a sna… ahem. 2 to check, if the quality is up to your standards~! Maybe even 3.
5 Slices of Black Forest Ham – or an equally punchy, cured and smoked ham; Bayonne works, Serrano doesn’t.
1 Tbsp Crème Légère
1 Tsp runny Honey
1/3 Tsp fresh Rosemary, finely chopped
½ Tsp dried Rosemary
¼ Tsp Cinnamon
½ Tsp Mustard Seeds
½ Tsp Coriander Seeds
½ Tsp Black Peppercorns
2 Cloves
½ dried Bay Leaf
1 Pinch Coarse Seal Salt
1 Pinch of ground Juniperberries – while I still loathe these with a raging passion, they really work wonders in this case
Salt and freshly cracked Black Pepper
1) First things first, get the filling out of the way. The longer roasted chestnuts are in easy reach, the higher the chance they… get lost somewhere on their way out of their shells into the filling.
2) Place the chestnuts, crème légère, honey, fresh rosemary, cinnamon and a generous pinch each of pepper and salt in a mortar or a food processor and have at it, working the ingredients into a thick paste. It doesn’t have to be extra smooth, just make sure it comes together well blended – that one’s up to your personal preference.
3) Move the filling into a small bowl or container, cover it with clingfilm or a lid and set it aside.
4) Pat the duck breast dry with a paper towel and check for excess fat and gnarly bits – remove them with a very sharp knife, should you encounter any.
5) Use the tip of the same very sharp knife to score the skin crosswise in a diamond pattern. Place the cuts about 1cm apart and make sure you only slice through the layers of skin and fat, down to but not into the meat. This will give the fat below the duck’s skin an easy escape route later, making it easier for the skin to crisp up beautifully.
6) The following steps do seem rather lengthy, so, for those of you not doing something like this for the first time, here’s a short version in advance:
– Cut a large pocket into the thicker side of the meat.
– Line the pocket with ham.
– Tightly and evenly stuff it with the filling.
– Use the ends of the ham to seal in the filling.
– Close the cut with butcher’s string and skip to point 30).
Now, the long version, a step-by-step, if you will:
7) Once the skin-treatment is done, place the breast in front of you, skin-side up, thicker end pointing towards you. Look for the thicker side – the one that had previously been attached to the other breast of the bird.
8) Cover the skin with a paper towel to get a better grip on the thing without harming the pattern you’ve cut into the skin.
9) Firmly hold the meat down with the palm of your hand, place the tip of your knife a bit below the rim of the skin near the upper end of the breast and carefully cut lengthwise into the meat, right down and into the middle of the piece. Try, by means of feel-following the knife with your hand on top of the breast, to leave about a thumb’s breadth of meat unharmed all around.
10) As you’re guiding the knife through the thick end, try not to cut the entire side of the breast open as you would when butterfly’ing one of these. Stick to the 1-thumb-rule and cut along the curve until you reach the flat side again. That way, you keep the opening as small as possible and the potential for filling-leakage at a minimum.
11) During this whole process, make sure you don’t cut through the meat – pay some extra attention to the bottom side – due to the fillet of the breast being somewhat loosely attached to it, the thickness of the meat around that area can be misleading and cause hole’y mishaps. If it’s a smaller one, you can take countermeasures later, though.
12) Place the breast on a sheet of clingfilm, set it aside and give your work surface, knife and hands a thorough cleanup.
13) Tilt the breast a little and roughly measure the length of the backside of your pocket. Turn it, so the pocket faces away from you.
14) Lay out the slices of ham, overlapping eachother, until the aligned ends of the slices fit that length.
15) Place your hand, palm up, on one half of the ham “sheet” and flip the other half onto your palm.
16) Gently press, wriggle and tuck the sheet into the pocket to line the inside of it with the ham – try to get the middle of your ham slices to meet with the “back end” of the pocket. The ends of the slices will, if everything went according to plan, hang out on both sides of the cut you’ve made.
17) Flip the breast onto it’s “closed” side for easy access to the ham-clad pocket. If you have one of those nifty taco trays, use it to stabilize the meat. Flip the dangling ends of the ham to both sides and gently but firmly press the sheet to the inner walls of the pocket, pressing out air bubbles.
18) Once you’re satisfied, grab your bowl of filling and tightly pack it into the prepped pocket. Again, try to avoid creating or sealing in air bubbles of the bigger variety.
19) Don’t overstuff it, check if the opening can still be closed around the filling from time to time.
20) When you’re done with the stuffing, fold the ham-ends on the bottom side of the breast into the pocket, as closely to the filling as possible.
21) Grab the ends dangling over the skinside and tuck them in between the lower layer and the meat of the bottom side.
Think of it this way: if you’d do the whole thing outside of the duck, you would be rolling the filling into a tightly packed and sealed ham-cigar. While doing exactly that actually seemed like a good idea at some point, it took me way longer to fiddle around with it to fit it to the inside of the pocket I had cut into the meat, and, in the end, I left too much room somewhere and it popped open in the pan. So, the whole cut-line-stuff-tuck-routine may seem a bit complicated, but its really easy after you’ve done it at least once. I’m getting the feeling that, by going into detail like this, I make it sound a lot more complicated than it is…
22) Flip the breast onto its bottom side, place your hand on top, feel for knots and lumps inside, and sort of “massage” the filling into an even layer or log inside the meat.
23) Lay out another sheet of clingfilm and place 4-5 pieces of butcher’s string vertically on top of it.
24) Gently place the duck across the strings and pull the top rim of your pocket over the bottom rim, tucking in the bottom rim, if you will, to close the cut. If your duck is giving you a hard time with this, use toothpicks to convince it to stay put until you time up the silly thing with the butcher’s string.
25) Tie up the meat into a firm package with the butcher’s string, making extra sure the pocket-cut on the side is firmly closed.
26) Place the meat back onto the clingfilm, skinside up.
27) Give your mustard seeds, coriander seeds, peppercorns, cloves and juniperberries a light tap with your pestle & mortar, just to crack them open a bit.
28) Generously dust the skin with coarse salt, rub it in a little, then add the cracked spices and massage them into the diamond pattern as well as the meaty side of the breast.
29) Tuck the bay leaf in under the meat before flipping it, once more, onto its bottom side.
30) Firmly roll the breast into the clingfilm, giving it an even’ish shape and tightly sealing it in with the spices.
31) Place the rolled up duck in the fridge for at least 4 hours, best over night, to set and have the spices’ magic worked on it. Time for a nap or the chutney~!
32) Once you’re ready to prep it, you have 2 options, depending on your kitchen~
33) If you’re using an oven…
– Preheat it to 160°C, unwrap the duck and pop it in for 25 mins.
– Add a dab of clarified butter, a sprig of rosemary and a crushed clove of garlic to a pan, get it up to temperature and finish off the duck in there, skinside down, of course, to crisp it up.
– Once the skin’s nicely rendered, crispy and yummily golden, place it on a warm plate, cover it with aluminum foil and leave it to rest for 5 mins.
34) If you’re not using an oven…
– Stack a bamboo steam-basket setup onto a pot of water simmering on medium-high heat.
– Place your duck-log, still wrapped, skinside up, inside the basket, pop on the lid and leave it to steam for 20 mins.
– Once that’s done, unwrap the duck, remove those spices that come off at a light touch along with the excess duck fat trapped inside the clingfilm and place it, skinside down in a cold, dry pan. Set the pan onto high-heat and let it get to its maximum temperature.
– By starting this process in a cold pan, you’re basically taking the skin to the point it would be coming out of the oven. The fat will slowly render off while the meat, protected by the skin, doesn’t get too much heat.
– Once the temperature of the pan is at its maximum and the skin is sizzling away, have a look at it. – The skin should be taking on a golden hue at this point, starting to crisp up.
– Give the meat ¼ of a turn, pop on the lid and give it 2 mins to get some tan, before turning it by ¼ again.
– Repeat this until each “side” had 2 mins of quality searing-time and finish off the party by 2 more mins on the skinside.
– As always, tuck in the meat under a blanket of aluminum foil and rest it for 5 mins.
36) Slice it into 2-2,5cm thick pieces just before serving. Time to finish off the chestnuts~!
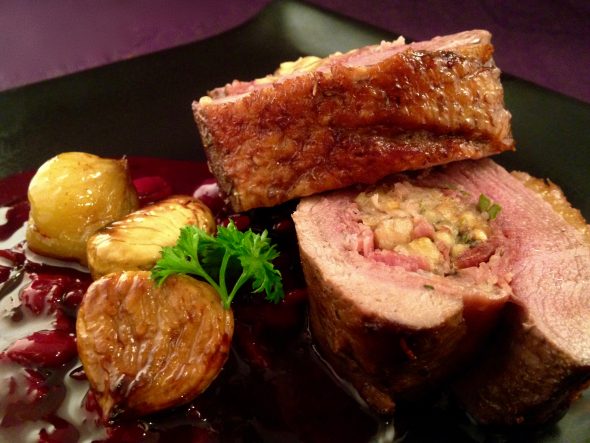
The Chestnuts
10 roasted Chestnuts, shelled and de-furred – the ones I’ve mentioned above
100ml Tawny Port
1 Pinch of Fleur de Sel
Opt: 10g cold Butter
All right, luckily, chestnuts, once roasted and shelled, don’t need a lot of work to be tasty.
1) Deglaze the pan you’ve just seared your duck in with the port. Make sure to stir up all of the yummies, juices and spices, sticking to the pan, with a wooden spoon.
2) Pop in the chestnuts, give them a good swirl and turn the heat down to the lowest setting after the initial bubble-up.
3) Cover the pan with a lid and leave the sauce to simmer until you’re ready to plate up – don’t take too much time, since those 100ml go poof really fast, thanks to the pan being piping hot from searing the duck when the liquids go in. Hence the lid – if the pan isn’t all that hot anymore, keep the lid off and let the sauce simmer off some of its moisture.
4) Just on a side note, this one’s not really supposed to be a sauce per se, the liquid’s just meant to thicken up a bit and coat the chestnuts, give them a bit of moisture and flavor. After all, theres a showstopping chutney on its way onto the plate~!
5) Just in case your saucy coating almost entirely poofs out of existence along with the port, pour in some more and let the residual heat of the pan take care of it – don’t set it back onto the heat until you’re sure it actually needs some more to reduce down into a sauce.
6) If you want a more silky touch to your port reduction, add the cold butter to bind it a little more.
7) Have a taste and season it with salt, if necessary.

The Sour Cherry Chutney
300g frozen Sour Cherries
150g preserved Sweet Cherries
60g Gelling Sugar
1 Tbsp Dark Muscovado
75g Shallots, finely chopped
1 Tsp Rapeseed Oil
30ml Aged Balsamic Vinegar
6 leafy Sprigs of Tarragon, leaves finely chopped
1 Star Anise
2 Tsp freshly cracked Black Pepper
1 Tsp Salt
1 Pinch of dried Habanero or Scotch Bonnet Flakes – or something a bit more mellow if these are in danger of nuking your tastebuds into oblivion. Their aroma just goes wonderfully with the cherry. If I have one at hand, I usually add a very finely chopped ¼ of a deseeded fresh scotch bonnet at the end, but then again, I’m very tolerant towards the punch of chilli heat.
1) Rinse and drain the cherries. Add them to a bowl large enough to comfortably hold all of them.
2) Sprinkle the lot with the gelling sugar, gently fold it into the cherries and set the bowl aside for about 30 mins.
3) After about 20 mins into the cherries’ macerating time, add the oil to a heavy-based pot, again, large enough for the cherries, and pop in the shallot cubes.
4) Set the heat to medium-high and give the shallots around 5 mins to soften up a little.
5) Crumble in the muscovado and gently stir the lot until the sugar has dissolved.
6) Add the star anise, salt, pepper and chilli flakes
7) Deglaze the pot with the balsamic vinegar and chase it with the contents of your cherry bowl.
8) Give the lot a good but gentle stir with a rubber spatula to loosen any shallots or spices possiby sticking to the bottom of the pan while not squishing the cherries more than necessary.
9) Once the mixture gets up to a gentle boil, reduce the heat to medium and leave it to simmer away for 15 mins.
10) After 15 mins, check up on the chutney’s consistency. You’re looking for a thick jam-with-fruit-bits’ey kind of sticky yumness. Since it will thicken up a bit more as it cools down, cut it some slack in case it seems to be almost there.
11) If you’re not sure, dip the backside of a cold metal spoon into the mix, give it a few blinks to cool off and check if it’s trying to escape off the spoon or staying in place. If it stays, nicely coating your spoon in a thick, dark purple layer, you’re golden.
12) One you’re at that “Almost” point, turn the heat to low, gently fold in the tarragon leaves, give them 5 mins to develop their aroma and pass it on to the chutney, then have a careful taste.
13) Adjust the seasoning with salt, black pepper, more tarragon – if you add more, up the dosage in smaller increments and give them time to develop their flavor in the warm chutney before adding more – or more chillies.
14) Set aside the amount you wish to serve with the duck and fill the rest of the chutney into sterilized jars while it’s still hot, tightly seal them and keep them in a cool and dark place – that way you’re looking at a stash of a real crowdpleaser – at least my crowd is pleased over the moon by this one – that will keep up to 3-4 months.

This chutney plays rough with contrasts, the punch of the very sour sour cherries and the sweetness of the other bunch, the spice of the pepper and chillies and the earthy aromas of the tarragon, the salt and the sugar, and so on. I admit, at first taste, I didn’t expect it to create such a delighted uproar from so many people since, both very hot and very sweet in combination with the infamous tarragon so many people usually object to, this type of composition is usually one people either want to take a bath in or hate with a raging passion, with no gray in between. Well, I guess, going to the extreme on so many levels was the right thing to do. There will be jars of this in this years holiday-gift-boxes~!
The followup for this one, a fitting dessert, also inspired by the Valley of the Nuns and that sense of the Black Forest looming behind it, will be coming your way next week~
Enjoy~!
♥
