
 You guys might remember that pesky Annual Cold Snap during February I mentioned 2 weeks ago. Well, this year it brought a friend and the two of them really went to town. The usually relatively short cold front freezing the dress choices for Valentine’s Day into non-existence recently teamed up with a Siberian cold front nosing around our neighborhood.
To everyone’s surprise, those two ganging up on our thermometers, beating them down to around -10°C, didn’t turn out all that bad. Quite the contrary, actually. Evidently, icy storms heading our way all the way from Siberia are dry enough to scare off any and all traces of clouds, leaving us with a picture perfect – admittedly somewhat late – Winter. Huzzah~! White frosted forests, azure blue sky, bright yellow sun and all that with a side of ridiculous sub-zero temperatures brutally clashing with the postcard visual and leaving absolutely no questions about what to wear. Of course, hubby and I grabbed at that chance to enjoy the extraordinary scenery the weather painted across the great outdoors around us and soak up a couple of sunbeams this past weekend. As usual, while hubby was arming himself up to the teeth with every bit of camera gear he owns, I took care of conjuring up a trail snack capable of keeping us warm and moving for the day and this time around, taking the temperatures into consideration, I added a thermos filled with a firey broth to go with a handful of yum to fight off the frostbite~

The amounts listed will net you 4 servings… or a lunch on the trail and a dinner for 2~!
The Szechuan Duck Broth
1kg Beef Short Ribs
1,5kg Duck Bones or Carcass – most butcher’s shops around here sell bones of any sort sealed up in ~1-2kg packages if they do the slaughtering themselves as well. If your butcher doesn’t fall into that category, you might have to order them or check the frozen meats section of a top-shelf supermarket.
2 Tbsp Grapeseed Oil
2 Carrots, roughly chopped
1 Brown Onion, roughly chopped
1 Large Clove of Garlic, roughly chopped
800ml Water
200ml Plum Wine
75g Ginger, finely sliced
3 Star Anise
3 Dried Shiitake Mushrooms
2 Tsp Szechuan Peppercorns
1 Tsp Coriander Seeds
1 Cinnamon Stick
1 Kaffir Lime Leaf
2 Spring Onions, light green and white parts sliced into thin ringlets
Salt
Opt: 5-Spice Powder to taste
Opt: Enoki Mushrooms, Plum Slices, Carrots, finely julienned for decorative measures
1) Pre-heat the oven to 200°C.
2) Snap on a pair of CSI gloves and get close and personal with the bones: give the pile of bones in front of you a once over and make sure they’re separated rather than still holding together as a whole carcass or rack of ribs.
3) Drizzle and rub them with enough grapeseed oil to make them shine before placing them on two separate trays. Add a generous sprinkle of salt to each stack of bones for good measure.
4) Pop the trays into the oven and roast the bones for roundabout 50-60 mins, turning them over from time to time, until they turn a beautifully honey-golden color.
5) Set a large pot onto medium heat and add 1 Tbsp of grapeseed oil.
6) Once the oil starts taking on some heat, add the onion-, garlic- and carrot cubes as well as the star anise and, while stirring occasionally, cook them until they soften up and start to caramelize. ~10 mins should do the trick.
7) Once that’s done, deglaze the pan with wine and swirl up all of the roasting juices sticking to the pan with a wooden spoon.
8) Allow the liquids in your pan to reduce by half, then add the ginger, Szechuan pepper, mushrooms, coriander seeds, cinnamon and the beef ribs.
9) Loosen the roasting bits left on the tray that held the ribs with a few spoonfuls of the water and add the lot to the pot as well.
10) Have a look at the duck bones on your other tray. You can drop them into your stock as they are right now or, if you’d like to amp up the oomph in the meaty flavor department, use a small hammer to break up the bones that are still intact despite the ordeal they just went through in the oven. That way, the marrow will have it easy to ooze out into your stock.
11) Broken or whole, transfer the duck bones into the stockpot as well and remember to take the juices on the tray, swirled up into a glug of water again, with them as you go.
12) Cover the bones in your stockpot with the remaining water and fire up the heat beneath the pot.
13) Allow the contents of the pot to work up a rapid boil on high heat, then reduce the heat to low, close the lid and leave it to gently simmer away for 3 hours.
14) Line a fine sieve with a double layer of muslin and wedge the sieve on top of a pot large enough to catch the stock. Pop the lime leaf into the pot before moving on.
15) Once the time’s up, use a pair of kitchen tongs to fish the larger, easily reached bones out of the stock and set them aside for the time being.
16) Filter the broth through the lined sieve into the second pot.
17) Pop the bones you’ve removed earlier into the sieve and leave the contraption to its own devices until the broth has cooled off entirely – and the swimmers have dripped off every bit of flavor into the broth as well.
18) In theory, you’re just one blink on the hot stove away from a bowl of steaming hot and spicy broth – in practice, you might fancy a really clear broth aka Consommé. To achieve that, the quickest and easiest way would be to pour the cooled broth into ice cube trays or baggies, freezing them and, once solid, placing the cubes in another double-layer-of-muslin-lined sieve on top of yet another pot.
19) While they’re slowly thawing and oozing through the cloth, the majority of the solids will stay behind, locked in the fabric. Golden, clear broth, check~!
20) Go through the usual taste-and-adjust routine, adding salt and the optional Five Spice if necessary.
21) Assuming you’re serving the broth at a table rather than in a thermos, bring the clarified broth to a gentle simmer on medium heat once dinner’o’clock is approaching and distribute the finely sliced spring onion and toppings of your choice in your serving bowls – pour the broth on top of them just before serving. The same concept applies, of course, to the thermos idea as well – you just don’t have to pay any extra attention to the visual effects of your julienning skills~
By the way – this, minus the deco veggies, spring onions and five-spice, is what passes for “duck stock” in my freezer most of the time, so I always have a batch of it stashed away, ready to be dolled up for an occasion like this~!
The Dumplings – Part #1: The Dough
200g Wholegrain Wheat Flour
300g Self Raising Flour
500ml Warm Skimmed Milk
2 Generous Pinches each of Sugar and Salt
1 Cube/42g Fresh Yeast
A few drops of Grapeseed Oil
1) Sift the flours into a large mixing bowl and press a well into the center of the flour pile with your knuckles.
2) Flake the yeast into the well and dust it with the sugar. Add 3 tbsp warm milk and leave this contraption in a warm room/place to „wake up“.
3) Add the rest of the milk and work the lot into a smooth dough first with a wooden spoon, then – once the spoon bit gets too hard – with your hands. Once the dough stops leaving sticky spikes on the sides of the bowl, tip it out onto a floured work surface and knead it through for 6-8 more mins.
4) If the dough remains sticky, work in more plain flour, one thin dusting at a time, until it comes together nicely.
5) If the dough starts to flake off dry bits around the edges as you work it through, lightly wet your hands with a few drops of milk at a time and keep at it until the dough agrees to ball up smooth and even.
6) Brush the bowl with a thin sheen of grapeseed oil, roll the dough up into a smooth ball and place it back in the bowl.
7) Cover the bowl with a damp kitchen towel, place it in a warm spot (yeast just loves temperatures of 25-30°C) and allow the yeast to work its magic for about 1 hour, doubling the volume of the dough in the process.
8) This would be the perfect time to take care of the duck, by the way~
9) Turn the dough out on a lightly floured surface again and, very gently, divide it in two, then lightly roll them into two logs of the same lenths and thickness. Line the logs up next to eachother.
10) With a very sharp knife and a couple of well-placed swipes of the blade, cut the logs into 8-10 evenly sized portions.
11) Roll the segments into smooth balls and place them on a tray lined with a sheet of baking parchment.
12) Cover them with a dry kitchen towel and allow them to rise once more for 30 mins~
Time to finish off the filling in the meantime~
The Duck
400-450g Duck Breast
1 Tsp Szechuan Peppercorns
1 Star Anise
1 Clove of Garlic, bashed
1 Slice of fresh Ginger
1 Tbsp Butter
1 Generous dusting of Five Spice Powder
1 Generous Pinch of Salt
1) Score the skin of the duck breasts, using a sharp knife, creating the signature diamond-shape pattern. Make sure you cut just deep enough to slice through the skin and the fat beneath without cutting into the meat itself.
2) Sprinkle the skinside with salt and a generous helping of five spice and carefully rub the spices into the cuts.
3) Place a non-stick frying pan on medium-high heat and place the duck inside, skin-side down.
4) Pop on the lid and allow the pan to catch up with the heat beneath. Take a peek – at some point, the duck’s fat should be oozing out beneath the meat.
5) As soon as the sound of the meat sizzling in the pan reaches your ears, take a look at a timepiece and, from that point on, allow the duck to sizzle away undisturbed for 6-7 mins.
6) Remove the lid, flip the duck over, add the pepper, garlic, ginger, star anise and butter.
7) Turn the heat down to medium-low, allow the butter to melt, and baste the duck with the spiced juices gathering at the bottom of your pan for 3-4 mins.
8) Wrap the duck in aluminum foil and set it aside to rest and cool down – keep the pan on the stove for the next round.
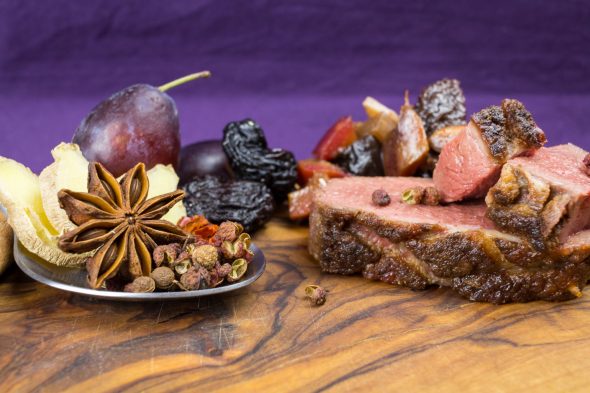
The Plum Sauce
1 Shallot, finely diced
1 Clove of Garlic, finely diced
200g Plums, pitted and roughly chopped
5-7 Large, juicy Prunes – if the fresh plums are on the sour side of things, add another prune or two
40g Dark Muscovado
100ml Plum Wine
200ml Duck or Beef Stock – you could, of course, use some of the broth above~
1 ½ – 2 Tsp Five Spice Powder
1 Tsp Szechuan Pepper
2 Thin Slices of Ginger
1 Tbsp of Soy Sauce
1) Add the shallot and the garlic to the liquids in the duck pan. Sauté the lot for 5 mins until they’re tender.
2) Pop in the plums and sugar, and gently stir the lot for a few mins until the sugar has dissolved.
3) Deglaze the contents of the pan with the red, plum wine and stock, then allow the sauce to simmer away for about 10 mins. Stir occasionally to keep the swimmers from sticking to the bottom of the pan or to eachother.
4) Once a test-bite of a slice of plum tells you they’re perfectly tender, fish out the plums and prunes with the help of a slotted spoon and transfer them to a mixing bowl.
5) Add the peppercorns to the sauce and allow it to simmer and reduce down for 10 more mins.
6) Strain the sauce through a sieve into another pot to remove the loose spices and have a taste-test.
7) If the sauce still seems too runny for comfort, reduce it down further for a while. Once you’re satisfied with the consistency, adjust the seasoning if necessary.
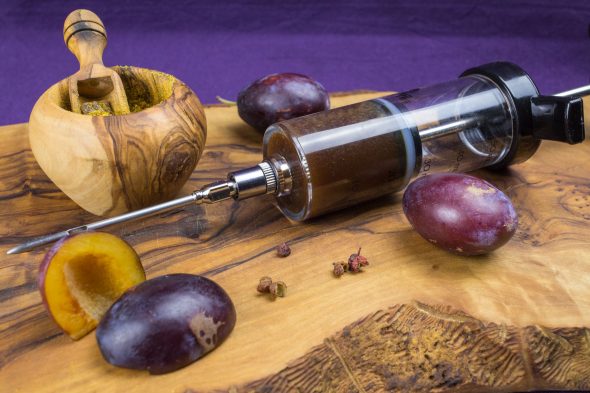
8) Keep the sauce warm until you’re ready to serve – once that time comes, draw it up into a marinade syringe.
The Dumplings – Part #2: Finishing Up
100-200g Butter
100-200ml Water
1-2 Very generous Pinches of Sea Salt
The Doughlings
The Duck
The Sauce
The Broth
1) Release the duck from its aluminum tent – pour any juices that may have gathered inside the foil into the bowl holding the plums and prunes you’ve set aside earlier.
2) Slice the duck into ½-1cm cubes, skin and all, and have them join the fruit in the bowl.
3) Give the contents of the bowl a quick fork-through and have a taste along with a few drops of the sauce. Adjust the seasoning of necessary. In case the Szechuan peppercorns – or the salt levels, for that matter – dance around on your tastebuds a bit too enthusiastically for comfort at this point, keep in mind that there’s a dough about to dampen down the buzz a bit.
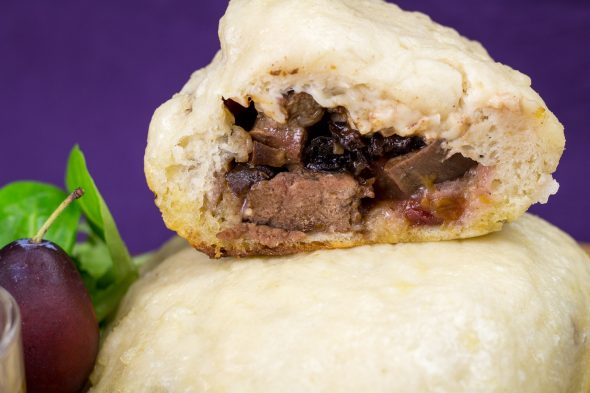
4) Speaking of… mentally divide the filling into portions matching the amount of balls of dough waiting to be filled.
5) Pick up the balls, one by one, and, while loosely holding them in the palm of one hand, gently press a portion of the filling into the center of each ball and gently pinch the dough closed over the filling.
6) Gently wriggle and roll the balls between your palms to evenly distribute the dough around the filling again, making sure the dough won’t pull back from the filling once it hits the heat.
7) Once all of the dumplings are re-rolled, give them one last round of R&R beneath a kitchen towel for 15-20 mins.
8) Cover the bottom of a heavy-based with a fitting lid with 3mm-½ cm of a 1:1 mixture of melted butter and water. It’s a bit hard to guesstimate exact amounts, so I can only share my usual setup with you guys: 28cm DIA cast iron pan, 10 dumplings, 2 rounds of 5 dumplings, 100g butter and 100ml water and a very generous pinch of salt for each round.
9) Turn the heat to medium, pop the lid on and allow the mixture to work up a gentle simmer.
10) Comfortably settle half of the dumplings inside the pan with the help of a spatula and close the lid again.
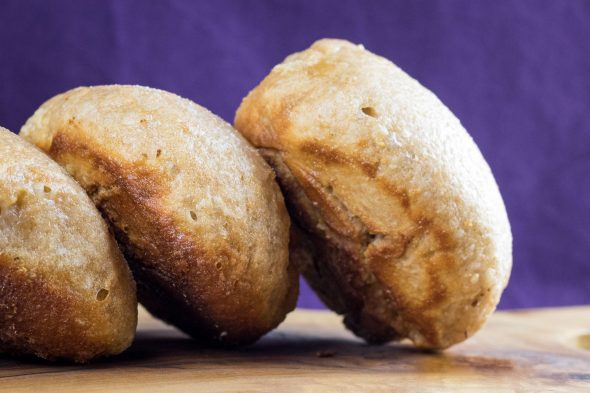
11) Now, the base recipe for a very basic version of these dumplings was one from my grandma’s collection, and here’s one of the catches that usually go with that kind of verbally handed-down recipe: I do not have an exact time for you guys. Depending on the mood of the yeast, the dumplings usually take around 10-15 mins in the pan, but trying to nail down an exact pan-time with the help of a stopwatch rather than with what my grandma told me netted me a couple of burned batches. So, here’s what she said: “Steam-fry them until they crackle”. And miraculously, that’s exactly it. You’ll know exactly what she was talking about once your dumplings reach that mark. Start listening to the proceedings in your pan after about 10 mins and proceed to the next step once the dumplings… “crackle”.
12) Very carefully, if necessary with the help of a kitchen towel, remove the lid – make sure no stray drops of condensed water hit the pristine, white surface of the dumplings.
13) Lift the dumplings out of the pan and place them on a plate lined with a double-layer of paper towels perfectly capable of soaking up the excess butter while you’re finishing up the second batch.
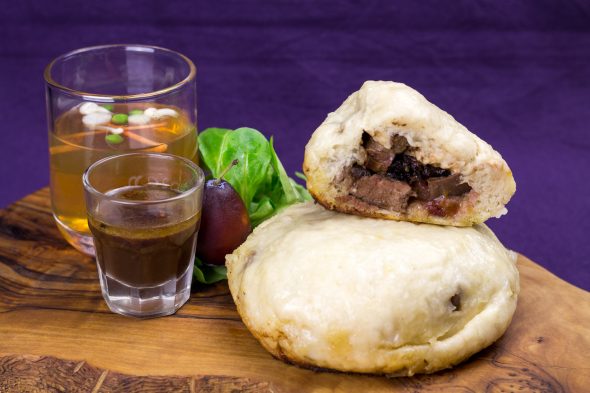
14) Once all of the dumplings are steamed and fried to fluffy-with-a-crispy-base perfection, pull up the sauce into a marinade-syringe and dose each bun with a bit of the sauce – try to hit the meaty center of the buns to avoid the dough turning soggy.
15) Pour the remaining sauce into individual dipping bowls to avoid major food fights breaking out around your table.
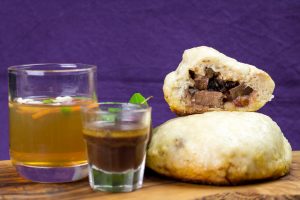
16) Speaking of liquids – don’t forget the bone broth waiting to dot the I on the dish~ Pour it into bowls or, for dramatic effect, into glass cups or even wine glasses if you made the effort of clarifying the broth. In case you’re going with decorative swimmers, add them to the broth servings, grab the dumplings and the sauce, lean back and…
…Enjoy~!
♥

I so enjoy your posts and this is a restaurant-quality recipe – amazing. If I lived nearer I’d be inviting myself over. 🙂
LikeLiked by 1 person
Oooh thank you so much for that compliment~! You had me jump up and down in my seat, clapping my hands like a little girl just now 😀 I’m so happy you enjoyed it~
LikeLiked by 1 person
Take a bow! 😀
LikeLiked by 1 person