
 The city Hubby and I call home has always been the go-to place in the region to indulge in healthy helping of the real, authentic, non-europeanized food from whatever country you could possibly think of. From a serious Argentinian Asado to a Zambian deep-fried Kudu surprise, you name it, you’ll most likely get it – as long as you don’t expect it to be adjusted to please a central-european palate.
The only thing you can’t find, no matter how closely you care to look… is Dim Sum. Jiaozi/Gyoza… steamed Baos, Mandu or any related sort of heavenly asian morsels for that matter. On that note: La Maison du Dim Sum, Paris. Unless they dropped in quality or closed up shop since we’ve last been there, a dinner at that place alone is totally worth a trip to Paris for. Anyways, for the time being, all I can do once the crave-craze for Dim Sum hits is chomp at the bit and make them myself. I have to admit, as a rule of thumb I’m only able to muster up enough patience for that sort of fiddly work about… two or three times per year, but when the time comes, I make it worth the while with a spread of different fillings and methods to roll/fill the yumtastic parcels. This time around, the idea to spend the day in the kitchen for an insane spread of various dumplings came at a simultaneously bad and good time. See, I’ve been carrying the mother of all tensions along my cervical vertebrae around for almost 3 weeks now, and of course, it added another log to the fire as soon as the long weekend had begun. Right now, I’m limited to a headbob of about 2cm and no range of movement whatsoever to either side, at least not without my whole chassis turning along with my head… The eighties just called, they want their Robot back! <insert sigh here> But, moving around a bit actually helps, and to make Dim Sum all you need is the ability to stand and look down on your hands for a while. Perfect if someone went and replaced your neck with steel girders! Going with the season and the ocean of herbs flooding the market these days, I picked a light and fluffy chicken filling for the gyozas to go with a punchy salad heralding the hot days of the year for todays dish~
The amounts listed will net you 3-4 servings.

The Spicy Mango-Papaya & Sage Salad
300g Mango, peeled, pitted and julienned
300g Papaya, peeled, deseeded and julienned – you can use either green ones for a Thai’ish twist or the “regular” ripe ones that are usually easier to get your hands on
75g Carrots, peeled, pitted and julienned or spiralled
50g Cranberries, roughly chopped
1 small Red onion, sliced into very thin half-moons
1 Lime, Juice and Zest
½ Orange, Juice and Zest
1 Tbsp Mango Infused Balsamic Vinegar or Rice Wine Vinegar
16 small Leaves of Young Sage, finely sliced into ribbons
½ Habanero Chilli, deseeded and finely chopped
1 Tsp Brown Sugar
2 Tsp Salt
1 Tsp Chilli Oil
Well, as usual, when there’s a fiddly component involved, I try to keep the other components at a minimum-effort level. This particular even makes its own dressing… overnight~!
1) First of all, check the mango and the papaya for their grade of ripeness.
If they’re perfect, prep them just before getting started with the gyozas – otherwise they would fall apart once exposed to the marinade.
In case they’re a day or two off the mark, pop them in with the rest the day before the gig – the acidity of the citrus juices and the vinegar will ripen them to perfection overnight.
2) And by “the rest”, I literally mean: everything else listed above~! Pop the julienned carrots, onion slices, cranberries, sage ribbons and chillies into an airtight container and allow them to R&R in the fridge overnight after you’ve thoroughly tossed them with the juices, zest, oil, vinegar, salt and sugar.
3) Whether you’ve added the fruit on day 1 or 2, once that’s done, the salad’s basically done~ Just keep it in the fridge until you’re ready to plate up.
You know, handing you guys a long’ish ingredients-lists and a neat one-liner of “chop – mix – chill” as cooking instructions makes me feel kind of bad, so here’s a quick tidbit on one of the guests in today’s salad bowls… Papaya Seeds. Biting down on one of the glossy black seeds inside the fruit is one of the things you either love or hate with a raging passion <insert cough here> especially if you’re not a fan of bitter things. I highly recommend giving them a second chance as a spice though, no matter how often an overlooked seed hiding within a bite has rained on your gloriously sweet and fruity papaya parade before. Once dried, they taste a bit like a mild variety of pepper, bitter-spicy and a hint of fruit and make a fantastic addition to any peppermill holding a colorful blend of peppercorns. No time like the present to try~! Pop the seeds into a fine sieve after peeling it in prep for the salad and give them a thorough rinse with cold water. Discard any remains of yellow fruit and fibers holding the seeds inside the fruit. Dry them off with a layer of paper towels, then spread out on a tray lined with baking parchment. Set your oven to 80°C and dry the seeds for 3-4 hours. Allow them to cool off entirely before blending them in with your pepper mix or filling them into a separate peppermill. By the way, other than adding another note to your seasoning, they’re also adding a health benefit! Papaya seeds are said to have a positive effect on your immune system.
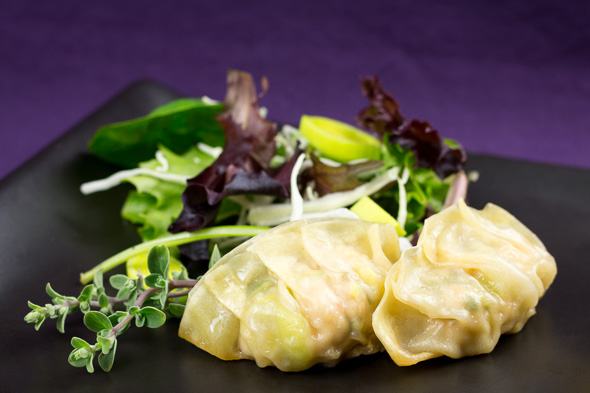
The Chicken and Leek Gyoza
5 Leafy Sprigs of Marjory, leaves picked and finely chopped
300g Chicken Breast, finely chopped – not minced! Chop the meat with a very sharp blade just before using it, otherwise it might turn gooey or worse somewhere down the line. You’ll want to have the filling to have some bite to it.
150g Leek, finely shredded
2 Tsp Ginger, finely grated
1 Clove of Garlic, very finely chopped
2 Tbsp Soy Sauce
2 Tbsp Sake or Plum Wine
1 Tsp Brown Sugar
1 Tsp Sesame Oil
1 good Crack of Black Pepper or ½ Tsp Togarashi Pepper Blend
1 Pack of ~40 frozen Gyoza Skins, allow them to thaw in fridge overnight – They’re widely available in packs of 50 in Asian supermarkets. Why did I say 40, then? Well, because following Murphy’s Law of kitchen Physics, you’ll rip 3-4 while pleating them, loose 2-3 to frozen-in-a-tight-stack-related stickage and 2-3 as patience starts loosing ground to hunger about ¾ of the way through the stack.
1 Tbsp Peanut Oil per batch
2 Tbsp Sparkling Water per batch
1) Drizzle the sesame oil into a mixing bowl large enough to hold the chicken and spices. Distribute the oil across the bottom of the bowl and about 2cm of the way up the sides with the help of a pastry brush.
2) Place the chopped chicken, leek shreds, ginger, garlic, soy sauce, sake, sugar, marjory and pepper in the bowl and work through the mix with CSI-gloved hands until the ingredients are well combined.
3) Cover the bowl with a sheet of clingfilm and place it in the fridge for about 30 mins.
4) In preparation for the following work, brush a a large plate with a very thin sheen of vegetable oil and fill a small bowl with cold water – keep both in easy reach, you’ll need them as soon as you start filling the gyoza skins.
5) Pick up one of the gyoza skins and place it on your left palm with the rim resting close to/almost on your fingertips in order to have free range with your thumb. Having the upper rim of the dough disk rest along the length/in the bend of your left index finger works too – that’s where it’ll move “on it’s own” after you’ve gotten used to the movements needed to pleat these, the fingertip-method is easier to start with, though.
6) Place a teaspoonful of the filling in the center of the doughling – make sure its densely packed to keep the possibility of exploding dumplings in your pan at a minimum. Also, make sure the rim stays clean while handling the filling, otherwise the dumplings won’t close properly.
7) Wet the fingertips of your right hand with the water you’ve readied for this exact purpose earlier and brush the upper rim of the gyoza skin.
8) Fold the bottom half of the doughling towards the upper rim – don’t press the aligned rims onto eachother just yet. Actually, you could do exactly that, getting thin-skinned Ravioli with a rather unusual filling as a result, if the following step turns out to be too time-consuming for a growling tummy… you won’t be able to steam-fry them properly though.
9) Align and pin the edges on the left side of the half-moon-in-the-making down with your left thumb, then, using your right thumb, slide a bit of the ”bottom” rim of the disk over your left thumbnail in sort of a S-shaped pleat before aligning it with the upper edge again and pressing it down onto the opposing rim to close off another segment of dough around the filling.
10) Once the filling is safely tucked in, gently set the dumpling down on its “belly” onto the lightly oiled plate.
11) Repeat this process 3-4 more times and pinch the outer corners once more for good measure.
12) If done right, you should be looking at a half-moon-shaped spine crowning an equally shaped dumpling sitting contentedly on a firmly packed, pear shaped filling.

13) If you’re dealing with this for the first time, you will break a few of the quite delicate skins with too much filling, fingernails or by applying too much pressure, so don’t give up too quickly. Think Murphy’s Law of Pancakes. The first ones are frustrating, but the ones that survive the whole process – including the pan – are so worth it~!
14) As soon as you’ve worked your way through wrappers and filling, fire up a large non-stick pan on high heat and add the peanut oil.
15) Close the lid and allow the pan to get up to it’s maximum heat.
16) Take the pan off the heat, remove the lid and quickly arrange the first batch of gyoza inside – make sure to leave some space in between to keep them from sticking to each other.
17) Pop the lid back on an place the pan back on the stove for a 2min quick-fry.
18) A gentle shake of the pan should send the dumplings sliding across the bottom and a quick peek beneath a test-dumpling should flash a crispy golden base back at you – if neither turns out to be the case, give them a minute longer.
19) Once the crisp is taken care of, sprinkle in the water and immediately close the lid again. Steam the dumplings for 3-4 mins until the water has disappeared into the dumplings and a test-bite – a very careful one – tells you the filling is cooked through to perfection.
Assembling the Dish
1) Retrieve your salad from the fridge and, after a quick taste-and-adjust-routine, distribute it onto serving plates – if you have a handle on your timing, you might just end up with a yumtastic, summer-appropriate hot & cold/spicy & cooling balance on your table today~!
2) Drizzle the servings with any and all juices remaining in your salad container.
3) Pop the gyoza onto the salad just before serving and dig in immediately.
Enjoy~!
♥

Ouch! That sounds really painful, hope you are soon better. The gyozas sound delicious though – I’m not sure I’d have had the patience to make them if my back was killing me. Well done you!
LikeLiked by 1 person
thanks 😀 well, having to pick between spending another day flat on my back and shuffling through the kitchen with a sort of forced patience (I probably wouldn’t have mustered up otherwise) for a bit, made the dim sum idea look better by the hour 😀 I’m glad you like the result! my back’s getting better in 2-day-steps – right now I’m back at around 75% which roughly translates into me finally being able to look down at my notebook and actually sit still at my desk, writing without falling off my chair after 3 minutes~ good times ahead 🙂
LikeLiked by 1 person
Onward and upward!
LikeLike
Pingback: GW2 Lemongrass – Coconut Soup & Spicy Chicken Skewers a.k.a. Tom Kha Gai with a Twist – Nahdala's Kitchen