
 Time to celebrate… good times, glorious times, delicious times for everybody with a sweet tooth for mother nature’s gem collection! Bushes, shrubs and other assorted types of greenery are bursting with berries this time of the year, just waiting to be picked, devoured and turned into yumtastic things – after the cook has taken his or her fill of the raw bounty, of course~
By “celebrate”, I mean: make each and every berry count, help it be on it’s best behavior on your tastebuds! Today’s treat was, in its First Round, a too-early-in-the-year attempt to breathe some berry-life into a tub of extraordinarily weak pre-season blueberries that just looked too damn good to pass on after a particularly nasty winter. After a first couple of depressing bites, I decided that they needed a serious dose of help in the cream, sugar or heat department to earn the “edible” tag. The surefire way to accomplish all of the above in one go is… a Crème Brûlée! Later during that same year, when the real fun had begun, I realized that, while this one was a wonderful way to boost weak berries, it’s also the perfect way to make the good stuff really shine, polished halo and angel choir included~! And since blueberry season is in full swing right now… Here’s what you need for 5-6 125ml-Ramekins of my No-Oven, Halfway-to-Guiltfree, Very Blueberry Crème Brûlée:
Oh, before we get started… just in case your local markets and stores go past your pain threshold on their berry prices like ours do – especially during the first phase of the season – completely ignoring the fact that that’s one seriously backwards kind of way to go about that whole local/regional/seasonal shebang they so vigorously advertise at the same time, here’s my two cents on sailing those berry-withdrawal shallows~
Solution one: have/make friends at your local farmer’s market *teehee*. Seriously though, since market stalls are always in direct competition with each other, chances are you’ll strike a good deal on a batch of freshly harvested goodies by comparing offers.
Solution two: If the need to really binge on berries comes knocking, put on some outdoorsy gear, shower in insect repellant and have some fun foraging for them yourself~ If you don’t know where/what/when in that area, keep an eye open for “pick them yourself” signs around berry-/fruit-growing farms and orchards – at least over here that’s a very common thing and it’s almost always a serious bargain.
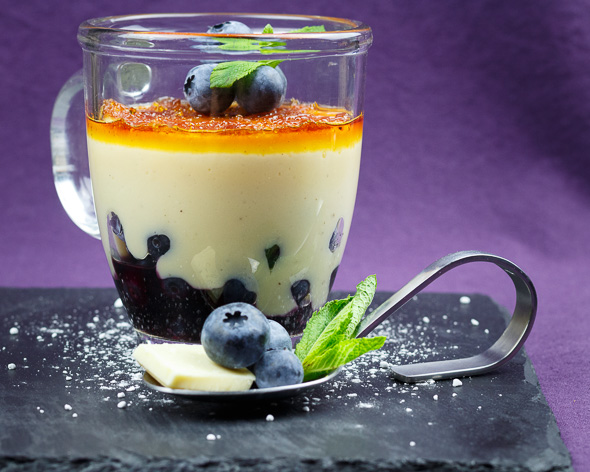
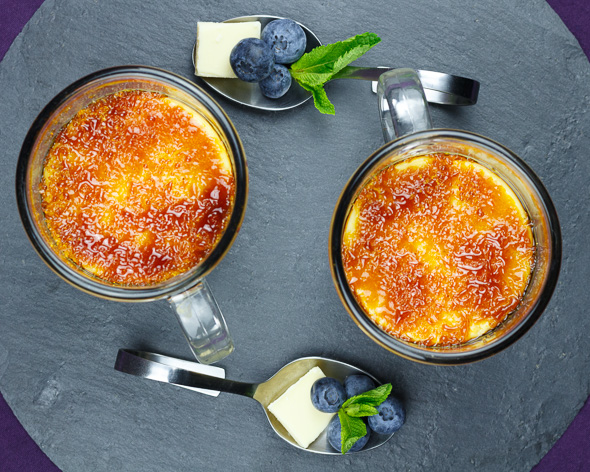
The White Chocolate & Blueberry Crème Brûlée
300ml Skimmed Milk – you could* go full fat on the milk if you wanted to, but with the chocolate in mind I wouldn’t recommend it, whether calories are friend or foe in your book
280ml Low Fat Cream – don’t go full fat on this one, it would strangle the berries
5 Egg Yolks (Size L)
1 Pinch of Salt
2-3 Scrapes of a Tonka Bean
250g White Chocolate, finely grated
300g Blueberries
1 Tbsp Brown Sugar for each Ramekin
1) Place 5-6 125ml ramekins on a tray or in a casserole’ish kind of container that will comfortably fit into your fridge. Speaking of fridges, make sure you have enough free/stable space for the tray in it and no foodstuffs emitting strong aromas you wouldn’t want to be trapped in a custard running wild~
2) Place a small pot on medium heat and pour in both the milk and the cream.
3) Add a pinch of salt along with a hint of tonka bean dust and allow them to almost work up simmer. Just before the mixture reaches the bubbly stage, remove the pot from the heat.
4) Meanwhile, separate the eggs – place the eggyolks in a large whisking bowl and the eggwhites in an airtight container for some other time. (An eggwhite & mushroom omelette with lots of chives for breakfast tomorrow comes to mind~)
5) Whisk the eggyolks in their bowl until they start to turn creamy.
6) Pick up the pot holding the hot milk mixture and pour it into the eggs in a slow and steady stream while thoroughly whisking the two into eachother to keep the eggs from turning into scrambled eggs.
7) Rinse the milk pot once the two are combined and pour the contents of the bowl back into the pot and turn the heat to low.
8) Heat the mixture, whisking constantly for about 5-6 minutes until the proto-custard has thickened up enough to coat the back of a wooden spoon in a silky-smooth and glossy layer.
9) Take the pot of the heat and add the chocolate in tablespoon-sized batches, stirring the mixture after each addition until the current dose of chocolate has dissolved completely.
10) After the last batch of chocolate has taken its course, give the mix one last stir and pop a fine sieve onto a heat-proof jug. Strain the mixture on its way into the jug, removing any and all traces of eggy lumps as you go.
11) Divide the blueberries into the ramekins and pour on the custard.
12) Place the tray/casserole holding the ramekins in the frige for 7-8 hours to allow the custard to set and, for once, to develop what everyone usually avoids at all costs… a thin layer of skin. Just enough to hold the sugar in place for the fun part of the prep~!
13) Speaking of… evenly sprinkle the surface of each custard with brown sugar and bust out the blowtorch.
14) Holding the flame at a steady distance, caramelize the sugar until the grains melt into a thin and even layer before turning a pretty dark golden brown.
If the sugar bubbles up or the individual grains simply turn brown on the spot, you’re holding the torch too close to the surface.
If parts of the crust break up and start to sink into the cream, you’re too far away, giving the custard just enough heat to soften up and swallow the crust before that, in turn, had enough time to melt and/or set.
15) Once you’re done, pop the ramekins back into the fridge for 15-30 mins, then get ready to tap-tap your way through the crackling sugar crust to very berry yumness! Weeeeee~

Enjoy~!
♥

Pingback: Goat’s Cheese Crème Brûlée & Speedy Spicy Rosemary-Quince Compote – Nahdala's Kitchen