
 Just a short while back, Hubby and I test-ventured into a new world for a couple of days, a new game world, that is. While it was a fun adventure in itself, we were constantly reminded of the world, gameplay and mechanics of a different game in the same series we played together years ago. One of the things that kept coming up, thanks to me having picked an elemental mage-type caster as my first class, was the food Black Mages were chowing down on in the “old world”.
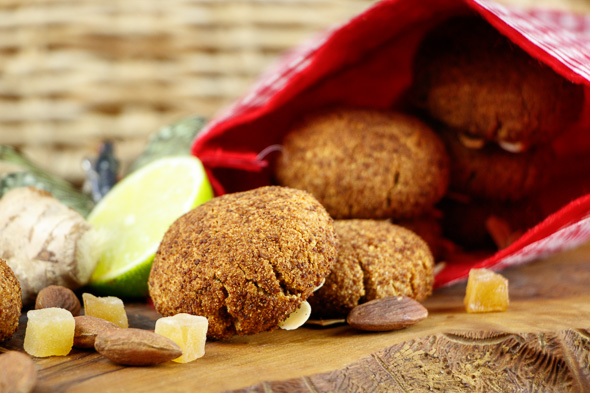
Sure, there was the inescapable damage-boost food, the party-wide endgame food, the legendary all stats up food… but the one thing neither of the mage classes could do without was, of course, mana – or magic points – and the need to replenish them, and fast! So, as a Black Mage, you basically cast your biggest Boom on a poor, unsuspecting monster minding its own beeswax (or not), used up a big chunk of your mana by doing so, and proceeded to eat <insert drumroll here> a cookie! and sit down to rest up. It was such a signature thing to do that everyone not in the business of being a Black Mage made jokes about them only getting up to get a cookie out of the bag and sit back down. Of course their Boom was the biggest one any class could produce but please don’t tell them that! Career BLMs… tsktsk… heads as big as their bellies… Anywhoo! We got talking about the different foods they used, and after a few forays down memory lane into all things Gateau au Fraises, Cream Puff and Melon Pie, finally remembered which type of cookies took the crowd pleaser crown back then – you’ve probably guessed by now – Ginger Cookies!

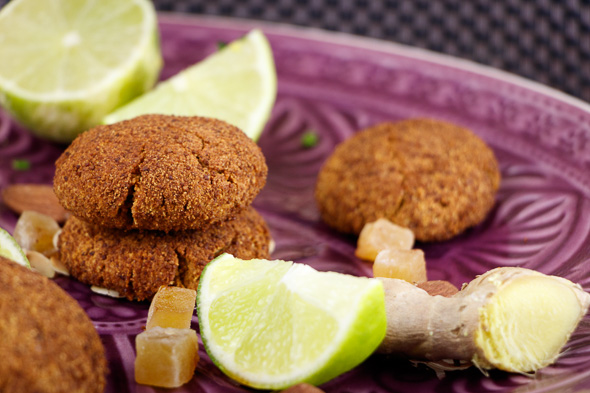
Coincidentally I “just” (back in January…) worked my way through a string of gluten-free/paleo oven experiments, a batch of these deliciously crispy and kneebucklingly juicy Ginger-Lime Cookies amongst the winners of that lineup. So, inspired by our borderline nerdy gametalk, I decided to connect the dots and polish up my notes on the matter into a recipe I could share with you guys way ahead of schedule! Not just to give you guys a glimpse of the full extent of my geekness, or because in times like these there’s nothing like a homemade, delicious and healthy sweet treat to pick up the edges of frayed nerve endings – simply the act of making these super-easy and therefore instantly gratifying cookies is a lot of fun and, what with the essential oils of ginger and lime permeating the air around you, as well as the irresistible aromas of baking cookies wafting through your home a short while later, aromatherapy at its best. And if that’s not enough, think health-nut along the lines of ginger, unrefined ingredients, gluten-free and all that jazz~ Miracle cookies, if you will~
Long story short: If you love cookies, and love them healthy, this one’s for you~!
The Gluten-free Paleo Ginger-Lime Cookies
250g Almond Flour
75g Coconut Flour
1 heaped Tsp Ginger, freshly ground
Opt: 1-2 Tsp Candied Ginger, finely chopped
½ Tsp Baking Powder
½ Tsp Baking Soda
¼ Tsp Salt
2 Tsp Ground Cinnamon
2 Tsp Ground Ginger
1 Tsp Ground Allspice
½ Tsp Freshly Grated Nutmeg
¼ Tsp Greshly Ground Tonka Bean
¼ Tsp Freshly Cracked Black Pepper
1 Pinch of Ground Clove
125g Dark, Runny Honey – my pick, as always, is the Silver Fir Honey from (literally) our neck of the woods. If you can’t get Silver Fir, go with anything dark and foresty – As long as its intense, delicious and local, go with the flow~
75g Coconut Oil, melted
75g Organic Molasses
50g Maple Syrup
Alt to rep both molasses and maple syrup: 100g Mel de Cana – an oversight of the chicken scratchings on the bottom of my grocery list led to me using the sugarcane honey I brought back from Madeira and netted me absolutely divine results on a second batch. I suppose both molasses and maple syrup are easier to come by, though.
4 Organic/Unwaxed Limes, Juice of 2, Zest of all
1 Tsp Vanilla Extract
1 Large Egg
Almond Slivers for the tray
Coconut Flower Sugar for dusting
Fleur de Sel Flakes
1) Preheat your oven to 180°C.
2) Line a baking tray with a sheet of baking parchment and generously sprinkle the surface with almond slivers and a couple of salt flakes.
3) Pick up a large mixing bowl, add the flours, spices, powder, soda, salt and lime zest and give everything a good stir until the black spice dots are evenly distributed throughout.
4) Place a small pot on low heat and add the coconut oil.
5) Allow it to melt into its liquid form, then take the pot off the heat again and stir in the honey, molasses, syrup, lime juice and vanilla extract.
6) Leave the mixture to cool down to room temperature – after all the stirring, you might just be there already.
7) Press a well into the center of your dry ingredients and crack in the egg.
8) Pour the contents of your pot on top, grab a wooden spoon and get stirring.
9) Keep at it until the mixture is very well combined. It might appear to be a bit on the runny side of all things cookie dough – that will change, though, so don’t panic.
10) Once the mixture is thoroughly blended, pop the bowl into the fridge for roundabout 30-40 mins to set and chill though.
11) Pour the coconut flwoer sugar – or unrefined brown sugar – into a bowl and snap on a pair of CSI gloves once the dough has set.
12) Pick up ~golfball sized knobs of the dough, roll them into tight little balls and roll them in the sugar grains until they’re nicely dotted all around.
13) Place them on your prepped tray and pat them down into your favored cookie shape and thickness – they don’t flow apart, so you might as well go wild if you have a mind for it! Just don’t pat them down too far, about 1,3-1,7cm is the way to go for the maximum deliciousness-ratio between shell-crispiness and core-juiciness.
14) Keep them evenly spaced – about 2-3cm apart, just in case – and slide the tray into the middle rack of your oven once you’re done.
15) Bake the lot for 20 mins. They’ll look a bit dry-crackly around the edges, perfectly hiding the juicy core, once they’re done. If you’re not sure about the proceedings inside of the cookies, pick one from the front row at around the 17-18 min mark, break/slice it into quarters, wait 2-3 mins and have a careful test bite~
16) Transfer the cookies to a wire rack to cool down once they’re done.
17) Lock them up nice and tight between layers of baking parchment in an airtight container/cookie jar after they’ve cooled off.
18) If you – and whoever has access to your stash – manage to pace yourselves, they’ll keep fresh for 4-5 days.
Enjoy~!
♥
