
 Get out your Welcome mats, folks~! Our world is about to grow a new continent! Tyria, that is~ Come September, the new expansion “Path of Fire” will open the gates to the Crystal Desert to us Tyrians and, if I know my heroes behind the Chef’s Guild at ArenaNet’s HQ right, they’ll provide me with new toys off the screen as well… Can’t. Wait~! But, it looks like I’ll be sitting on hot coals for another month until it’s released… hang on. Coals? Path of Fire? A~ha!
When I logged in this morning to pre-order my copy of the expansion, I found myself standing next to a tray of food someone had plonked down in the middle of nowhere, and the subliminal suggestion of a “Feast of Deluxe Burgers” lulled me into a Neanderthal’esque meat-mood before I knew it.


Unable and, to be honest, quite unwilling to resist the impulse, I decided to pick up the “Path of Fire” idea, take it to the kitchen and whip up a tweaked “Feast of Deluxe Burgers” of my own for the occasion. Seeing as BBQ season is still in full swing, I thought you guys, Earthlings and Tyrians alike, might be interested in this one as well, so here goes my Firey-in-many ways GW2 Path of Fire-inspired Burger with a punchy Salsa Roja, a Chipotle Chilli & Coffee Mayo and Avocado~!
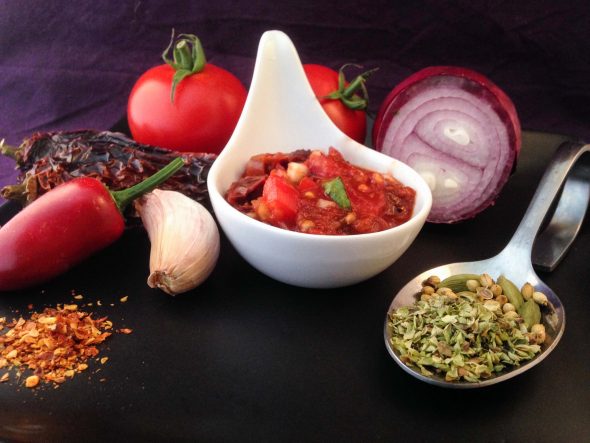
The Salsa Roja
Enter the Salsa Roja, Queen of South American condiments! I suppose, there’s almost more versions of this delicious sauce across the world than there’s people able to wield a cooking spoon with a related purpose… In general, it’s labeled “Mexican” and divided into three major subtypes, distinguished by their preparation methods: Salsa Cocida – cooked – Salsa Asada – roasted – and Salsa Cruda – raw. My version here is a kinda-sorta-cooked-potentially-roasted one with a raw finish… Ok, maybe I should elaborate. Most of the times this yummy pops up on our table, I don’t have an oven or BBQ at hand, so I go about the roasting business with my trusty pan. While the oven-roasted version is a little less fussy, the results are basically the same in the aroma department. The BBQ version, however, has the potential to knock your socks off should you have a couple of Mesquite-, Maple- or Applewood chips waiting to be tossed on the coals for a smoky boost – I’ll get to the how-to in a bit~
1 Poblano Chilli, coarsely chopped
Alt: 1 Ancho Chilli – In our corner of the world, these two are a bit hard to come by in non-industrial quantities outside of delicacy stores or online shops. I’m lucky enough to have found a greens vendor on the farmers market for this kind of thing, but before I got to that point, I found a rather unusual – as in: other side of the world – replacement that, although not quite the same, gets the job done well enough: Sambal Oelek. 1 Tsp of the Indonesian condiment replaces the one Poblano or Ancho well enough.
1 Jalapeno Chilli, coarsely chopped
1 dried Habanero Chilli, coarsely chopped
Alt: 1 Scotch Bonnet or 3 Bird’s Eye Chillies
2 dried Chipotle Chillies, coarsely chopped
2-3 Sun-dried Tomatoes, coarsely chopped
1 Tbsp dried Oregano
1 Tbsp Cumin Seeds
Alt: ½ Tbsp ground Cumin
1 Tbsp Coriander Seeds
150-200ml Hot Water
1 400g-Tin of Date Tomatoes, drained – catch the tomato juice in a bowl, you might need it near the end to adjust the consistency of your salsa.
1 medium-sized Red Onion, very finely chopped
3 Cloves of Garlic, roughly chopped
2 leafy Sprigs of Flatleaf Parsley
1 Tbsp Brown Sugar
1 Tbsp of Sherry Vinegar
Alt: 1 Lime, Zest and Juice – the Sherry Vinegar boosts the warmth of the smoky chillies, the lime adds a fresh layer to the sauce. Have a taste near the end and decide which of the two zings you’d prefer~
Salt and Pepper to taste
A couple of fresh Coriander leaves as finishing touch
1 large, fresh Plum Tomato, deseeded and finely diced
The Pan-Version
1) Set a heavy-based pan onto medium heat and add the chillies, dried and fresh.
2) Give them 2 mins to get up to speed, then add the seeds and spices.
3) About 2-3 mins later, once the aromas of the spices start wafting up to you and the seeds give off small popping noises, turn the heat to low and add just enough of the hot water to cover the lot – with a 28cm DIA pan, this translates into roughly 160-180ml.
4) Leave them to simmer away for around 15 mins. Have an eye on it – while most of the water is supposed to poof out, leaving behind a thick’ish paste, you might have to add a little more of it to keep the mixture from burning.
5) Meanwhile, fire up a griddle on high heat and brush it with just a hint of olive oil.
6) Add your garlic chunks and roast them until they’re nicely golden and griddle-marked all around.
7) Pop in the dried tomatoes, oregano, parsley and a generous pinch each of salt and freshly cracked pepper before turning the heat to medium-low.
8) Allow the fragrant mixture to develop it’s flavor in the heat for 5 mins, then move the lot into a stick-blender friendly container.
9) Once the chilli blend has done it’s time in the pan, have it join the garlic in the same container and cover the lot with the canned tomatoes.
10) Whizz the mixture into a smooth purée and pour it into a small pot.
11) Set the pot onto low heat, stir in the sugar and allow the sauce to work up a gentle simmer while stirring occasionally.
12) After 2-3 mins of bubble-time, stir in the onion cubes and have a closer look at the consistency of your salsa.
13) Your goal, with the Burger in mind, is a thick’ish, chutney- or chunky-jam-like oozyness, somewhat thicker than the usual Salsa Roja. So, while stirring frequently to keep the sauce from burning, keep it at a low simmer until it has reduced down to almost the thickness you feel is right for your burger. For those of you who haven’t meddled in all things jam or chutney as of yet – the “almost”, meaning: slightly runnier than you’d want it in the end, takes the sugar into account, which will do some thickening-work on it’s own as the salsa is cooling down.
14) Depending on the ingredients you’ve used so far, there’s a slim chance of the contents of the pot in front of you already being on the thick-enough or slightly-too-thick-already side of the deal. In that case, stir in some of the tomato juice you’ve saved earlier – a bit more than necessary for the perfect consistency, then simmer it down to the almost-there-stage.
15) While the consistency is approaching it’s destination, spoon a dollop of it out onto a cold plate.
16) Give it a couple of blinks to cool down, then drag your finger through the drop – if the edges of the mark remain exactly where they are rather than ooze into the signs of your finger’s passing, you’ve hit the consistency goal.
17) Second step: have a taste. Decide on the type of acidity you’d like to add, lime or sherry vinegar, and add it to the salsa along with whatever else might be missing – there’s a good chance you might need a bit more salt, but I’ve learned to tread carefully around salt when there are dried tomatoes involved…
18) Once you’re there, move the salsa into a bowl and set it aside to cool off. If you don’t intend on serving all of it at once, or are preparing this a couple of days in advance, fill the salsa – or the amount you won’t be using right away, that is – into sterilized jars while it’s still piping hot, seal them and store them in a cool and dark place until you need them.
19) As munch-time is approaching, pick up the amount of salsa destined for your burgers, pour it into a conveniently sized bowl and fold in the fresh tomato and coriander leaves.

The Oven-roasted and BBQ-smoked Versions
Like I’ve said, prepping it in the oven doesn’t make that much of a difference flavor-wise, with one little exception, but it’s a time- and attention-saver when you’re buzzing around the kitchen with other things on your mind.
Theres just one tiny change in the ingredients list for both the oven and the BBQ version: instead of the 3 cloves of garlic, you’re going to need a whole head of it to make the whole deal really worth the while. If you find your hair standing on end at the thought, don’t worry~ Once slow-roasted and basically boiled in it’s own skin, the humble bulb looses it’s sharp sting (and with it the possibly undesirable aftermath) turning into something else entirely.
– Preheat your oven to 180°C.
– Pick up the bulb and a very sharp knife. Slice off the top of the bulb, taking off about 3mm of the cloves inside.
– Set the bulb onto a sheet of aluminum foil and give it a generous sprinkle of salt and pepper.
– Fold up the sides of the foil a bit and fill the space between the cloves with extra virgin olive oil. If the bulb in front of you is a very young one, you might have to wriggle the cloves around a bit to make some space for the oil first – just make sure not to break them apart entirely. Rub the outside of the bulb as well while you’re at it.
– Tightly wrap the foil around the bulb and set the package into a baking dish lined with baking parchment – you’re going to be using the same dish for the spices and veggies later, so pick one large enough for the whole lot.
– Place the tray in the oven and leave the garlic to its own devices for about 40 mins.
– Take out the tray and add the fresh and dried chillies, dried tomatoes, cumin and coriander seeds.
– Spread them out a bit, drizzle everything with a bit of olive oil and dust the lot with a generous pinch each of salt and pepper.
– Pop the tray back into the oven for another 15 mins, then turn the heat off but leave the tray inside for 10 more mins.
– Set the tray aside and allow the veggies and spices to cool off – open the garlic package a little bit to speed up the process.
– Separate the garlic cloves once they’re cooled off enough to handle and squeeze the pulp out into your blender.
– Move the other contents of your tray into the blender as well and proceed to Step 10) of the “Pan Version” above~
The BBQ-smoked version works very much the same – you’ll need a domed BBQ or Smoker and some measure of temperature-control for it, though. Since 180°C are kind of hard to hold unless you’re a pro with your BBQ, aim for 200°C and shorten the roasting-time to 45 mins, 30 mins for the garlic and 10 mins for the veg. For the last 5 mins, open the top half of your garlic package and throw a handful of Mesquite-, Maple or Applewood chips onto the coals beneath your tray to add a wonderfully smoky note to your salsa.
Again, once the contents of your tray are cooled down enough to handle safely, whizz them up and continue with the recipe at Step 10)
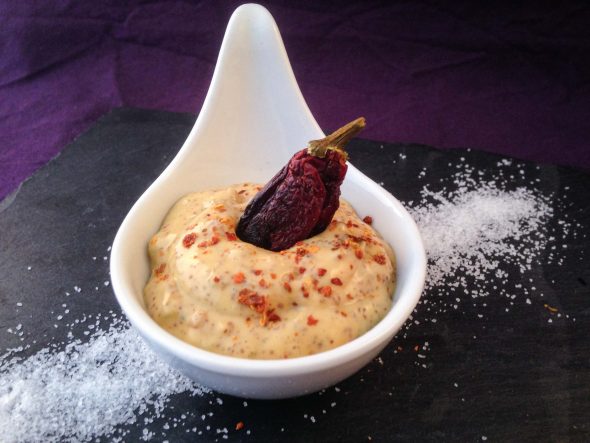
The Chipotle-Coffee Mayonnaise
Alright, that was a lot of work for a “simple” salsa, so the second condiment of the day is allowed to be a quick and easy pantry fix, right~? If you’re on a roll, you could crank this mayo up a bit by whipping up your own mayonnaise, of course…
5 Tbsp high-quality Mayonnaise or Dijonnaise
2 dried Chipotle Chillies, very finely chopped
1 Clove of Garlic, very finely chopped
1 Tsp Instant Coffee
1 Tsp Sherry Vinegar
1) Place the chopped chilli pod in a small bowl and drizzle it with the sherry vinegar.
2) Cover the bowl with clingfilm and set it aside for about 1 hr.
3) Add the mayo to a second bowl and sprinkle it with the coffee powder. Stir the mixture until the coffee has dissolved completely.
4) Fold in the soaked chillies as well as the garlic. Stir the lot until everything is well combined.
5) Cover the bowl with a layer of clingfilm and pop it into the fridge, allowing the chillies and garlic to infuse the mayo with their combined flavor-bomb for at least 1 hr.

The Burger
While the Salsa and the Mayo will either feed a whole bunch of people or make a yummy fridge staple for a couple of days, the ingredients listed for the burgers will net you 4 serious burgers – adjust the amounts to the size of your guest list if needed~ If this is the first Burger recipe you’re reading through on my blog, you might find my instructions a bit peculiar, so, in case you’re interested in the why and/or in taking your homemade Burgers to the next level, having an eye or two on my little Burger-101 in this recipe over here – quite conveniently another “GW2 Deluxe Burger”-inspired recipe of mine~!
600g Beef Mince
4 Buns – I’ve used my Artisan Baker’s Roasted Corn Sourdough Buns here, any good, non-grainy, non-cottony bun will do, though
4 Slices of Manchego Cheese
Alt: 4 Slices of Aged Cheddar Cheese
1 Avocado, halved, pitted, peeled and thinly sliced
1 Handful of Salad Greens – make sure theres something bitter in the mix, like arugula, spinach or dandylion to compliment the other flavors on your burger.
Salt, Pepper
1) Grab a long sheet of clingfilm and fold it into a double-layered rectangle. Smooth it out on your work surface and tug it into a wrinkle-free blanket in front of you.
2) Stack up the strands of mince in layers on top of the blanket, seasoning each layer with a generous pinch each of salt and freshly ground pepper. In case you don’t see where this is going: you’re about to stack up the strands of meat, preferably without breaking them up (it’s a consistency thing…), into a tightly packed log of minced beef waiting to be sliced into fire-ready patties.
3) So, while you’re stacking and seasoning your mince, aim for a log a bit thicker than the DIA of your buns – you’ll be compressing the strands down into a more compact form with the help of your clingfilm blanket, so aim for the DIA of the buns and add another finger’s breadth of mince on top.
4) The “perfect”-rule-of-thumb concerning the thickness of a finished burger pattie says: 2 cm, so aim for a log of 10-12 cm length while you’re stacking the meat, taking the compression process into consideration again.
5) As soon as you’re done arranging and seasoning the mince, tightly wrap the clingfilm blanket around the length of the log.
6) Grab the ends of the clingfilm and use them to twist and sausage-roll the meat-cigar into shape, as tightly as possible without the clingfilm actually breaking.
7) Once you’re about halfway through the compression process, gently stab the clingfilm-skin with a metal skewer or the tip of a thin knife to release the air trapped inside.Twist the ends a bit more to tighten the skin again, carefully watching for any escape attempts the mince might make in case you’re taking it too far. Wrap the roll into yet another layer of clingfilm to close the holes again and finish the pattie-to-bun fitting process.
8) You can use the buns to re-check on the DIA of the future-patties – since the meat will shrink a bit on the coals, the pattie should be slightly larger than the bun in diameter at this point.
9) Place the log in the fridge and allow the salt and pressure to work their magic for at least 3-4 hours, binding the meat into a yumtastic, melt-in-your-mouth burger pattie.
10) Take the log out of its cool resting place 30 min prior to fire-time and, using a very sharp knife, slice it, clingfilm-skin and all, into 4 evenly-sized disks.
11) Place them on a tray lined with baking parchment and peel off the skin.
12) Pat and wriggle them – without actually picking them up and messing up the grain of the meat strands – to even out the cutting surfaces. Any bits sticking out might burn in the heat otherwise.
13) One last step before hitting the fire: gently press your thumb down on the center of the patties, just a little, to keep them from ballooning up as they’re being fired up. Prep-time over, munch-time, go~!
14) Either place them on a hot BBQ with the help of a spatula or use a heavy-based pan set on high heat, lightly brushed with a heat-resistant oil to finish them off.
15) If you’re going with the pan you’ll need to watch the temperature in the pan, like with any other type of meat – don’t overcrowd the pan, stick to 2 patties at a time to prevent a temperature-drop which would result in a boiled grey mess.
16) Keep the patties at a hearty sizzle for 45 seconds, then carefully flip them. The first flip will be the iffiest, given their texture, so use two spatulas to keep them from breaking up at this stage.
17) Flip the burgers over every 30 secs – this is still pan-talk, you won’t be able to or rather: don’t need to do that on the coals – for a total of 3-4 minutes for a medium-rare-slightly-on-the-medium-side burger with a beautifully caramelized crisp.
18) For those of you without a slightly vampiric preference of core temperature, add another minute for each stage upwards from medium. One of the huge advantages of the ordered-grain method I described here is that, even slightly overcooked – happens just too easily when you’re involved in a garden shindig around a BBQ – the burgers won’t turn out gnarly as they normally would. Let’s hear it for meat strands standing up like good little soldiers~!
19) Anyways, once they’re done, set them onto a warmed plate, brush each wil a dollop of the mayonnaise and top them off with the cheese. Place a dome of sorts or a aluminum foil blanket on top and let them rest for around 4 mins, allowing the meat to set and the cheese to melt.
20) Meanwhile, give the buns, sliced in halves, a quick toast and place them on your work surface.

Assembling the Burger
1) Arrange a few leaves of greens on each bun bottom so the bun doesn’t soak up all of the salsa.
2) Weigh them down with a few slices of avocado and add a spoonful of your salsa.
3) Pop the meat on top, cheesy side up, and add more salsa – amounts depend on preference, just remember that squeezing the burger might cause a mess if you are too greedy~!
4) Bun-lid on, sit down, Burger o’clock has arrived~!
Enjoy~!
♥

Pingback: GW2 Horseradish Burger – Nahdala's Kitchen